Linux - Increase the size of a LVM
This will cover how to increase the disk space for a VMware virtual machine running Linux that is using logical volume manager (LVM). Firstly we will be increasing the size of the actual disk on the VMware virtual machine, so at the hardware level – this is the VM’s .vmdk file. Once this is complete we will get into the virtual machine and make the necessary changes through the operating system in order to take advantage of the additional space that has been provided by the hard drive being extended. This will involve creating a new partition with the new space, expanding the volume group and logical group, then finally resizing the file system.
Important Note: Be very careful when working with the commands in this article as they have the potential to cause a lot of damage to your data. If you are working with virtual machines make sure you take a snapshot of your virtual machine beforehand, or otherwise have some other form of up to date backup before proceeding. Note that a snapshot must not be taken until after the virtual disk has been increased, otherwise you will not be able to increase it. It could also be worth cloning the virtual machine first and testing out this method on the clone.
Prerequisites: As this method uses the additional space to create a primary partition, you must not already have 4 partitions as you will not be able to create more than 4. If you do not have space for another partition then you will need to consider a different method, there are some others in the above list.
Throughout examples we will be working with a VMware virtual machine running Debian 6, this was set up with a 20gb disk and we will be increasing it by 10gb for a total final size of 30gb.
Identifying the partition type
As this method focuses on working with LVM, we will first confirm that our partition type is actually Linux LVM by running the below command.
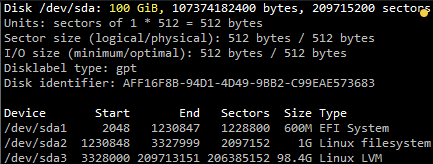
fdisk -lAs you can see in the above image /dev/sda3 is listed as “Linux LVM” and it has the ID of 8e. The 8e hex code shows that it is a Linux LVM, while 83 shows a Linux native partition. Now that we have confirmed we are working with an LVM we can continue. For increasing the size of a Linux native partition (hex code 83).
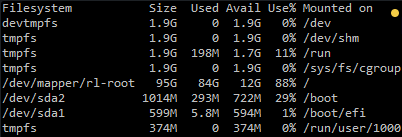
Below is the disk information showing that our initial setup only has the one 95gb disk currently, which is under the logical volume named /dev/mapper/rl-root – this is what we will be expanding with the new disk.
Note: that /dev/mapper/rl-root is the volume made up from /dev/sda3 currently – this is what we will be expanding.
Increasing the virtual hard disk
First off we increase the allocated disk space on the virtual machine itself. This is done by right clicking the virtual machine in vSphere, selecting edit settings, and then selecting the hard disk. In the below image I have changed the previously set hard disk of 100gb to 350gb while the virtual machine is up and running. Once complete click OK, this is all that needs to be done in VMware for this process.
If you are not able to modify the size of the disk, the provisioned size setting is greyed out. This can happen if the virtual machine has a snapshot in place, these will need to be removed prior to making the changes to the disk. Alternatively you may need to shut down the virtual machine if it does not allow you to add or increase disks on the fly, if this is the case make the change then power it back on.
Detect the new disk space
Once the physical disk has been increased at the hardware level, we need to get into the operating system and create a new partition that makes use of this space to proceed.
Before we can do this we need to check that the new unallocated disk space is detected by the server, you can use “fdisk -l” to list the primary disk. You will most likely see that the disk space is still showing as the same original size, at this point you can either reboot the server and it will detect the changes on boot or you can rescan your devices to avoid rebooting by running the below command. Note you may need to change host0 depending on your setup.
echo "- - -" > /sys/class/scsi_host/host0/scanBelow is an image after performing this and confirming that the new space is displaying.
Partition the new disk space
As outlined in my previous images the disk in my example that I am working with is /dev/sda, so we use fdisk to create a new primary partition to make use of the new expanded disk space. Note that we do not have 4 primary partitions already in place, making this method possible.
fdisk /dev/sdaWe are now using fdisk to create a new partition, the inputs I have entered in are shown below in bold. Note that you can press ‘m’ to get a full listing of the fdisk commands.
‘n’ was selected for adding a new partition.
Welcome to fdisk (util-linux 2.32.1).
Changes will remain in memory only, until you decide to write them.
Be careful before using the write command.

GPT PMBR size mismatch (209715199 != 734003199) will be corrected by write.
The backup GPT table is not on the end of the device. This problem will be corrected by write.

Command (m for help):
As I already have /dev/sda1, sda2 and sda3 as shown in previous images, I have gone with using ‘4’ for this new partition which will be created as /dev/sda4
Enter the “n” for new partition and enter for the rest of the defaults
Command (m for help): n
Partition number (4-128, default 4):
First sector (209713152-734003166, default 209713152):
Last sector, +sectors or +size{K,M,G,T,P} (209713152-734003166, default 734003166):

Created a new partition 4 of type 'Linux filesystem' and of size 250 GiB.

Command (m for help):
‘p’ to view the current changes in the session
Command (m for help): p
Disk /dev/sda: 350 GiB, 375809638400 bytes, 734003200 sectors
Units: sectors of 1 * 512 = 512 bytes
Sector size (logical/physical): 512 bytes / 512 bytes
I/O size (minimum/optimal): 512 bytes / 512 bytes
Disklabel type: gpt
Disk identifier: AFF16F8B-94D1-4D49-9BB2-C99EAE573683

Device         Start       End   Sectors  Size Type
/dev/sda1       2048   1230847   1228800  600M EFI System
/dev/sda2    1230848   3327999   2097152    1G Linux filesystem
/dev/sda3    3328000 209713151 206385152 98.4G Linux LVM
/dev/sda4  209713152 734003166 524290015  250G Linux filesystem

Command (m for help):
As you can see the new partition of 150gb is a 8e meaning a Linux file system which is correct, older version we needed to change this.
‘w’ is used to write the table to disk and exit, basically all the changes that have been done will be saved and then you will be exited from fdisk.
Command (m for help): w
The partition table has been altered.
Syncing disks.
You will see a warning which basically means in order to use the new table with the changes a system reboot is required. If you can not see the new partition using “fdisk -l” you may be able to run “partprobe -s” to rescan the partitions. In my test I did not require either of those things at this stage (I do a reboot later on), straight after pressing ‘w’ in fdisk I was able to see the new /dev/sda3 partition of my 10gb of space as displayed in the below image.
That’s all for partitioning, we now have a new partition which is making use of the previously unallocated disk space from the increase in VMware.
Increasing the logical volume
We use the pvcreate command which creates a physical volume for later use by the logical volume manager (LVM). In this case the physical volume will be our new /dev/sda4 partition.
pvcreate /dev/sda4
  Physical volume "/dev/sda4" successfully created.
Next we need to confirm the name of the current volume group using the vgdisplay command. The name will vary depending on your setup, for me it is the name of my test server. vgdisplay provides lots of information on the volume group, I have only shown the name and the current size of it for this example.
vgdisplay
  --- Volume group ---
  VG Name               rl
  System ID
  Format                lvm2
  Metadata Areas        1
  Metadata Sequence No  3
  VG Access             read/write
  VG Status             resizable
  MAX LV                0
  Cur LV                2
  Open LV               2
  Max PV                0
  Cur PV                1
  Act PV                1
  VG Size               98.41 GiB
  PE Size               4.00 MiB
  Total PE              25193
  Alloc PE / Size       25193 / 98.41 GiB
  Free  PE / Size       0 / 0
  VG UUID               16Qr51-iLg8-HDNB-MkUc-TB5c-dL9j-rnpHUE
Now we extend the ‘rl’ volume group by adding in the physical volume of /dev/sda4 which we created using the pvcreate command earlier.
vgextend rl /dev/sda4
  Volume group "rl" successfully extended
Using the pvscan command we scan all disks for physical volumes, this should confirm the original /dev/sda5 partition and the newly created physical volume /dev/sda4
pvscan
  PV /dev/sda3   VG rl              lvm2 [98.41 GiB / 0    free]
  PV /dev/sda4   VG rl              lvm2 [<250.00 GiB / <250.00 GiB free]
  Total: 2 [<348.41 GiB] / in use: 2 [<348.41 GiB] / in no VG: 0 [0   ]
Next we need to increase the logical volume (rather than the physical volume) which basically means we will be taking our original logical volume and extending it over our new partition/physical volume of /dev/sda4.
Firstly confirm the path of the logical volume using lvdisplay. This path name will vary depending on your setup.
lvdisplay
  --- Logical volume ---
  LV Path                /dev/rl/root
  LV Name                root
  VG Name                rl
  LV UUID                mb2gT4-2oqM-8icq-B8S6-A3lZ-9Ivi-scDZqS
  LV Write Access        read/write
  LV Creation host, time mfb-us-lin-001, 2022-10-08 19:34:32 -0400
  LV Status              available
  # open                 1
  LV Size                94.45 GiB
  Current LE             24180
  Segments               1
  Allocation             inherit
  Read ahead sectors     auto
  - currently set to     8192
  Block device           253:0

  --- Logical volume ---
  LV Path                /dev/rl/swap
  LV Name                swap
  VG Name                rl
  LV UUID                NWNCL3-rzD7-av3v-lRP0-OQy9-4CcE-phna9T
  LV Write Access        read/write
  LV Creation host, time mfb-us-lin-001, 2022-10-08 19:34:33 -0400
  LV Status              available
  # open                 2
  LV Size                <3.96 GiB
  Current LE             1013
  Segments               1
  Allocation             inherit
  Read ahead sectors     auto
  - currently set to     8192
  Block device           253:1
The logical volume is then extended using the lvextend command.
lvextend /dev/rl/root /dev/sda4
  Size of logical volume rl/root changed from 94.45 GiB (24180 extents) to <344.45 GiB (88179 extents).
  Logical volume rl/root successfully resized
There is then one final step which is to resize the file system so that it can take advantage of this additional space, this is done using the xfs_growfs command. Note that this may take some time to complete, it took about 30 seconds for my additional space.
xfs_growfs /dev/rl/root
meta-data=/dev/mapper/rl-root    isize=512    agcount=4, agsize=6190080 blks
         =                       sectsz=512   attr=2, projid32bit=1
         =                       crc=1        finobt=1, sparse=1, rmapbt=0
         =                       reflink=1    bigtime=0 inobtcount=0
data     =                       bsize=4096   blocks=24760320, imaxpct=25
         =                       sunit=0      swidth=0 blks
naming   =version 2              bsize=4096   ascii-ci=0, ftype=1
log      =internal log           bsize=4096   blocks=12090, version=2
         =                       sectsz=512   sunit=0 blks, lazy-count=1
realtime =none                   extsz=4096   blocks=0, rtextents=0
data blocks changed from 24760320 to 90295296
That’s it, now with the ‘df’ command we can see that the total available disk space has been increased.
df -h
Filesystem           Size  Used Avail Use% Mounted on
devtmpfs             1.8G     0  1.8G   0% /dev
tmpfs                1.8G     0  1.8G   0% /dev/shm
tmpfs                1.8G  8.7M  1.8G   1% /run
tmpfs                1.8G     0  1.8G   0% /sys/fs/cgroup
/dev/mapper/rl-root  345G   85G  260G  25% /
/dev/sda2           1014M  319M  696M  32% /boot
/dev/sda1            599M  5.8M  594M   1% /boot/efi
tmpfs                367M     0  367M   0% /run/user/0
260gb more drive space, aaaaaaah 🙂


