Visual Studio
Copyright Notice
SFL Services LLC has prepared this document for use only by their staff, agents, customers and prospective customers. Companies, names and data used as examples in this document are fictitious unless otherwise noted. No part of this document may be reproduced or transmitted in any form or by any means, electronic or mechanical, for any purpose, without the express written permission of SFL Services LLC, who reserve the right to change specifications and other information contained herein without prior notice. The reader should consult SFL Services LLC to determine whether any such changes have been made.
Licensing and Warranty
The terms and conditions governing the licensing of SFL Services LLC software consist solely of those set forth in the written contracts between SFL Services LLC and its customers. Except as expressly provided for in the warranty provisions of those written contracts, no representation or other affirmation of fact contained in this document, including but not limited to statements regarding capacity, suitability for use or performance of products described herein, shall be deemed to be a warranty by SFL Services LLC for any purpose, or give rise to any liability of SFL Services LLC whatsoever.
Liability
In no event shall SFL Services LLC be liable for any incidental, indirect, special or consequential damages whatsoever (including but not limited to lost profits) arising out of or related to this document or the information contained in it, even if SFL Services LLC had been advised, knew or should have known of the possibility of such damages, and even if they had acted negligently.
- Visual Studio - Deploy to Linux
- Visual Studio - Entity Framework Tips
- Visual Studio - Bag of Tricks
- Service - Add Installer and Setup
- Log4Net - Wrapper
- DataGrid - Working with Cells and Rows
- Visual Studio - Publish to Linux and Restart Service
- Visual Studio - Git Create new repo in on-prem Azure Devops
- Visual Studio Code - Git Create new repo in on-prem Azure Devops
Visual Studio - Deploy to Linux
The only thing that you need to do do to deploy to Linux is too change the target runtime setting.
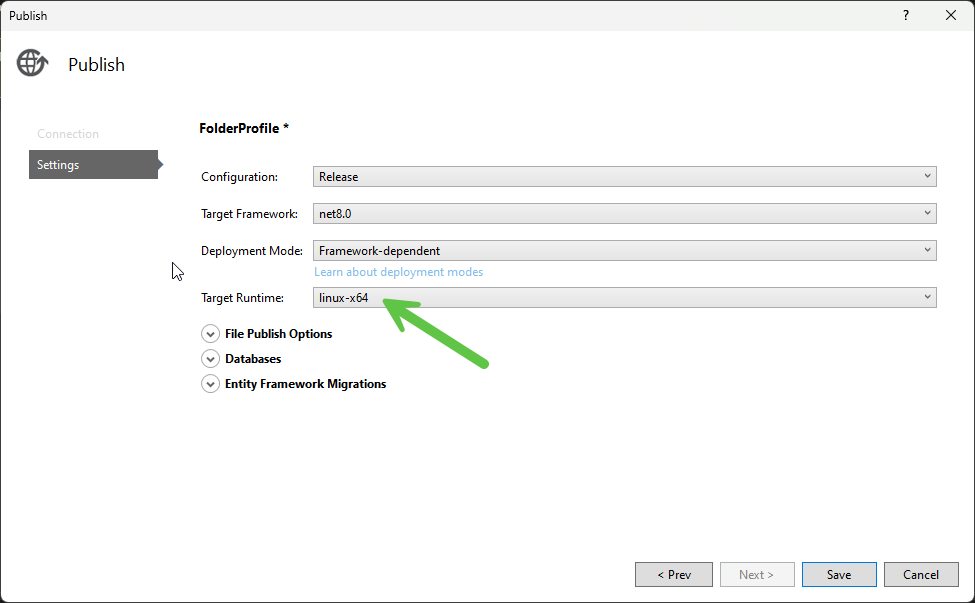
This allows for the deployment to add the specific files to the folder.
Visual Studio - Entity Framework Tips
dotnet tool install --global dotnet-ef
dotnet ef migrations add CreateInitial
dotnet ef database update
//https://www.youtube.com/watch?v=Fbf_ua2t6v4
Scaffold
dotnet ef dbcontext scaffold "Data Source=mfb-us-sql-001;Initial Catalog=MyFFLBookAPI;TrustServerCertificate=True;User Id=XXXXXX;Password=XXXXXX" Microsoft.EntityFrameworkCore.SqlServer -c DataContext --context-dir Data -o Data -fRedo
https://stackoverflow.com/questions/36741793/ef-7-migration-to-existing-database
Visual Studio - Bag of Tricks
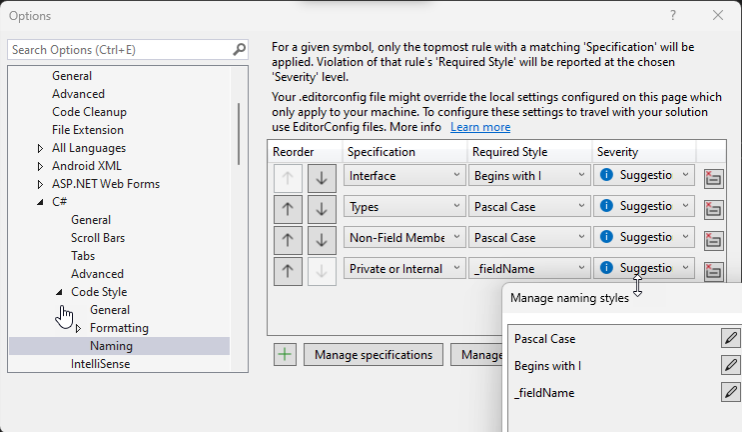
To Add underscore to fieldNames
Service - Add Installer and Setup
Go to Solution Explorer and right-click on your project solution then go to the view designer then look at the design view then right-click on the design page and click on “add installer” and it will look like this: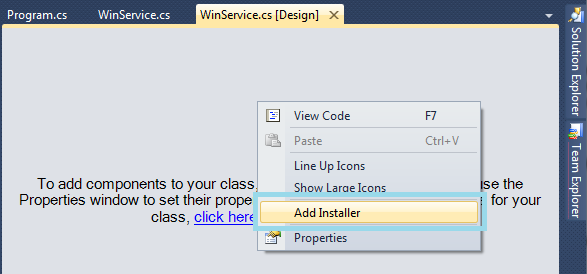
After adding the ProjectInstaller.cs you have 2 components in the design view of the ProjectInstaller.cs (serviceProcessInstaller1 and serviceInstaller1). You should then set up the properties as you need.
Click on serviceinstaller1 and go to the properties in the right pane and edit the service name Service1 to your project solution as in the following: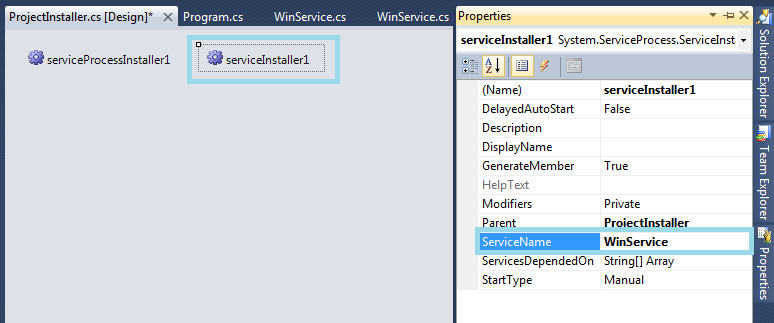
Click on serviceProcessInstaller1 and go to the properties in the right pane and select Account and choose LocalService from the dropdown and save. See the following: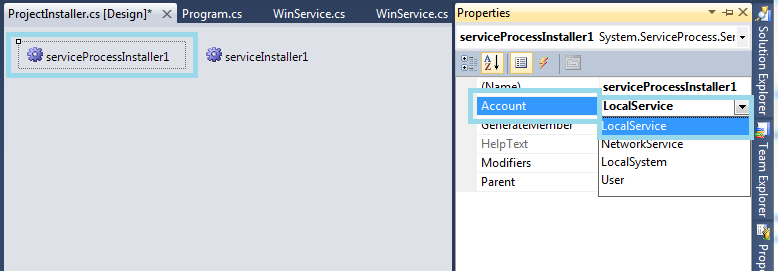
You have two assemblies under References as in the following highlighted (1) System.Configuration.Install and (2) System.ServiceProcess.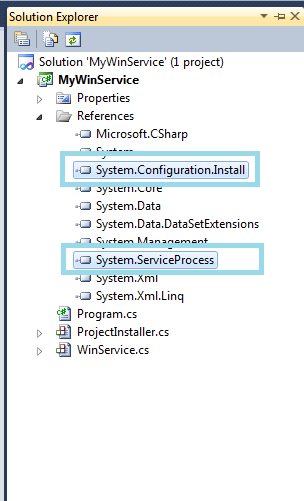
Create Setup Project
Build your service project, you need to set up the project to install the build/compiled project and run the installers to run the Windows service. Create a new project as a “Setup Project” and you need to add project output.
Create Setup Project for Window Service
Go to the Solution Explorer and right-click on the solution, go to Add > New Project.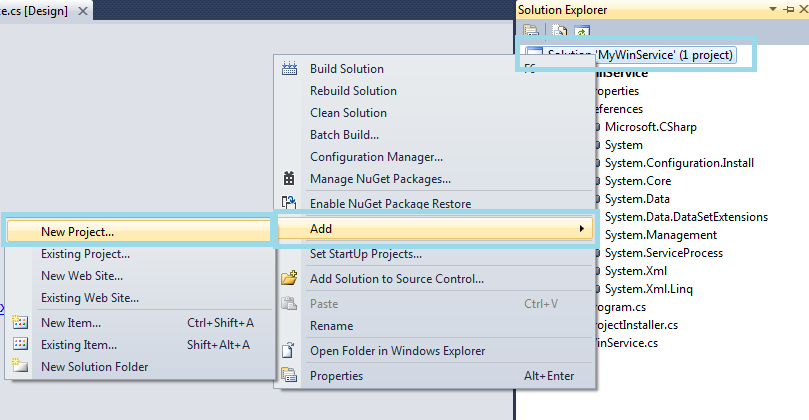
Open a dialog box, go to left pane under Installed Templates > Other Project Types > Setup and Deployment > Visual Studio Installer and go to the right pane and select the project as a “Setup Project” and click on the OK button.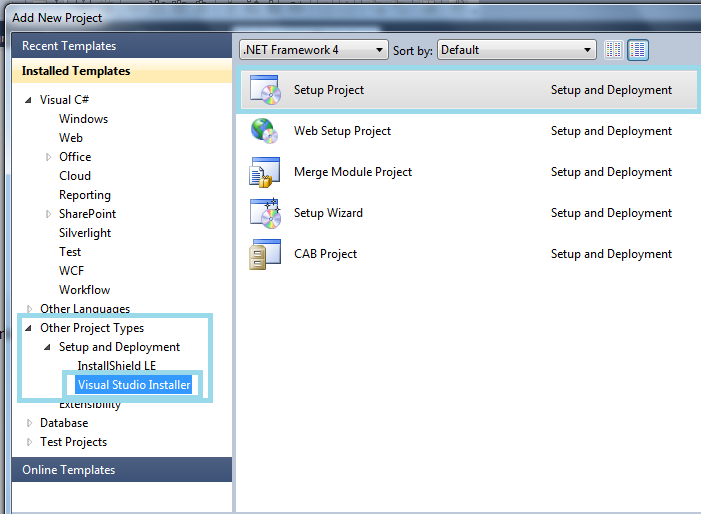
Custom actions add to setup project
Go to the solution, right-click on the setup project then select View > Custom action.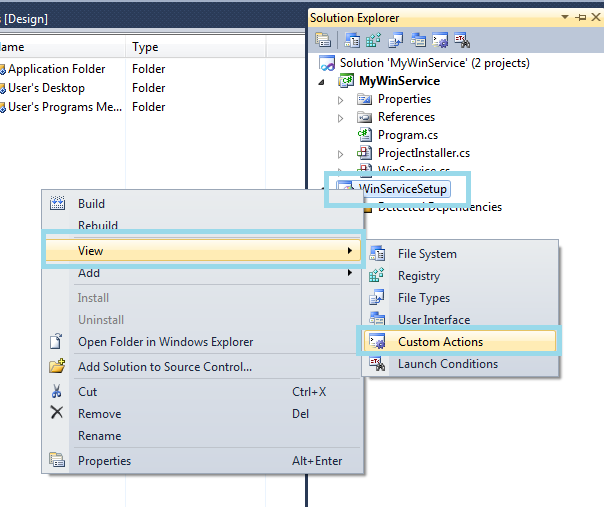
The “Custom action” editor appears.
Right-click on “Custom action > Add Custom action” and add the "Primary Output” from (Active)" to every custom action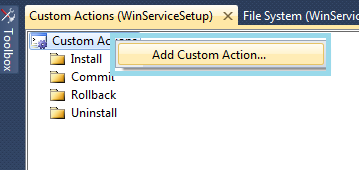
Open a dialog box “Select Item In Project” then double-click on “Application Folder” then click on the “Add Output” button. Open a dialog box, choose your project (Window service) and “Primary Output” from (Active) and click on the OK button.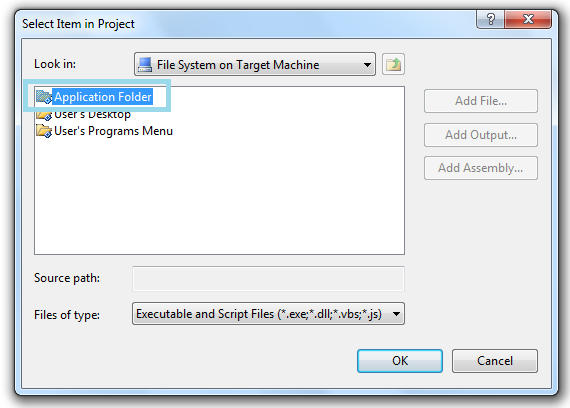
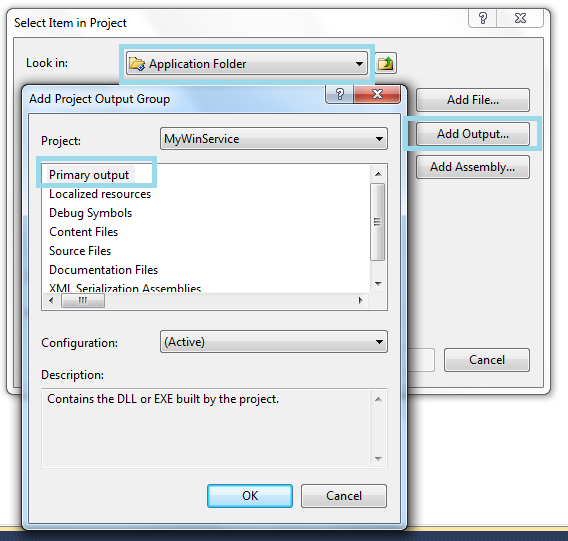
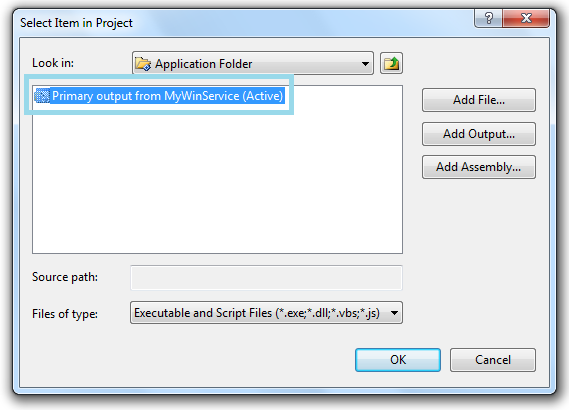
Build your setup project and install the Windows service.
Install And Start The Service
Go to the Solution Explorer then select Build for both projects (Windows Service and Setup Project) then right-click on the Setup Project and click on the Install option and follow the setup wizard procedure. Finally your service is ready for being started and stopped. If you want to start the Windows server then go to Start > Administrator tools > Service > Find Your Service then right-click on the Service Name then select Start. Otherwise go to Start > Computer (My Computer) > Manage > Click on Service And Application from the left pane > Services.
Log4Net - Wrapper
https://stackoverflow.com/questions/1028375/how-do-you-configure-and-enable-log4net-for-a-stand-alone-class-library-assembly
DataGrid - Working with Cells and Rows
void dataGridView_CellValidating(object sender, DataGridViewCellValidatingEventArgs e)
{
    // Ignore cell if it's not dirty
    if (dataGridView.isCurrentCellDirty)
        return;

    // Validate current cell.
}

void dataGridView_RowValidating(object sender, DataGridViewCellCancelEventArgs e)
{
    // Ignore Row if it's not dirty
    if (!dataGridView.IsCurrentRowDirty)
        return;

    // Validate all cells in the current row.
}

void dataGridView_CellEndEdit(object sender, DataGridViewCellEventArgs e)
{
    // Validate all cells in the current row and return if any are invalid.

    // If they are valid, save changes to the database

    // This is when I would expect dataGridView.IsCurrentRowDirty to be false.
    // When this row loses focus it will trigger RowValidating and validate all
    // cells in this row, which we already did above.
}
https://stackoverflow.com/questions/2043210/datagridview-row-is-still-dirty-after-committing-changes
Visual Studio - Publish to Linux and Restart Service
To stop and restart a Linux service automatically when publishing from Visual Studio to a local folder, you must modify your Publish Profile (.pubxml) to include post-publish commands. Since Visual Studio runs on Windows, these commands typically trigger a script (like PowerShell or a WinSCP script) to remotely execute the systemctl commands on the Linux server.
NOTE: In the exercise our service is called api.service
1. Update the Publish Profile
Visual Studio doesn't have a built-in "Post-publish" box in the UI for folder publishing, so you must edit the .pubxml file manually.
- In Solution Explorer, expand
Properties>PublishProfiles. - Open your
.pubxmlfile (e.g.,FolderProfile.pubxml). - Add a custom
Targetat the end of the file, before the closing</Project>tag:
<Target Name="CustomActionsAfterPublish" AfterTargets="AfterPublish">
<Exec Command="powershell -ExecutionPolicy Bypass -File "$(ProjectDir)Scripts\RestartLinuxService.ps1"" />
</Target>2. Generate SSH Key on Your Windows Machine (once)
Open PowerShell as your normal user and run:
ssh-keygen -t ed25519 -C "visualstudio-publish-key"
# Press Enter for default location (~/.ssh/id_ed25519)
# Leave passphrase empty (for fully automated) or set one (then use ssh-agent)
3. Copy the Public Key to Your Linux Server (as root or your user)
# Replace with your actual server
type $HOME\.ssh\id_ed25519.pub | ssh root@linux-server "mkdir -p ~/.ssh && cat >> ~/.ssh/authorized_keys && chmod 600 ~/.ssh/authorized_keys && chmod 700 ~/.ssh"
Enter the root password one time during this setup.
4. Create Your RestartLinuxService.ps1 Script
Since your publish target is a folder, you likely still need to move the files to Linux and then restart the service. You can use PowerShell with SSH to handle this.
Create or replace the script with this clean version (no password needed):
# RestartLinuxService.ps1
# Run after Visual Studio publish to stop/restart the systemd service

$server = "linux-server"
$user   = "root"   # or a sudo-enabled user

Write-Host "Stopping api.service on $server..." -ForegroundColor Yellow
ssh -o StrictHostKeyChecking=no -o BatchMode=yes "${user}@${server}" "sudo systemctl stop api.service"

# Optional: If you also want to sync files here (instead of relying only on VS publish folder profile)
# Write-Host "Syncing files..."
# scp -r -o StrictHostKeyChecking=no "C:\Path\To\Your\Publish\Output\*" "${user}@${server}:/path/to/your/app/"

Write-Host "Restarting api.service on $server..." -ForegroundColor Green
ssh -o StrictHostKeyChecking=no -o BatchMode=yes "${user}@${server}" "sudo systemctl restart api.service"

# Verify status (optional)
ssh -o StrictHostKeyChecking=no -o BatchMode=yes "${user}@${server}" "sudo systemctl status api.service --no-pager -l"
Notes:
- -o BatchMode=yes fails fast if something is wrong (no interactive prompts).
- -o StrictHostKeyChecking=no skips the host key prompt on first run (you can remove it after the first successful connection).
5. Modifying sudoers
Make sure the Linux user (root or a dedicated deploy user) can run sudo systemctl without a password.
Option 1: On the Linux server, edit sudoers:
sudo visudoAdd a line like:
deployuser ALL=(ALL) NOPASSWD: /usr/bin/systemctl stop api.service, /usr/bin/systemctl restart api.service, /usr/bin/systemctl status api.serviceOption 2: Add to the /etc/sudoers.d directory
Using /etc/sudoers.d is the recommended and best practice way to add this kind of limited sudo permission. It keeps your changes clean, separate from the main /etc/sudoers file, and easier to manage or remove later.
Create a Proper sudoers.d Entry
On your Linux server linux-server, run these commands as root:
1. Create the file safely using visudo (this checks syntax automatically)
sudo visudo -f /etc/sudoers.d/deploy-api2. Paste the following content into the editor that opens:
# Allow the deployuser to manage the api.service without entering a password
# This is very limited - only stop, restart, and status for this specific service

deployuser ALL=(ALL) NOPASSWD: /usr/bin/systemctl stop api.service, \
                          /usr/bin/systemctl restart api.service, \
                          /usr/bin/systemctl status api.service
Important notes on the rule:
- Use the full path /usr/bin/systemctl (most common on modern Ubuntu/Debian/RHEL).
- You can add more commands if needed (e.g., start, reload, enable).
- The backslashes (\) allow the rule to span multiple lines for readability.
deployusershould be replaced with the actual username you use in your SSH script (e.g., deploy or apiuser — do not use root for this).
Save and exit the editor (Ctrl+O, Enter, Ctrl+X in nano).
Verify the Rule Works
After saving, test it from the deployuser account (or via SSH):
# Switch to the deploy user if needed
su - deployuser

# Test the allowed commands (should NOT ask for password)
sudo systemctl status api.service
sudo systemctl stop api.service
sudo systemctl restart api.service
You can also check what the user is allowed to run:
sudo -l -U deployuserUpdated PowerShell Script (Using the Non-Root Deploy User)
Now update your RestartLinuxService.ps1 to use the dedicated deploy user instead of root:
# RestartLinuxService.ps1 - Improved version

$server = "linux-server"
$user   = "deployuser"   # <-- Change to your non-root deploy user

Write-Host "Connecting to $server as $user..." -ForegroundColor Cyan

# Stop the service
Write-Host "Stopping api.service..." -ForegroundColor Yellow
ssh -o StrictHostKeyChecking=no -o BatchMode=yes "${user}@${server}" "sudo systemctl stop api.service"

# Restart the service
Write-Host "Restarting api.service..." -ForegroundColor Green
ssh -o StrictHostKeyChecking=no -o BatchMode=yes "${user}@${server}" "sudo systemctl restart api.service"

# Optional: Show brief status
Write-Host "Service status:" -ForegroundColor Cyan
ssh -o StrictHostKeyChecking=no -o BatchMode=yes "${user}@${server}" "sudo systemctl status api.service --no-pager -l" | Select-Object -First 15
Extra Security Tips
- File permissions — The file /etc/sudoers.d/deploy-api must be 0440 (readable only by root):
sudo chmod 0440 /etc/sudoers.d/deploy-api
sudo chown root:root /etc/sudoers.d/deploy-api- Filename convention — Many admins prefix with a number (e.g., 10-deploy-api or 99-deploy-api) to control loading order.
- Least privilege — This rule is already quite tight. Avoid adding ALL or wildcard * unless absolutely necessary.
-
If you want even tighter control, you can define a
Cmnd_Aliasfirst in the same file, see below for the link
Finally
In both options, your existing .pubxml target stays exactly the same as in step 1
<Target Name="CustomActionsAfterPublish" AfterTargets="AfterPublish">
<Exec Command="powershell -ExecutionPolicy Bypass -File "$(ProjectDir)Scripts\RestartLinuxService.ps1"" />
</Target>6. Alternative: If You Must Use Password (Not Recommended)
If key auth is blocked (e.g., company policy), you can use sshpass (install via Chocolatey: choco install sshpass) or a simple PowerShell wrapper.
Using sshpass (install once):
# In RestartLinuxService.ps1
$password = "YourSuperSecretPassword"   # <-- WARNING: Plain text! Very insecure

$server = "linux-server"
$user   = "root"

sshpass -p $password ssh -o StrictHostKeyChecking=no "${user}@${server}" "sudo systemctl restart api.service"
Even worse for security: store the password encrypted with ConvertFrom-SecureString and load it at runtime, but it's still risky for automated builds.
7. Bonus Tips
- Run as non-root — Create a dedicated deploy user on Linux with limited sudo rights.
- File sync — The publish profile in Visual Studio can already target a network share or use Web Deploy / Folder publish with rsync/scp in the profile. Then your script only needs to handle stop → restart.
- Error handling — Add try/catch and check $LASTEXITCODE after each ssh call.
- Test first — Run the .ps1 manually from PowerShell before relying on the publish step.
8. Cmnd_Alias setup for ease of multi-commands
Click Here