Security
This is for anything to do with security on Windows and Linux environments
- pfSense - VLANs Setup
- Security - Windows LDAPS Cert
- Security - Retrieve Windows Root CA Certificate for Import
- Security - Export Kerberos KeyTab from Windows Root CA
- pfSense - LDAP to Windows 2025 without CA
- Security - Create a Code Signing Template
- Security - Code Signing Enroll User For Different Domain
- pfSense - Local System Config Backup and send to S3 Buckets
pfSense - VLANs Setup
https://nguvu.org/pfsense/pfsense-baseline-setup/
https://www.youtube.com/watch?v=b2w1Ywt081o
Security - Windows LDAPS Cert
This is to setup a Windows ADCS
Windows Certificate
These command are to install ADCS, this will take a while to complete.
Step 1: Install Active Directory Certificate Services (AD CS)
Add-WindowsFeature Adcs-Cert-Authority -IncludeManagementToolsStep 2: Assign EnterpriseRootCA Role
Install-AdcsCertificationAuthority -CAType EnterpriseRootCAType "Y" for the installation question
This will update the server
gpupdate /forceStep 3: Verify AD CS Role is Installed
Go to server manager and verify by refreshing the page and that the AD CS Role was installed
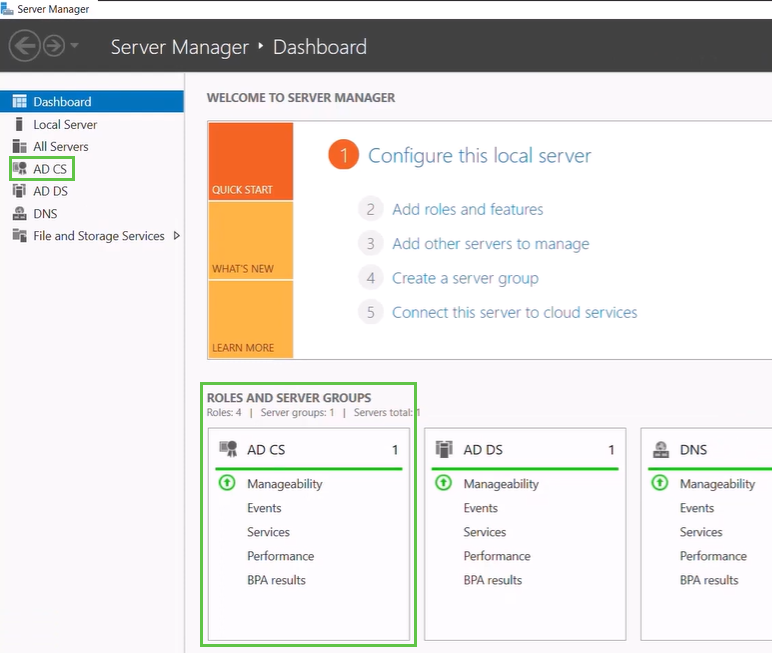
Step 4: Create Certificate Template
Run the following
certsv.msc
Security - Retrieve Windows Root CA Certificate for Import
This is to retrieve a Windows certificate that was configured HERE
Security - Export Kerberos KeyTab from Windows Root CA
KeyTab Export
To export the KeyTab from the Windows CA server, in this case it is for KeyCloak mentioned HERE
Run this in PowerShell
cd \temp
ktpass -princ HTTP/server.domain.com@SERVER.DOMAIN.COM -mapuser user@DOMAIN.COM -pass '' -crypto AES256-SHA1 -ptype KRB5_NT_PRINCIPAL -out keycloak.keytab
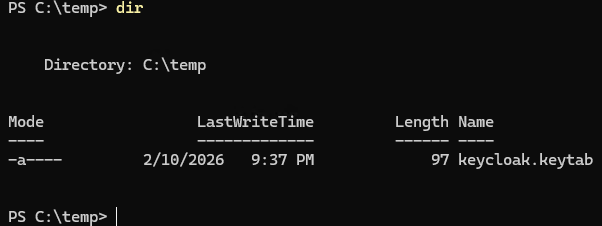
dir
This will show you the newly create KeyTab
pfSense - LDAP to Windows 2025 without CA
To be able to hook up pfsense to Windows 2025 default AD you need to add a Group Policy to override the defaults in windows 2025 server
| Domain Controller Policy ===Computer Configuration ======Policies =========Windows Settings ============Security Settings ===============Local Policies ==================Security Options =====================Domain controller: LDAP server channel binding token requirements: "When Supported" =====================Domain controller: LDAP server signing requirements: "None" =====================Domain controller: LDAP server Enforce signing requirements: "Disabled" =====================Network security: LDAP client encryption requirements: "Negotiate Sealing" =====================Network security: LDAP client signing requirements: "Negotiate Signing" |
Taken from here
Security - Create a Code Signing Template
Here’s a step-by-step guide to create a new code signing certificate template in Active Directory Certificate Services (AD CS) based on the built-in "Code Signing" template. This new template can be used by domain users (from your current domain or trusted domains in the same forest) to enroll for code signing certificates.
The phrase "for a different domain name" likely means you want certificates where the subject name (or Subject Alternative Name / UPN) reflects a different domain/organization/branding (e.g., "Code Signing Authority - othercompany.com" instead of the user's actual AD name like "Steve@contoso.com"). The standard "Code Signing" template builds the subject from Active Directory (user's CN + UPN), which ties it to the enrolling user's domain identity.
To allow a custom / different subject name (common for organizational code signing certs), set the template to Supply in the request. This lets the user provide their own subject during enrollment (via certreq.exe, MMC Certificates snap-in, or PowerShell).
Important security note: Setting "Supply in the request" without tight controls is risky (ESC vulnerabilities like ESC1/ESC2). Limit enrollment to a small, trusted group (e.g., developers or a code-signing admins group). Avoid enabling this broadly for all Domain Users unless necessary.
Step 1: Open the Certificate Templates Console
- Log in to a domain-joined machine with Enterprise Admin rights (or delegated rights to manage templates).
- Run certtmpl.msc (Certificate Templates MMC snap-in).
Step 2: Duplicate the Built-in Code Signing Template
- In the list, find the template named Code Signing.
- Right-click it → Duplicate Template.
- In the Compatibility tab (if shown):
- Certification Authority: Windows Server 2016 / 2019 / 2022 (or highest supported).
- Certificate recipient: Same or highest.
- Click OK to open the new template properties.
Step 3: Configure General Tab
- Template display name: Something descriptive, e.g., Custom Code Signing - OtherDomain or Code Signing - branding.otherdomain.com.
- Template name: Auto-filled (spaces removed from display name).
- Validity period: 1–3 years (common for code signing; match your policy).
- Renewal period: e.g., 6 weeks.
- Check Publish certificate in Active Directory if you want the cert discoverable (usually not needed for code signing).
Step 4: Request Handling Tab
- Purpose: Signature and encryption (default is fine; code signing mainly needs signature).
- Check Allow private key to be exported (very common for code signing — developers often need to export to other machines or build servers).
- Minimum key size: 2048 (or 4096 for stronger security).
- Uncheck Strong private key protection unless required.
Step 5: Subject Name Tab (Key Change for "Different Domain Name")
- Select Supply in the request (this is the main change — it allows custom subject during enrollment instead of pulling from AD).
- This enables users to specify a different/common organizational name (e.g., CN = "Code Signing", E = "sales@otherdomain.com").
- Do NOT select "Build from this Active Directory information" unless you want the cert tied to the user's actual AD name/UPN.
Step 6: Extensions Tab
- Application Policies → Ensure Code Signing is present (it should be inherited).
- You can add others if needed (e.g., Time Stamping via additional policies).
- Key Usage: Digital signature (required), non-repudiation (recommended).
- Optional: Add Certificate Template Information extension if you want to include metadata.
Step 7: Security Tab (Critical — Restrict Enrollment)
- Remove Domain Users / Authenticated Users if present (or set their permissions to Read only).
- Add your intended group(s), e.g.:
- A security group like "Code Signing Users" or "Developers - OtherDomain".
- Grant them Read + Enroll (and Autoenroll if you want GPO auto-enrollment, though rare for custom-subject code signing).
- Do not give Domain Users Enroll unless this is intentional (very broad).
Step 8: Issue the New Template on Your CA
- Open certsrv.msc (Certification Authority snap-in) on your CA server.
- Right-click Certificate Templates → New → Certificate Template to Issue.
- Select your new template (e.g., Custom Code Signing - OtherDomain) → OK.
Security - Code Signing Enroll User For Different Domain
This is how to enroll into a cert from the users computer.
How Users Enroll for Certificates with Custom ("Different") Domain Name
Users with Enroll permission can now request a certificate:
Option A – Using MMC (easiest for testing)
- Run certmgr.msc (Current User).
- Right-click Personal → All Tasks → Request New Certificate.
- Select your enrollment policy (Active Directory Enrollment Policy).
- Choose your new template.
- When prompted, click Details → Properties.
- On Subject tab: Enter custom values (e.g., Common name = "OtherDomain Code Signing Authority").
- On Subject tab: Enter custom values (e.g., Organtization = "SFL Services LLC").
- On Subject tab: Enter custom values (e.g., Locality = "Loveland").
- On Subject tab: Enter custom values (e.g., State = "Ohio").
- On Subject tab: Enter custom values (e.g., Country = "US").
- On Extensions tab: Add SAN if needed (e.g., email=signing@otherdomain.com).
- Enroll.
Using certreq.exe (scriptable / automated) Create an .inf file:
[Version]
Signature="$Windows NT$"

[NewRequest]
Subject = "CN=Code Signing, O=SFL Services LLC, L=Loveland, S=Ohio, C=US"
; You can make Subject empty if you prefer only SAN / no CN, but most code signing tools expect a CN
KeySpec = 1
KeyLength = 4096                   ; 3072 or 4096 is strongly recommended in 2025+
Exportable = TRUE                  ; Usually yes for code signing
MachineKeySet = FALSE              ; User context (most common for code signing)
SMIME = FALSE
PrivateKeyArchive = FALSE
UserProtected = FALSE
UseExistingKeySet = FALSE
ProviderName = "Microsoft Enhanced RSA and AES Cryptographic Provider"
ProviderType = 24
RequestType = PKCS10
KeyUsage = 0x80                    ; digitalSignature = required for code signing

[EnhancedKeyUsageExtension]
OID=1.3.6.1.5.5.7.3.3              ; Code Signing EKU

; Optional: if you really want to add DNS SANs (rare for pure code signing)
[Extensions]
2.5.29.17 = "{text}"
_continue_ = "dns=www.sflservicesllc.com&"
_continue_ = "email=sales@sflservicesllc.com"
Then:
certreq -new codesign-request.inf codesign.csr
certutil -dump codesign.csr
certreq -submit -attrib "CertificateTemplate:YourTemplateName" codesign.csr codesign.cer
certreq -accept codesign.cer
certutil -store my
pfSense - Local System Config Backup and send to S3 Buckets
rclone package. This eliminates the need for complex custom shell scripts because rclone can natively authenticate with AWS S3 and encrypt your files.- Log into your pfSense WebGUI.
- Navigate to System > Package Manager > Available Packages.
- Search for and install
rclone. - Search for and install
cron(this gives you a visual interface to schedule the backup).
Step 2: Configure Rclone for Amazon S3
- Connect to your pfSense firewall via SSH (or use the WebGUI via Diagnostics > Command Prompt).
- Run the rclone configuration tool:
rclone config - Type
nfor "New remote" and name its3-backup. - When prompted for the storage type, type
s3(or look for the number corresponding to Amazon S3). - Choose your S3 provider by typing
Amazon(or press enter for the default AWS S3). - Select
falsefor entering AWS credentials from the env_auth. - Enter your AWS account details when prompted:
access_key_id: Your AWS Access Keysecret_access_key: Your AWS Secret Key
- Select your AWS Region (e.g.,
us-east-1). - For all other advanced settings (endpoint, ACLs, encryption), you can press Enter to accept the defaults.
- Type
yto confirm and save the configuration, thenqto quit.
Optional if rclone is not available and install rclone Manually
1. Download and Extract the Binary
# 1. Navigate to a temporary folder
cd /tmp

# 2. Download the official FreeBSD 64-bit binary zip archive
fetch https://downloads.rclone.org/v1.75.0/rclone-v1.75.0-freebsd-amd64.zip

# 3. Unzip the downloaded archive
tar -xf rclone-current-freebsd-amd64.zip
2. Move rclone to the System Path
# 1. Move the executable binary into your local execution path
mv /tmp/rclone-*-freebsd-amd64/rclone /usr/local/bin/

# 2. Grant execution permissions to the binary file
chmod +x /usr/local/bin/rclone

# 3. Clean up the leftover installation files from /tmp
rm -rf /tmp/rclone-*
3. Verify the Installation
rclone versionStep 3: Create the Backup Script on pfSense
/conf/config.xml. We will write a simple 3-line script to copy this file, timestamp it, and upload it.- In the WebGUI, go to Diagnostics > Command Prompt.
- In the Execute Shell Command box, run this command to create a backup directory:
bash
mkdir -p /root/backups - Go to Diagnostics > Edit File.
- In the Path to file to edit box, type:
/root/backup_pfsense.shand click Load. - Paste the following script into the text area:
bash
#!/bin/sh DATE=$(date +%Y%m%d-%H%M%S) BACKUP_FILE="/root/backups/pfsense-config-${DATE}.xml" # 1. Copy the live config to the local backup folder cp /conf/config.xml "${BACKUP_FILE}" # 2. Push the file to your S3 bucket (replace "your-bucket-name" with your actual bucket) /usr/local/bin/rclone copy "${BACKUP_FILE}" s3-backup:your-bucket-name/pfsense/ # 3. Clean up local files older than 7 days to save space on pfSense find /root/backups/ -name "pfsense-config-*.xml" -type f -mtime +7 -delete - Click Save.
- Go back to Diagnostics > Command Prompt and make the script executable by running:
bash
chmod +x /root/backup_pfsense.sh
/root/backup_pfsense.sh in the Command Prompt box and checking your S3 bucket).- Navigate to Services > Cron in the WebGUI. [1]
- Click + Add to create a new cron job.
- Configure the schedule (e.g., to run daily at 3:00 AM):
- Minute:
0 - Hour:
3 - Day of the Month:
* - Month:
* - Day of the Week:
* - User:
root - Command:
/root/backup_pfsense.sh
- Minute:
- Click Save.
config.xml file contains your firewall's root password hashes, VPN private keys, and network topology.- Encrypt the Remote Bucket: Ensure your S3 bucket has Server-Side Encryption (SSE) turned on.
- Alternative (Rclone Encryption): If you want absolute zero-knowledge security, you can run
rclone configagain, add a new remote of typecrypt, and point it ats3-backup:your-bucket-name. This will encrypt the file locally on pfSense before it touches AWS infrastructure.