Raspberry PI
Anything to do with raspberry pi world!
- Raspberry Pi - SD card to a USB SSD
- Raspberry Pi - Bash Colors
- Raspberry Pi - Kiosk
- Linux - Setup FTP and sFTP Server on Raspberry PI
- Pi-Hole - Adding blocklist urls to the Gravity DB from the command-line
- Prometheus - Raspberry PI Node Exporter Install
- Prometheus - Ubuntu Node Exporter Install
- Raspberry PI - Uctronics panel setup
- Raspberry PI - Install NFS Server
- Raspberry PI- Pi-Nut Network
- Raspberry PI - Error encountered raspi-firmware sense-hat
- Raspberry Pi - Upgrade bulleys to trixie
- Pi-Hole - Add DNS to your Pi-Hole from Active Directory LDAPS
- Raspberry Pi - Zero 2 W RTSP Server
- PiHole - Blocklist
- PiHole - Add KeepAlive on two Pi's
Raspberry Pi - SD card to a USB SSD
Install
With the new version of the OS you can just use SD Card Copier from the accessories menu.
We assume that you have already imaged and are booted up with the SD Card.
1. Terminal
Open the terminal windows

Change the boot option with this command from the terminal window
sudo raspi-config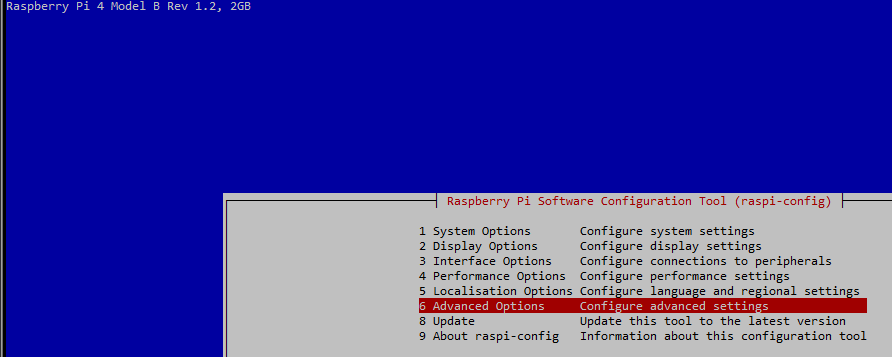
Then choose the option Boot Order
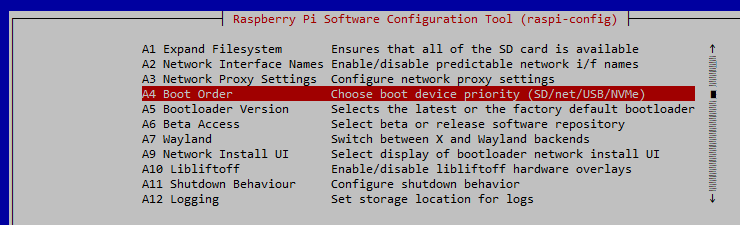
Then choose the option NVMe/USB Boot

From the Accessories menu, run the copier from you SD card to the SSD as this will copy you SD to your new SSD.
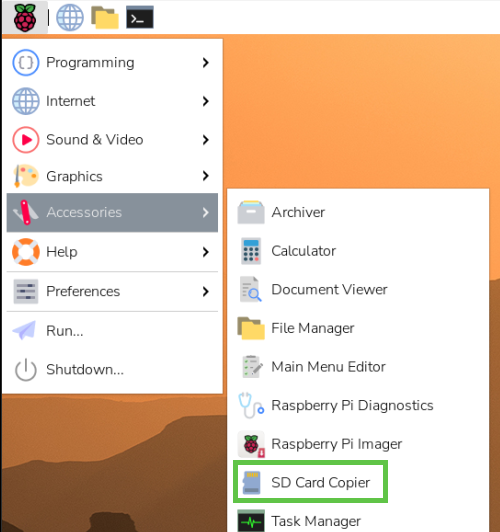
Then change the boot order back on the SD card to use on another device.
Follow the privious instructions but use this final option

Shutdown your Pi
sudo shutdownTake out your SD card before powering on
DEPRICATED
rpi-clone is on github and is downloaded by cloning the repository. It is a standalone script and the install is a simple copy to a bin directory. When run it checks its program dependencies and offers to install needed packages. But currently rpi-clone knows how to install only Debian packages with apt-get.
On a Raspberry Pi:
	$ git clone https://github.com/billw2/rpi-clone.git
	$ cd rpi-clone
	$ sudo cp rpi-clone rpi-clone-setup /usr/local/sbin
Clone to the drive you need the drive first with
lsblkThen clone to it
sudo rpi-clone sdaMake sure /usr/local/sbin is in your $PATH and then run rpi-clone or rpi-clone-setup with no args to print usage.
Get it HERE
Video HERE
Raspberry Pi - Bash Colors
Check you shell to be default to bash if not already:
Here's how to set Bash as your default login shell on Debian / Raspberry Pi OS:
Step1. Check current shell
Run this first to see what you're currently using:
echo $SHELLStep2. Set Bash as default shell
Run the following command:
chsh -s /bin/bash- It will ask for your password.
- Type it and press Enter.
Step3. Verify the change
cat /etc/passwd | grep ^pi:You should see /bin/bash at the end of the line for the pi user.
Step4. Apply the change
Log out and log back in (or reboot):
logoutOr if you're using SSH, just close the connection and reconnect.
After logging back in, run echo $SHELL again — it should show /bin/bash.
Alternative method (if chsh doesn't work)
sudo usermod -s /bin/bash piThen log out and back in.
Change the colors of the shell do the following steps.
Step 1: Better organization (recommended)
Many people keep aliases separate:
# Create a dedicated aliases file
nano ~/.bash_aliases# Safety aliases
alias rm='rm -i'
alias cp='cp -i'
alias mv='mv -i'
# Convenience
alias vi='vim'
alias tailf='tail -f'
# LS colors
LS_COLORS='rs=0:di=01;44:ln=01;36:mh=00:pi=40;33:so=01;35:do=01;35:bd=40;33;01:cd=40;33;01:or=40;31;01:su=37;41:sg=30;43:ca=30;41:tw=30;42:ow=34;42:st=37;44:ex=01;32:*.tar=01;31:*.tgz=01;31:*.arj=01;31:*.taz=01;31:*.lzh=01;31:*.lzma=01;31:*.tlz=01;31:*.txz=01;31:*.zip=01;31:*.z=01;31:*.Z=01;31:*.dz=01;31:*.gz=01;31:*.lz=01;31:*.xz=01;31:*.bz2=01;31:*.bz=01;31:*.tbz=01;31:*.tbz2=01;31:*.tz=01;31:*.deb=01;31:*.rpm=01;31:*.jar=01;31:*.rar=01;31:*.ace=01;31:*.zoo=01;31:*.cpio=01;31:*.7z=01;31:*.rz=01;31:*.jpg=01;35:*.jpeg=01;35:*.gif=01;35:*.bmp=01;35:*.pbm=01;35:*.pgm=01;35:*.ppm=01;35:*.tga=01;35:*.xbm=01;35:*.xpm=01;35:*.tif=01;35:*.tiff=01;35:*.png=01;35:*.svg=01;35:*.svgz=01;35:*.mng=01;35:*.pcx=01;35:*.mov=01;35:*.mpg=01;35:*.mpeg=01;35:*.m2v=01;35:*.mkv=01;35:*.ogm=01;35:*.mp4=01;35:*.m4v=01;35:*.mp4v=01;35:*.vob=01;35:*.qt=01;35:*.nuv=01;35:*.wmv=01;35:*.asf=01;35:*.rm=01;35:*.rmvb=01;35:*.flc=01;35:*.avi=01;35:*.fli=01;35:*.flv=01;35:*.gl=01;35:*.dl=01;35:*.xcf=01;35:*.xwd=01;35:*.yuv=01;35:*.cgm=01;35:*.emf=01;35:*.axv=01;35:*.anx=01;35:*.ogv=01;35:*.ogx=01;35:*.aac=00;36:*.au=00;36:*.flac=00;36:*.mid=00;36:*.midi=00;36:*.mka=00;36:*.mp3=00;36:*.mpc=00;36:*.ogg=00;36:*.ra=00;36:*.wav=00;36:*.axa=00;36:*.oga=00;36:*.spx=00;36:*.xspf=00;36:'
export LS_COLORS
# Detect OS name
if [ -f /etc/os-release ]; then
OS_NAME=$(awk -F= '/^NAME/{print $2}' /etc/os-release | tr -d '"')
else
OS_NAME="Unknown"
fi
export PS1="\[$(tput bold)\]\[$(tput setaf 1)\]\[$(tput setab 8)\]\u\[$(tput setaf 5)\]@\[$(tput setaf 1)\]$(hostname) \[$(tput setaf 2)\]: $(uname) : \[$(tput setaf 6)\]\d \t : ${OS_NAME}\[$(tput sgr0)\]\n\[$(tput sgr0)\][\w]\$ "Step 2: Testing the Prompt
Option 1 : Logout and back in
Option 2 : Reload:
source ~/.bash_aliasesResult
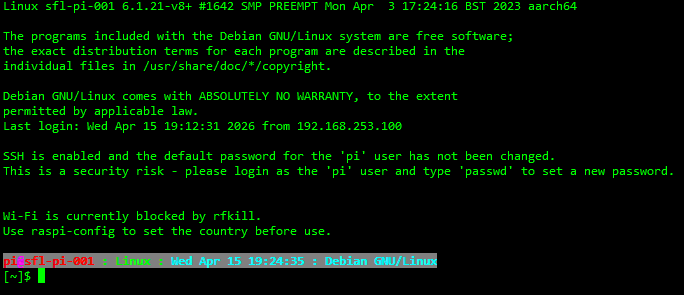
Add VIM colors to your shell
Step1. Install Git (and Vim if not already installed)
sudo apt update
sudo apt install git vim -y
Step2. Clone the vim-colorschemes repository
git clone https://github.com/flazz/vim-colorschemes.git ~/.vim/This will create the ~/.vim/colors/ directory with hundreds of color schemes (including desert.vim).
Step3. Set the desert colorscheme properly (Recommended way)
On Debian/Raspberry Pi OS, it’s better not to copy files to /etc/vimrc.local (that file is not always sourced reliably).
Instead, create or edit your personal ~/.vimrc file:
mkdir -p ~/.vim/colors
cp ~/.vim/colors/desert.vim ~/.vim/colors/   # just in case

cat > ~/.vimrc << EOF
syntax on
colorscheme desert
EOF
Alternative: One-liner to do everything
Run these commands one by one:
sudo apt update && sudo apt install git vim -y

git clone https://github.com/flazz/vim-colorschemes.git ~/.vim/

cat > ~/.vimrc << 'EOF'
syntax on
colorscheme desert
set background=dark
EOF
Raspberry Pi - Kiosk
Configure kiosk mode
clear chrome cache
rm -rf ~/.cache/chromium ~/.config/chromiumNew one https://reelyactive.github.io/diy/pi-kiosk/
https://github.com/debloper/piosk
Change hostname if not already done
sudo hostnamectl set-hostname ???
sudo reboot
Install the following
sudo apt install xdotool unclutterCreate a kiosk file
sudo nano /home/pi/kiosk.shPaste the following in for chromium
#!/bin/bash

xset s noblank
xset s off
xset -dpms

unclutter -idle 0.5 -root &

sed -i 's/"exited_cleanly":false/"exited_cleanly":true/' /home/pi/.config/chromium/Default/Preferences
sed -i 's/"exit_type":"Crashed"/"exit_type":"Normal"/' /home/pi/.config/chromium/Default/Preferences

#/usr/bin/chromium-browser --noerrdialogs --disable-infobars --kiosk https://www.raspberrypi.com/ https://time.is/London &
#/usr/bin/chromium-browser --no-sandbox --window-size=1024,768 --kiosk --window-position=0,0 https://hdrcameras.onling.com:5001/webman/3rdparty/SurveillanceStation/?launchApp=SYNO.SS.App.VideoViewerVue.Instance&SynoToken=W9ZwQIG7NiF1Q &
#/usr/bin/chromium-browser --window-size=1080,720 --kiosk --window-position=0,0 https://www.hammerdownrange.com/lobby/index.php &
/usr/bin/chromium-browser --window-size=1080,720 --kiosk --window-position=0,0 https://www.hammerdownrange.com/lineup/lineup.php &

while true; do
   xdotool keydown ctrl+Tab; xdotool keyup ctrl+Tab;
   sleep 10
done
Paste the following in for firefox
# Disable screen blanking and power management (works on both X11 and Wayland via xwayland compatibility)
xset s noblank
xset s off
xset -dpms

# Hide mouse cursor (unclutter works best on X11; if you're on pure Wayland, see notes below)
unclutter -idle 0.5 -root &

# Optional: Clean any crash flags (Firefox is more forgiving, but harmless to keep)
sed -i 's/"exited_cleanly":false/"exited_cleanly":true/' ~/.mozilla/firefox/*.default*/prefs.js 2>/dev/null || true

# Launch Firefox in kiosk mode
# -kiosk          → Fullscreen kiosk (hides UI, prevents exiting easily)
/usr/bin/firefox --kiosk --private-window https://synology.onling.com/webman/3rdparty/SurveillanceStation/login.cgi?SynoToken=nQhMc44EQyoEpeg &

# Optional: Cycle tabs / refresh every 10 seconds (your original behavior)
# If you only have one URL, you can comment this out or change it to a refresh instead
while true; do
    # Send Ctrl+Tab to cycle tabs (if you open multiple tabs)
    xdotool keydown ctrl+Tab; xdotool keyup ctrl+Tab;
    sleep 10
done
Make it executable
sudo chmod 777 /home/pi/kiosk.sh Make a service file to auto startup
sudo nano /lib/systemd/system/kiosk.servicePaste the following in
[Unit]
Description=Firefox Kiosk Mode
After=graphical.target
Wants=graphical.target

[Service]
Type=simple
Environment=DISPLAY=:0
ExecStart=/home/pi/kiosk.sh
Restart=always
RestartSec=5
User=pi
WorkingDirectory=/home/pi

[Install]
WantedBy=graphical.target
Make it so it auto starts and start it
sudo systemctl enable kiosk.service
sudo systemctl start kiosk.service
Linux - Setup FTP and sFTP Server on Raspberry PI
Introduction
Are you looking to set up an FTP server on your Raspberry PI, Rocky, Ubuntu or Debian-based operating system? vsftpd is a reliable and secure solution that allows you to transfer files between your computer and a remote server.
In this comprehensive guide, I’ll walk you through the process of installing and using vsftpd step by step. Whether you’re a beginner or an experienced user, this guide has got you covered.
Installing VSFTPD
Before we proceed let us ensure that our Raspberry Pi OS is running the latest available packages.
To update all packages on the device you will need to run the following two commands on the terminal.
sudo apt update
sudo apt upgrade -y
Updating all packages ensures that we shouldn’t run in to any weird issues when installing vsftpd on to our Raspberry Pi.
Once the update process has completed we can now install the software we require.
Install vsftpd to your Raspberry Pi by using the command below.
sudo apt install vsftpdBefore you can start using vsftpd, you need to configure it to suit your needs. To do this, we’ll need to make a few changes to the vsftpd configuration file. Open the file using the following command:
sudo cp /etc/vsftpd.conf /etc/vsftpd.conf.orig
sudo nano /etc/vsftpd.conf# Change or enable these values
anonymous_enable=NO
local_enable=YES
write_enable=YES
chroot_local_user=YES
# Add the following to the very end
user_sub_token=$USER
local_root=/home/$USER/ftp
userlist_enable=YES
userlist_file=/etc/vsftpd.userlist
userlist_deny=NOOnce you’ve made the necessary changes, save the file and exit the editor. To apply the new configuration, restart the vsftpd service by running the following command:
sudo systemctl restart vsftpdCreating a User
To make use of vsftpd, you’ll need to create user accounts that can access the FTP server. This allows you to control who can upload and download files. To create a new user account, use the adduser command followed by the desired username.
Script to use
Create a file in your home folder and, eg: sudo nano addFTP.sh
#!/bin/bash

# Configuration
USERNAME="$1"
PASSWORD="$2"
LOG_IDENTIFIER="create_user"  # Identifier for syslog entries
USER_LIST_FILE="/etc/vsftpd.userlist" # File to append usernames

# Function to log messages to syslog
log() {
  logger -t "$LOG_IDENTIFIER" "$1"
}

# Check if arguments are provided
if [ -z "$USERNAME" ]; then
  log "Error: Username is missing."
  exit 1
fi

if [ -z "$PASSWORD" ]; then
  log "Error: Password is missing."
  exit 1
fi

user_id=$(id -u "$USERNAME" &>/dev/null)

# Check if the user already exists
if [ ! $user_id = "" ]; then
  log "Error: User '$USERNAME' already exists."
  exit 1
fi

# Create the user
log "Creating user '$USERNAME'..."
sudo useradd "$USERNAME"

if [ $? -ne 0 ]; then
  log "Error: Failed to create user '$USERNAME'."
  exit 1
fi

# Set the password (using a non-interactive method)
log "Setting password for user '$USERNAME'..."
echo "$USERNAME:$PASSWORD" | chpasswd

if [ $? -ne 0 ]; then
  log "Error: Failed to set password for user '$USERNAME'."
  sudo userdel "$USERNAME"
  log "Cleaning up user '$USERNAME' due to password failure."
  exit 1
fi

log "User '$USERNAME' created successfully."
# Append username to the user list file
#sudo echo "$USERNAME" >> "$USER_LIST_FILE"
echo "$USERNAME" | sudo tee -a "$USER_LIST_FILE"

if [ $? -ne 0 ]; then
  log "Error: Failed to append username to '$USER_LIST_FILE'."
  sudo userdel "$USERNAME" # if the file append fails, delete the created user.
  exit 1
fi

log "Creating the ftp folder"
sudo mkdir -p /home/$USERNAME/ftp

log "Change the owner to nobody:nogroup"
sudo chown nobody:nogroup /home/$USERNAME/ftp

log "Adding the correct permissions"
sudo chmod a-w /home/$USERNAME/ftp

log "Showing the permissions on the ftp folder"
sudo ls -la /home/$USERNAME/ftp

log "Making a files folder within the '$USERNAME' folder"
sudo mkdir /home/$USERNAME/ftp/files

log "Changing the ownership on the files folder for the user"
sudo chown $USERNAME:$USERNAME /home/$USERNAME/ftp/files

log "Showing the permissions within the ftp folder"
sudo ls -la /home/$USERNAME/ftp

log "Change the user to have FTP access only"
sudo usermod -s /bin/ftponly $USERNAME

exit 0 # Exit with a zero status to indicate success.
Change the permissions on the file
chmod 777 addFTP.shRun like this to add a FTP user, eg: [script] [username] [password]
addFTP.sh steve 1E3%^fqEnabling FTPS (FTP over SSL)
o add an extra layer of security to your FTP server, you can enable FTPS, which is FTP over SSL. This encrypts the data transferred between the client and the server, ensuring that it cannot be intercepted by unauthorized users.
To enable FTPS, we need to create an SSL certificate. Run the following command to generate the certificate:
sudo openssl req -x509 -nodes -days 365 -newkey rsa:2048 -keyout /etc/ssl/private/vsftpd.pem -out /etc/ssl/private/vsftpd.pemDuring the certificate generation process, you will be prompted to provide information such as the country code, state, and organization name. Once the certificate is generated, we can proceed with the configuration.
Open the vsftpd configuration file again:
sudo nano /etc/vsftpd.confScroll down to the bottom of the file and locate the RSA certificate settings. Replace the paths with the following:
rsa_cert_file=/etc/ssl/private/vsftpd.pem
rsa_private_key_file=/etc/ssl/private/vsftpd.pem
ssl_enable=YES
allow_anon_ssl=NO
force_local_data_ssl=YES
force_local_logins_ssl=YES
ssl_tlsv1=YES
ssl_sslv2=NO
ssl_sslv3=NO
require_ssl_reuse=NO
ssl_ciphers=HIGH
Save the file and exit the editor. Restart the vsftpd service to apply the changes:
sudo systemctl restart vsftpdYour FTP server is now configured to accept FTPS connections. You can test this by connecting to the server using an FTP client that supports FTPS.
Securing FTP User Access
To further enhance security, you can limit FTP users to only FTP access and disable shell access. This prevents users from accessing the command line interface on your server.
To restrict FTP user access, we need to create a limited shell. Run the following command to create the shell script:
sudo nano /bin/ftponlyInside the editor, add the following line:
#!/bin/sh
echo "Limited to FTP access only"sudo chmod a+x /bin/ftponlysudo nano /etc/shells/bin/ftponlySave the file and exit the editor. Finally, modify the user’s account to use the limited shell:
sudo usermod -s /bin/ftponly ftpuserPi-Hole - Adding blocklist urls to the Gravity DB from the command-line
This is to add block list to the Gravity DB from the command line from a text file.
You will need a few things to do this
This is for allowing zmodem options if you telnet session allows it like SecurCRT that I used.
Install the following packages
sudo apt-get install lrzsz
sudo apt-get install sqlite3
Add the URL's per line for example
Blocklist: HERE
To add these URL's you have to add them to the following file
sudo nano /etc/pihole/adlists.listCreate a file to run as the import script
sudo nano /etc/pihole/adlists.shThen create a script and call it what ever you like and put this in
#!/bin/bash
set -e

DB_FILE="/etc/pihole/gravity.db"
BACKUP_FILE="/etc/pihole/gravity_backup_$(date +%Y%m%d_%H%M%S).db"
ADLIST_FILE="/etc/pihole/adlists.list"

# Check if adlists.list exists
if [ ! -f "$ADLIST_FILE" ]; then
    echo "Error: $ADLIST_FILE not found!"
    exit 1
fi

echo "1. Backing up existing gravity.db..."
sudo cp "$DB_FILE" "$BACKUP_FILE"

echo "2. Clearing existing adlists from database..."
sudo sqlite3 "$DB_FILE" "DELETE FROM adlist;"

echo "3. Importing HTTPS URLs from $ADLIST_FILE..."
count=0

# Process lines using process substitution to keep scope in the main shell
while IFS= read -r url; do
    if [ -n "$url" ]; then
        safe_url=$(echo "$url" | sed "s/'/''/g")
        sudo sqlite3 "$DB_FILE" "INSERT INTO adlist (address, enabled, comment) VALUES ('$safe_url', 1, 'Imported from adlists.list');"
        count=$((count + 1))
        echo "Added: $safe_url"
    fi
done < <(grep 'https://' "$ADLIST_FILE" | grep -v '^[[:space:]]*#' | grep -o 'https://[^[:space:]]*')

echo "Successfully imported $count adlists."

echo "4. Updating Gravity (downloading lists)..."
sudo pihole -g

echo "Done! Pi-hole gravity update complete."
Change the permissions on the file
sudo chmod +x /etc/pihole/adlists.shDocker Users
If you place the script within the working directory of pihole container you can do the following:
docker exec -it pihole chmod +x /etc/pihole/bash_script.sh
docker exec -it pihole chmod 777 /etc/pihole/adlists.list
docker exec -it pihole ./etc/pihole/bash_script.sh
Error Check
Run the following to make sure your database is still okay and does not display any errors like these
| 2025-03-25 21:53:21.039 EDT [1353/T9050] ERROR: SQLite3: no such table: info in "SELECT value FROM info WHERE property = 'updated';" (1) 2025-03-25 21:53:21.039 EDT [1353/T9050] WARNING: gravity_updated(): SELECT value FROM info WHERE property = 'updated'; - SQL error prepare: SQL logic error |
If so just rebuild the database like this
sudo mv /etc/pihole/gravity.db /etc/pihole/gravity_backup.db
sudo pihole -g
Prometheus - Raspberry PI Node Exporter Install
This is to install the node exporter on a raspberry pi for Prometheus to scrap.
Step1: Download
Install the node exporter for Prometheus on your Raspberry Pi
You will need to look at here for the current version of the node exporter from github
https://github.com/prometheus/node_exporter/releasesStep2: Install
Log into your raspberry pi
Once you have the latest located from step 1 then right click on it to get the link copied in your clipboard, for this example we are using 1.91 version
wget https://github.com/prometheus/node_exporter/releases/download/v1.12.1/node_exporter-1.12.1.linux-armv7.tar.gzNow un-tar the release using this command.
tar -xvzf node_exporter-1.12.1.linux-armv7.tar.gzThis will un-tar the files into a sub-directory that looks like this.
| node_exporter-1.12.1.linux-armv7/ node_exporter-1.12.1.linux-armv7/node_exporter node_exporter-1.12.1.linux-armv7/LICENSE node_exporter-1.12.1.linux-armv7/NOTICE |
The only file we need out of the expanded tarball is the node_exporter binary. Copy that file to /usr/local/bin.
sudo cp node_exporter-1.12.1.linux-armv7/node_exporter /usr/local/binUse the chmod command to make the node_exporter binary executable.
sudo chmod +x /usr/local/bin/node_exporterStep 3 – Setup systemd unit file
Next step, setting up the unit file. The unit file will allow us to control the service via the systemctl command. Additionally it will ensure node_exporter starts on boot.
Create a file called node_exporter.service in the /etc/sytemd/system directory. The full path to the file should be:
sudo nano /etc/systemd/system/node_exporter.servicePut the following contents into the file:
[Unit]
Description=Node Exporter
Wants=network-online.target
After=network-online.target

[Service]
#User=pi  # Or the user you want to run it as, or leave commented out for default
ExecStart=/usr/local/bin/node_exporter
Restart=on-failure

[Install]
WantedBy=multi-user.target
Now lets reload systemd, enable and start the service.
sudo systemctl daemon-reload
sudo systemctl enable node_exporter.service
sudo systemctl start node_exporter.service
sudo systemctl status node_exporter
Step4: Test
You can test if the setup works this way as well
curl http://localhost:9100Next steps on Prometheus
Now you should add the metrics endpoint as a target to your Prometheus server. You can do this by editing the prometheus configuration file on your prometheus server. For reference mine looks like this.
# my global config
global:
  scrape_interval:     15s # Set the scrape interval to every 15 seconds. Default is every 1 minute.
  evaluation_interval: 15s # Evaluate rules every 15 seconds. The default is every 1 minute.
  # scrape_timeout is set to the global default (10s).

# Alertmanager configuration
alerting:
  alertmanagers:
  - static_configs:
    - targets:
      # - alertmanager:9093

# A scrape configuration containing exactly one endpoint to scrape:
# Here it's Prometheus itself.
scrape_configs:
  # The job name is added as a label `job=<job_name>` to any timeseries scraped from this config.
  - job_name: 'prometheus'
    # metrics_path defaults to '/metrics'
    # scheme defaults to 'http'.
    static_configs:
    - targets: ['localhost:9090']

  - job_name: 'raspberry_pi'
    scrape_interval: 5s
    static_configs:
    - targets: ['pi1.sflservicesllc.com::9100','pi2.sflservicesllc.com:9100']
This is the standard prometheus config file. However I added the following target at the end for my Raspberry Pi:
- job_name: 'pi1'
    scrape_interval: 5s
    static_configs:
    - targets: ['pi1.sflservicesllc.com::9100']
The IP address of my Raspberry Pi is 10.1.100.2. The Port 9100 corresponds is the port used by node_exporter.
Restart Prometheus server to start scrapping
Prometheus - Ubuntu Node Exporter Install
This is to install the node exporter on a raspberry pi for Prometheus to scrap.
Step1: Download
Install the node exporter for Prometheus on your Raspberry Pi
You will need to look at here for the current version of the node exporter from github
https://github.com/prometheus/node_exporter/releasesStep2: Install
Log into your Redhat Server
Once you have the latest located from step 1 then right click on it to get the link copied in your clipboard, for this example we are using 1.91 version
wget https://github.com/prometheus/node_exporter/releases/download/v1.12.1/node_exporter-1.12.1.linux-amd64.tar.gzNow un-tar the release using this command.
tar -xvzf node_exporter-1.12.1.linux-amd64.tar.gzThis will un-tar the files into a sub-directory that looks like this.
| node_exporter-1.12.1.linux-armv7/ node_exporter-1.12.1.linux-armv7/node_exporter node_exporter-1.12.1.linux-armv7/LICENSE node_exporter-1.12.1.linux-armv7/NOTICE |
The only file we need out of the expanded tarball is the node_exporter binary. Copy that file to /usr/local/bin.
sudo cp node_exporter-1.12.1.linux-amd64/node_exporter /usr/local/binUse the chmod command to make the node_exporter binary executable.
sudo chmod +x /usr/local/bin/node_exporterStep 3 – Setup systemd unit file
Next step, setting up the unit file. The unit file will allow us to control the service via the systemctl command. Additionally it will ensure node_exporter starts on boot.
Create a file called node_exporter.service in the /etc/sytemd/system directory. The full path to the file should be:
sudo vi /etc/systemd/system/node_exporter.servicePut the following contents into the file:
[Unit]
Description=Node Exporter
Wants=network-online.target
After=network-online.target

[Service]
#User=pi  # Or the user you want to run it as, or leave commented out for default
ExecStart=/usr/local/bin/node_exporter
Restart=on-failure

[Install]
WantedBy=multi-user.target
Now lets reload systemd, enable and start the service.
sudo systemctl daemon-reload
sudo systemctl enable node_exporter.service
sudo systemctl start node_exporter.service
sudo systemctl status node_exporter
Step4: Test
You can test if the setup works this way as well
curl http://localhost:9100Next steps on Prometheus
Now you should add the metrics endpoint as a target to your Prometheus server. You can do this by editing the prometheus configuration file on your prometheus server. For reference mine looks like this.
# my global config
global:
  scrape_interval:     15s # Set the scrape interval to every 15 seconds. Default is every 1 minute.
  evaluation_interval: 15s # Evaluate rules every 15 seconds. The default is every 1 minute.
  # scrape_timeout is set to the global default (10s).

# Alertmanager configuration
alerting:
  alertmanagers:
  - static_configs:
    - targets:
      # - alertmanager:9093

# A scrape configuration containing exactly one endpoint to scrape:
# Here it's Prometheus itself.
scrape_configs:
  # The job name is added as a label `job=<job_name>` to any timeseries scraped from this config.
  - job_name: 'prometheus'
    # metrics_path defaults to '/metrics'
    # scheme defaults to 'http'.
    static_configs:
    - targets: ['localhost:9090']

  - job_name: 'raspberry_pi'
    scrape_interval: 5s
    static_configs:
    - targets: ['pi1.sflservicesllc.com::9100','pi2.sflservicesllc.com:9100']
This is the standard prometheus config file. However I added the following target at the end for my Raspberry Pi:
- job_name: 'pi1'
    scrape_interval: 5s
    static_configs:
    - targets: ['pi1.sflservicesllc.com::9100']
The IP address of my Raspberry Pi is 10.1.100.2. The Port 9100 corresponds is the port used by node_exporter.
Restart Prometheus server to start scrapping
Raspberry PI - Uctronics panel setup
This is to setup the panel on the rack mount UCTRONICS raspberry pi holder with SSD drives
You will need to get the following from GitHub
sudo git clone https://github.com/UCTRONICS/SKU_RM0004.gitCompile the download
cd SKU_RM0004
sudo make clean && sudo make
Run this to auto configure
sudo ./deployment_service.sh Reboot your Pi
sudo rebootBelow Depricated
You will have to modify the following file
sudo nano /boot/config.txt
or
sudo nano /boot/firmware/config.txt
At the end of the file add below the last [ALL] section
dtparam=i2c_arm=on,i2c_arm_baudrate=400000
dtoverlay=gpio-shutdown,gpio_pin=4,active_low=1,gpio_pull=up
You will need to get the following from GitHub
git clone https://github.com/UCTRONICS/SKU_RM0004.gitRun the following
cd SKU_RM0004
make
Edit the following file:
sudo nano /etc/rc.localYou will need to add the following after the fi and before the exit 0
|
|
Once modified should look like this
|
|
Run the following:
cd /home/pi/SKU_RM0004
make clean
make
./display &
Raspberry PI - Install NFS Server
dnf install nfs-kernel-serversudo cp /etc/exports exports.orgvi /etc/exportsConfigure NFS Exports: Edit the /etc/exports file to define the directories to be shared and the clients allowed to access them.
Export the new change
sudo nano /etc/exportsadd a folder to share
# /etc/exports: the access control list for filesystems which may be exported
#               to NFS clients.  See exports(5).
#
# Example for NFSv2 and NFSv3:
# /srv/homes       hostname1(rw,sync,no_subtree_check) hostname2(ro,sync,no_subtree_check)
#
# Example for NFSv4:
# /srv/nfs4        gss/krb5i(rw,sync,fsid=0,crossmnt,no_subtree_check)
# /srv/nfs4/homes  gss/krb5i(rw,sync,no_subtree_check)
#
/home/ftp 192.168.253.0/255.255.255.0(rw,no_subtree_check)
On the client side
vi /etc/fstab Add after the current drives
#Custom
192.168.253.100:/home/ftp /var/www/html/files nfs auto,default 0 0
Raspberry PI- Pi-Nut Network
Installing Network UPS Tools (NUT) version 2.8.3 from source on a Raspberry Pi 4 running Raspberry Pi OS (based on Debian) requires compiling the software from the source code, as a pre-built Debian package for this specific version may not be available. Below are the detailed steps to accomplish this, tailored for a Raspberry Pi 4. These instructions assume you're using Raspberry Pi OS 64-bit (based on Debian Bullseye or later), but they should also work for 32-bit with minor adjustments.
---
### Prerequisites
1. **Raspberry Pi OS**: Ensure your Raspberry Pi 4 is running an up-to-date version of Raspberry Pi OS. Update the system before starting:
sudo apt update && sudo apt upgrade -y2. **Dependencies**: You’ll need tools and libraries to compile NUT and support its functionality (e.g., USB, if your UPS connects via USB).
3. **Internet Connection**: Required to download the source code and dependencies.
4. **UPS Connection**: If using a USB-connected UPS, ensure it’s plugged into the Raspberry Pi before configuring NUT.
### Step-by-Step Installation Guide
#### 1. Install Required Dependencies
NUT requires several development tools and libraries to build from source. Install them using:
sudo apt install -y build-essential autoconf automake libtool pkg-config \
libusb-dev libneon27-dev libsnmp-dev python3-dev python3-pip git
- **build-essential**: Provides compilers (gcc, g++) and make.
- **autoconf, automake, libtool**: Needed to generate the configure script.
- **pkg-config**: Helps locate libraries during compilation.
- **libusb-dev**: Required for USB UPS support (common for modern UPS devices).
- **libneon27-dev, libsnmp-dev**: Optional, for network-based UPS protocols like SNMP.
- **python3-dev, python3-pip**: Optional, for Python-based NUT tools.
- **git**: Used to clone the NUT repository if needed.
If you need additional features (e.g., CGI for web interfaces), you can install `apache2` and `nut-cgi` dependencies later, as shown in some guides.[](https://technotim.live/posts/NUT-server-guide/)
#### 2. Download NUT 2.8.3 Source Code
The NUT 2.8.3 source code is available from the official NUT website or GitHub. Download the stable tarball for version 2.8.3:
wget https://networkupstools.org/source/2.8/nut-2.8.3.tar.gzVerify the integrity of the downloaded file using the SHA-256 checksum (optional but recommended):
sha256sum nut-2.8.3.tar.gzCompare the output with the SHA-256 sum provided on the NUT website (https://networkupstools.org/source/2.8/).[](https://networkupstools.org/historic/v2.8.3/download.html)
Extract the tarball:
tar -xzf nut-2.8.3.tar.gz
cd nut-2.8.3
Alternatively, if you prefer to clone the Git repository and check out the specific 2.8.3 tag:
```bash
git clone https://github.com/networkupstools/nut.git
cd nut
git checkout v2.8.3
./autogen.sh
```
Note: The Git method requires `autoconf`, `automake`, and `libtool` to generate the configure script, as these are not included in the repository. The tarball already includes a pre-built configure script, making it simpler for most users.[](https://networkupstools.org/historic/v2.8.3/download.html)
#### 3. Configure the Build
Before compiling, configure the source tree for your system. Create a system user and group for NUT (e.g., `ups` and `nut`) to run the services securely:
sudo groupadd nut
sudo useradd -r -g nut -s /bin/false ups
-r : Creates a system user.
-g nut: Assigns the user to the `nut` group.
-s /bin/false: Prevents the user from logging in.
Now, configure the build with the appropriate user and group:
```bash
./configure --with-user=ups --with-group=nut --with-usb
```
- `--with-user=ups` and `--with-group=nut`: Specify the user and group for NUT services.
- `--with-usb`: Enables USB support (common for UPS devices). Add other options like `--with-snmp` or `--with-cgi` if needed (see `./configure --help` for options).[](https://networkupstools.org/docs/user-manual.chunked/ar01s05.html)
If you encounter issues with missing dependencies, install them using `apt` (e.g., `sudo apt install libusb-1.0-0-dev` for USB support).[](https://github.com/networkupstools/nut/issues/2431)
#### 4. Build and Install NUT
Compile the source code:
```bash
make
```
This builds the NUT client, server, and selected drivers. If you encounter errors, check for missing dependencies or consult the NUT user manual.[](https://networkupstools.org/docs/user-manual.chunked/ar01s05.html)
Install the compiled programs:
```bash
sudo make install
```
This installs NUT to the default location (`/usr/local/ups`). Sample configuration files are installed with `.sample` extensions to avoid overwriting existing configurations.[](https://networkupstools.org/docs/user-manual.chunked/ar01s05.html)
Optionally, use `make install-as-root` to handle additional setup tasks like setting permissions and creating directories (see below).[](https://networkupstools.org/docs/user-manual.chunked/ar01s05.html)
#### 5. Set Up the State Path
Create a directory for NUT to store UPS status data and set appropriate permissions:
```bash
sudo mkdir -p /var/state/ups
sudo chmod 0770 /var/state/ups
sudo chown root:nut /var/state/ups
```
This ensures the `ups` user and `nut` group have access to the state path.[](https://networkupstools.org/docs/user-manual.chunked/ar01s05.html)
#### 6. Configure USB Permissions (if using a USB UPS)
If your UPS connects via USB, set permissions for the USB device to allow the `ups` user to access it. USB devices are dynamically created, so use `udev` rules to manage permissions. Create a `udev` rule:
```bash
sudo nano /etc/udev/rules.d/99-nut-ups.rules
```
Add the following (adjust `idVendor` and `idProduct` based on your UPS, which you can find using `lsusb` or `nut-scanner -U`):
```bash
SUBSYSTEM=="usb", ATTR{idVendor}=="051d", ATTR{idProduct}=="0002", MODE="0660", GROUP="nut"
```
Save and reload `udev` rules:
```bash
sudo udevadm control --reload-rules
sudo udevadm trigger
```
Run `nut-scanner` to identify your UPS:
```bash
sudo nut-scanner -U
```
This should output details like `vendorid`, `productid`, and `driver` (e.g., `usbhid-ups`). Use these in the next step.[](https://technotim.live/posts/NUT-server-guide/)[](https://www.jeffgeerling.com/blog/2025/nut-on-my-pi-so-my-servers-dont-die)
#### 7. Configure NUT
NUT configuration files are installed in `/usr/local/ups/etc/`. Copy the sample files to their active versions:
```bash
sudo cp /usr/local/ups/etc/ups.conf.sample /usr/local/ups/etc/ups.conf
sudo cp /usr/local/ups/etc/upsd.conf.sample /usr/local/ups/etc/upsd.conf
sudo cp /usr/local/ups/etc/upsmon.conf.sample /usr/local/ups/etc/upsmon.conf
sudo cp /usr/local/ups/etc/upsd.users.sample /usr/local/ups/etc/upsd.users
sudo cp /usr/local/ups/etc/nut.conf.sample /usr/local/ups/etc/nut.conf
```
Edit `ups.conf` to define your UPS:
```bash
sudo nano /usr/local/ups/etc/ups.conf
```
Example configuration (adjust based on `nut-scanner` output):
```bash
[myups]
driver = usbhid-ups
port = auto
desc = "My UPS"
vendorid = 051d
productid = 0002
```
Edit `upsd.conf` to allow network access:
```bash
sudo nano /usr/local/ups/etc/upsd.conf
```
Change:
```bash
LISTEN 127.0.0.1 3493
```
to:
```bash
LISTEN 0.0.0.0 3493
```
Edit `upsd.users` to define admin and monitor users:
```bash
sudo nano /usr/local/ups/etc/upsd.users
```
Example:
```bash
[admin]
password = myadminpassword
actions = set
actions = fsd
instcmds = all
upsmon primary
[observer]
password = myobserverpassword
upsmon secondary
```
Edit `upsmon.conf` to monitor the UPS:
```bash
sudo nano /usr/local/ups/etc/upsmon.conf
```
Example:
```bash
MONITOR myups@localhost 1 admin myadminpassword primary
FINALDELAY 180
```
Set the NUT mode in `nut.conf`:
```bash
sudo nano /usr/local/ups/etc/nut.conf
```
Set:
```bash
MODE=netserver
```
#### 8. Start and Enable NUT Services
Start the NUT driver and server:
```bash
sudo /usr/local/ups/sbin/upsdrvctl start
sudo /usr/local/ups/sbin/upsd
sudo /usr/local/ups/bin/upsmon
```
Enable services to start on boot:
```bash
sudo systemctl enable nut-server
sudo systemctl enable nut-monitor
sudo systemctl start nut-server
sudo systemctl start nut-monitor
```
If `systemctl` commands fail, it may be due to missing systemd service files. Create them manually or use `make install-as-root` to generate them.[](https://www.jeffgeerling.com/blog/2025/nut-on-my-pi-so-my-servers-dont-die)[](https://networkupstools.org/docs/user-manual.chunked/ar01s05.html)
#### 9. Verify Installation
Check if NUT is working:
```bash
upsc myups@localhost
```
This should display UPS status details (e.g., `battery.charge`, `device.model`). If it fails, check logs in `/var/log/syslog` or `/var/log/messages` for errors.[](https://www.jeffgeerling.com/blog/2025/nut-on-my-pi-so-my-servers-dont-die)
#### 10. Troubleshooting
- **Command not found (e.g., `upsdrvctl`)**: Ensure `/usr/local/ups/bin` and `/usr/local/ups/sbin` are in your PATH:
```bash
export PATH=$PATH:/usr/local/ups/bin:/usr/local/ups/sbin
```
Add this to `~/.bashrc` for persistence. This issue was reported in similar installations.[](https://forums.raspberrypi.com/viewtopic.php?t=334804)
- **USB issues**: Verify `libusb-1.0-0-dev` is installed and the `udev` rules are correct.[](https://github.com/networkupstools/nut/issues/2431)
- **Service not starting**: Check permissions on `/var/state/ups` and configuration files. Ensure the `ups` user has access.
- **Driver issues**: If `nut-scanner` doesn’t detect your UPS, consult the NUT hardware compatibility list (https://networkupstools.org/docs/user-manual.chunked/ar01s05.html) or try a different driver (e.g., `nutdrv_qx`).[](https://www.jeffgeerling.com/blog/2025/nut-on-my-pi-so-my-servers-dont-die)
#### 11. Optional: Install NUT CGI for Web Interface
To monitor via a web interface:
```bash
sudo apt install apache2 nut-cgi
sudo a2enmod cgi
sudo systemctl restart apache2
```
Configure `/usr/local/ups/etc/hosts.conf`:
```bash
sudo nano /usr/local/ups/etc/hosts.conf
```
Example:
```bash
MONITOR myups@localhost "My UPS"
```
Access the web interface at `http://<your-pi-ip>/cgi-bin/nut/upsstats.cgi`.[](https://technotim.live/posts/NUT-server-guide/)
---
### Notes
- **Why 2.8.3?**: This version includes specific fixes and features not in earlier releases (e.g., improved driver support). Check the release notes for details (https://networkupstools.org/docs/release-notes.chunked/NUT_Release_Notes.html#_release_notes_for_nut_2_8_3).[](https://github.com/networkupstools/nut/releases)
- **Security**: Set strong passwords in `upsd.users` and limit network access in `upsd.conf` if not needed.
- **Upgrading**: If upgrading from NUT 2.7.x, remove the old version first (`sudo apt remove nut nut-client nut-server`) to avoid conflicts.[](https://forums.raspberrypi.com/viewtopic.php?t=334804)
- **Documentation**: Refer to the NUT user manual (https://networkupstools.org/docs/user-manual.chunked/) for advanced configuration.[](https://networkupstools.org/docs/user-manual.pdf)
If you encounter specific errors, let me know the error messages, and I can provide targeted assistance!
Raspberry PI - Error encountered raspi-firmware sense-hat
Error
| dpkg: error processing package sense-hat (--configure): dependency problems - leaving unconfigured Processing triggers for initramfs-tools (0.142+rpt4+deb12u3) ... Errors were encountered while processing: raspi-firmware sense-hat E: Sub-process /usr/bin/dpkg returned an error code (1) |
These steps should make your broken system usable.
sudo umount /boot
sudo mkdir /boot/firmware
sudo sed -i "s:boot:boot/firmware:" /etc/fstab
sudo systemctl daemon-reload
sudo mount /boot/firmware
sudo apt -f install
Raspberry Pi - Upgrade bulleys to trixie
First upgrade to bookworm
sudo apt update
sudo apt full-upgrade
sudo sed -i 's/bullseye/bookworm/g' /etc/apt/sources.list
sudo sed -i 's/bullseye/bookworm/g' /etc/apt/sources.list.d/*.list
sudo apt update
sudo apt full-upgrade
sudo reboot
You may get this error
Upgrade to trixie
sudo apt update
sudo apt full-upgrade
sudo sed -i 's/bookworm/trixie/g' /etc/apt/sources.list
sudo sed -i 's/bookworm/trixie/g' /etc/apt/sources.list.d/*.list
sudo apt update
sudo apt full-upgrade
sudo reboot
If you get stuck with another error like this
|
Errors were encountered while processing: /var/cache/apt/archives/lxpanel_0.11.1-1_arm64.deb |
Run the following
sudo dpkg --purge --force-depends lxplug-cpu
sudo apt --fix-broken install
Pi-Hole - Add DNS to your Pi-Hole from Active Directory LDAPS
This pulls DNS node names from Active Directory over LDAPS, resolves A records against the AD DNS server (dig), imports into Pi-hole's custom.list, and restarts DNS.
Make sure you have the ROOT cert on the pi-hole side:
Certificate Trust Issue (by far the #1 cause with AD LDAPS) Active Directory DCs usually use certificates issued by your internal Enterprise CA (or a self-signed one). Your Pi-hole doesn't trust it by default.
Setup option:
- Recommended (secure): Export your root CA certificate from AD and trust it on the Pi-hole.
- On a Windows machine: Open MMC → Certificates → Trusted Root Certification Authorities → find your domain CA → Export as Base-64 encoded X.509 (.CER).
- Copy the .cer file to Pi-hole:
/usr/local/share/ca-certificates/ad-root-ca.crt - Run:
update-ca-certificates
How it works:
- Queries both DomainDnsZones and ForestDnsZones
- Handles hostnames with multiple IP addresses
- Improved skipping of junk records
- Proper error handling and logging
- Compatible with Pi-hole v6 (uses systemctl restart pihole-FTL or fallback)
- Uses your domain onling.com as example (easily changeable)
- Safer password handling via file
- Backup of previous records
#!/bin/bash
# =============================================================================
# AD-to-Pi-hole DNS Sync Script (via LDAPS with LDAP fallback)
# Pulls DNS node names from Active Directory, resolves A records,
# imports into Pi-hole's custom.list, and restarts DNS.
#
# Requirements: sudo apt install -y ldap-utils dnsutils
# Run as root (or via sudo). Recommended via cron.
# Created by Steve Ling 2026-04-15
# =============================================================================
set -euo pipefail

# ========================== ANSI COLORS ==========================
RED='\033[0;31m'
GREEN='\033[0;32m'
YELLOW='\033[1;33m'
CYAN='\033[0;36m'
MAGENTA='\033[0;35m'
BLUE='\033[0;34m'
NC='\033[0m' # No Color

success() { echo -e "${GREEN}[✓] $1${NC}"; }
info()    { echo -e "${CYAN}[i] $1${NC}"; }
warn()    { echo -e "${YELLOW}[!] $1${NC}"; }
error()   { echo -e "${RED}[✗] $1${NC}"; }
header()  { echo -e "${MAGENTA}=== $1 ===${NC}"; }
# ================================================================

# ========================== CONFIGURATION ==========================
AD_DC="sfl-dom-001.onling.com"
BIND_DN="CN=svcDevices,OU=Special_Users_Groups,DC=onling,DC=com"
BIND_PASS_FILE="/root/.ad_bind_pass"
DOMAIN="onling.com"

CUSTOM_LIST="/etc/pihole/custom.list"
BACKUP_DIR="/root/dns_backups"

# Optional: skip junk records (space-separated)
SKIP_PATTERNS="@ . _msdcs _tcp _udp _sites _gc _kerberos _kpasswd _ldap _smtp gc _domaincontroller"

# LDAPTLS settings (set to "never" only for testing)
export LDAPTLS_REQCERT=demand
# =================================================================

header "Starting Active Directory → Pi-hole DNS Sync"
echo -e "${BLUE}Started at: $(date '+%Y-%m-%d %H:%M:%S')${NC}\n"

# Create backup directory
mkdir -p "$BACKUP_DIR"
TIMESTAMP=$(date +"%Y%m%d-%H%M%S")
BACKUP_FILE="${BACKUP_DIR}/custom.list.${TIMESTAMP}.bak"

# Read password securely
if [ -f "$BIND_PASS_FILE" ]; then
    BIND_PASS=$(cat "$BIND_PASS_FILE")
    success "Password loaded from ${BIND_PASS_FILE}"
else
    error "Password file $BIND_PASS_FILE not found!"
    echo "Create it with:"
    echo "  echo 'YourPassword' > $BIND_PASS_FILE && chmod 600 $BIND_PASS_FILE"
    exit 1
fi

# Temporary files
TEMP_NAMES=$(mktemp)
TEMP_DOMAIN=$(mktemp)
TEMP_FOREST=$(mktemp)
TEMP_RECORDS=$(mktemp)
trap 'rm -f "$TEMP_NAMES" "$TEMP_DOMAIN" "$TEMP_FOREST" "$TEMP_RECORDS"' EXIT

# ====================== LDAP QUERY WITH FALLBACK ======================
DOMAIN_DN="DC=$(echo "$DOMAIN" | sed 's/\./,DC=/g')"

query_ldap() {
    local uri=$1
    local desc=$2

    info "Trying ${desc} (${uri})..."

    # DomainDnsZones
    info "  → Searching DomainDnsZones..."
    ldapsearch -H "${uri}" \
      -x -D "${BIND_DN}" -w "${BIND_PASS}" \
      -b "CN=MicrosoftDNS,DC=DomainDnsZones,${DOMAIN_DN}" \
      -s sub "(objectClass=dnsNode)" dc 2>"$TEMP_DOMAIN.err" | \
      grep -E "^dc:" | awk '{print $2}' | sort -u > "$TEMP_DOMAIN"

    # ForestDnsZones
    info "  → Searching ForestDnsZones..."
    ldapsearch -H "${uri}" \
      -x -D "${BIND_DN}" -w "${BIND_PASS}" \
      -b "CN=MicrosoftDNS,DC=ForestDnsZones,${DOMAIN_DN}" \
      -s sub "(objectClass=dnsNode)" dc 2>"$TEMP_FOREST.err" | \
      grep -E "^dc:" | awk '{print $2}' | sort -u > "$TEMP_FOREST"

    # Check if we got results
    if [ -s "$TEMP_DOMAIN" ] || [ -s "$TEMP_FOREST" ]; then
        success "LDAP query successful via ${desc}"
        return 0
    else
        warn "No results or error via ${desc}. Checking error output..."
        cat "$TEMP_DOMAIN.err" "$TEMP_FOREST.err" 2>/dev/null | tail -n 10
        return 1
    fi
}

# Try LDAPS first, then fallback to LDAP
if query_ldap "ldaps://${AD_DC}" "LDAPS (secure)"; then
    LDAP_SUCCESS=1
else
    warn "LDAPS failed. Falling back to plain LDAP (port 389)..."
    if query_ldap "ldap://${AD_DC}" "LDAP (fallback)"; then
        LDAP_SUCCESS=1
    else
        error "Both LDAPS and LDAP queries failed. Check credentials, network, firewall, and AD DC availability."
        exit 1
    fi
fi

# Combine and deduplicate
cat "$TEMP_DOMAIN" "$TEMP_FOREST" 2>/dev/null | sort -u > "$TEMP_NAMES"
NAME_COUNT=$(wc -l < "$TEMP_NAMES")

success "Found ${NAME_COUNT} unique DNS node names from AD."

if [ "$NAME_COUNT" -eq 0 ]; then
    error "No DNS nodes found. Please verify bind credentials and search bases."
    exit 1
fi

# ====================== RESOLVE A RECORDS ======================
header "Resolving A records against ${AD_DC}"
> "$TEMP_RECORDS"

while IFS= read -r name || [ -n "$name" ]; do
    [ -z "$name" ] && continue

    # Skip unwanted patterns
    if [[ " ${SKIP_PATTERNS} " == *" ${name} "* ]]; then
        info "  Skipping: ${name}"
        continue
    fi

    resolved=false
    for fqdn in "${name}.${DOMAIN}" "${name}"; do
        info "  Resolving: ${fqdn}"

        mapfile -t ips < <(dig @"${AD_DC}" +short +time=3 +tries=2 "${fqdn}" A 2>/dev/null | \
                          grep -E '^[0-9]{1,3}\.[0-9]{1,3}\.[0-9]{1,3}\.[0-9]{1,3}$')

        if [ ${#ips[@]} -gt 0 ]; then
            for ip in "${ips[@]}"; do
                echo "${ip} ${name}" >> "$TEMP_RECORDS"
                if [ "${fqdn}" != "${name}" ]; then
                    echo "${ip} ${fqdn}" >> "$TEMP_RECORDS"
                fi
            done
            success "    → ${#ips[@]} IP(s) found for ${fqdn}"
            resolved=true
            break
        fi
    done

    if ! $resolved; then
        warn "    No A record found for ${name}"
    fi
done < "$TEMP_NAMES"

sort -u "$TEMP_RECORDS" -o "$TEMP_RECORDS"
RECORD_COUNT=$(wc -l < "$TEMP_RECORDS")

success "Resolved ${RECORD_COUNT} A record entries."

# ====================== BACKUP & IMPORT ======================
header "Updating Pi-hole custom.list"

echo "Backing up current custom.list..."
if [ -f "$CUSTOM_LIST" ]; then
    cp -f "$CUSTOM_LIST" "$BACKUP_FILE"
    success "Backup created: ${BACKUP_FILE}"
else
    warn "No existing custom.list found (first run?)"
fi

info "Writing ${RECORD_COUNT} new records to ${CUSTOM_LIST}..."
cp "$TEMP_RECORDS" "$CUSTOM_LIST"
chown pihole:pihole "$CUSTOM_LIST" 2>/dev/null || true
chmod 644 "$CUSTOM_LIST"
success "Custom list updated."

# ====================== RESTART PI-HOLE ======================
#header "Restarting Pi-hole DNS"
#if command -v systemctl >/dev/null 2>&1; then
#    systemctl restart pihole-FTL && success "Restarted via: systemctl restart pihole-FTL" || error "Failed to restart pihole-FTL"
#else
#    service pihole-FTL restart && success "Restarted via: service pihole-FTL restart" || error "Failed to restart pihole-FTL"
#fi
header "Reloading Pi-hole DNS Lists"
#pihole reloaddns reload-lists && success "Reloaded DNS lists smoothly" || error "Failed to reload lists"
pihole reloadlists && success "Reloaded DNS lists smoothly" || error "Failed to reload lists"
pihole reloaddns && success "Reloaded DNS smoothly" || error "Failed to reload DNS"

# ====================== SUMMARY ======================
header "Sync Completed Successfully"
echo -e "${GREEN}Imported ${RECORD_COUNT} entries from Active Directory.${NC}"
echo -e "Total unique hostnames processed: ${NAME_COUNT}"
echo -e "Backup: ${BACKUP_FILE}"
echo ""
echo -e "${CYAN}Quick verification commands:${NC}"
echo "  pihole -q <hostname>"
echo "  sudo journalctl -u pihole-FTL -n 50 --no-pager"
echo ""
echo -e "${BLUE}Finished at: $(date '+%Y-%m-%d %H:%M:%S')${NC}"

exit 0
How to Deploy
- Save as /usr/local/bin/ad-pihole-dns-sync.sh
- Make executable: chmod +x /usr/local/bin/ad-pihole-dns-sync.sh
- Create the password file securely:
echo 'YourActualPassword' > /root/.ad_bind_pass chmod 600 /root/.ad_bind_pass - Update AD_DC and BIND_DN if needed.
- Test: sudo /usr/local/bin/ad-pihole-dns-sync.sh
- Add to cron (example: every hour):
0 * * * * /usr/local/bin/ad-pihole-dns-sync.sh >> /var/log/ad-dns-sync.log 2>&1
Raspberry Pi - Zero 2 W RTSP Server
Introduction
While setting up my smart home I was looking into creating a cost effective NVR that would allow for a high degree of privacy and control. The choice of NVR software fell on the excellent Frigate NVR, it integrates well with Home Assistant and supports hardware accelerated object detection via the little AI chip I had lying around.
The other part was having affordable, power-efficient camera hardware. There are many network-attached cameras on the market, but most of them require external services to set up/function and software wise they are black-boxes which raises considerable privacy concerns.
The choice fell on the Raspberry Pi Zero 2 running the default Raspberry Pi OS. The original Raspberry Pi Zero (v1) boards unfortunately are not suitable for streaming video in Full-HD, the CPUs were running at the limit and got too hot started heavily throttling. Fortunately the Raspberry Pi Zero 2 alleviated these issues at a similar price point (once they became available again in 2023/24).
The video to Frigate has to be an RTSP stream, to facilitate this we will be running MediaMTX via docker.
OS Setup
To set up the boot media for the Pi Zero we run Raspberry Pi imager
- Click
Choose device->Raspberry Pi Zero 2 W. - Click
Choose OS->Raspberry Pi OS (other)->Raspberry Pi OS (Legacy, 32 bit) Lite. - Click
Choose Storage-> Select the SD Card. - Click
Next->Edit Settings. - Under
Generalset desired hostname, credentials, etc. - Under
Services->Enable SSH. 7 ClickYesto create the boot media for the Pi Zero.
Now we transfer the Micro-SD card to the Raspberry Pi Zero with a connected camera.
Hardware check
We will do this part locally on the Raspberry Pi, so we need to connect a keyboard and display to it, for the Pi Zero we’ll need two adapters to connect a keyboard and a monitor:
- USB-A -> micro-USB
- HDMI -> micro-HDMI
Boot up the Pi Zero and wait for the initial file system resize to complete.
Once it reboots we can log in as the picam user and do a short test of whether the camera is recognized by the OS:
This should open a window on top of the terminal screen for a few seconds that shows the a camera feed.
Network Setup
We want to set a static IP that will persist on the SD Card in case I want to switch it over to another Raspberry Pi.
For this we edit the dhcp daemon config
Towards the bottom we should see some commented out entries we can use. We just uncomment them and change the ip_address to our desired IP:
If there are any Raspberry Pi configurations we still want to change (e.g. enabling SSH in case we haven’t yet or setting the hostname)
Once we reboot we should be able to SSH into the machine
Upgrade/Install dependencies
We will install docker from the Debian repo after updating the OS packages:
Now we need to add the user to the docker group so it will have the right permissions
RSTP Server setup
With docker set up we can now use it to run MediaMTX as the RTSP server, lets start it up:
Once we verified it runs correctly we can set up the service. Create a script to run it:
with the following content (note, we’re removing -it from the above command for this script, as we don’t run an interactive shell for the service):
then make it executable:
Now we add the service:
with:
Then we start it and activate startup on system start.
take from here
PiHole - Blocklist
This is a good list for office and homelabs
If you need to import them into piHole v6 click HERE
# ==============================================================================
# 1. CORE ALL-IN-ONE & BASE ADS (Essential)
# ==============================================================================
https://raw.githubusercontent.com/StevenBlack/hosts/master/hosts
https://v.firebog.net/hosts/AdguardDNS.txt
https://v.firebog.net/hosts/Easylist.txt
https://adaway.org/hosts.txt
https://pgl.yoyo.org/adservers/serverlist.php?hostformat=hosts&showintro=0&mimetype=plaintext
https://raw.githubusercontent.com/anudeepND/blacklist/master/adservers.txt
https://s3.amazonaws.com/lists.disconnect.me/simple_ad.txt

# ==============================================================================
# 2. MODERN LAB STANDARD (High Quality, Active Maintenance)
# ==============================================================================
# HaGeZi Multi Pro (Standard for tech users/homelabs - replaces dozens of older lists)
https://cdn.jsdelivr.net/gh/hagezi/dns-blocklist@latest/adblock/pro.txt
# OISD Telemetry & Ads (Extremely low false positives)
https://big.oisd.nl/

# ==============================================================================
# 3. PRIVACY & TELEMETRY
# ==============================================================================
https://v.firebog.net/hosts/Easyprivacy.txt
https://v.firebog.net/hosts/Admiral.txt
https://raw.githubusercontent.com/crazy-max/WindowsSpyBlocker/master/data/hosts/spy.txt
https://raw.githubusercontent.com/FadeMind/hosts.extras/master/add.2o7Net/hosts
https://raw.githubusercontent.com/FadeMind/hosts.extras/master/add.Spam/hosts
https://raw.githubusercontent.com/FadeMind/hosts.extras/master/UncheckyAds/hosts

# ==============================================================================
# 4. MALWARE, PHISHING & THREAT INTEL
# ==============================================================================
https://urlhaus.abuse.ch/downloads/hostfile/
https://phishing.army/download/phishing_army_blocklist_extended.txt
https://s3.amazonaws.com/lists.disconnect.me/simple_malvertising.txt
https://v.firebog.net/hosts/Prigent-Crypto.txt
https://v.firebog.net/hosts/Prigent-Ads.txt
https://raw.githubusercontent.com/DandelionSprout/adfilt/master/Alternate%20versions%20Anti-Malware%20List/AntiMalwareHosts.txt
https://raw.githubusercontent.com/Spam404/lists/master/main-blacklist.txt
https://raw.githubusercontent.com/AssoEchap/stalkerware-indicators/master/generated/hosts

# ==============================================================================
# 5. DNS-OVER-HTTPS (DoH) BYPASS PREVENTION
# Prevents devices & browsers from ignoring your Pi-hole via hardcoded DoH
# ==============================================================================
https://raw.githubusercontent.com/oneoffdallas/doh-ipv4/master/doh-domains.txt

# ==============================================================================
# 6. ADULT / CONTENT BLOCKING (Optional - included from your original list)
# ==============================================================================
https://raw.githubusercontent.com/mhhakim/pihole-blocklist/master/porn.txt
Deprecated
https://raw.githubusercontent.com/StevenBlack/hosts/master/hosts
https://raw.githubusercontent.com/PolishFiltersTeam/KADhosts/master/KADhosts.txt
https://raw.githubusercontent.com/FadeMind/hosts.extras/master/add.Spam/hosts
https://v.firebog.net/hosts/static/w3kbl.txt
https://adaway.org/hosts.txt
https://v.firebog.net/hosts/AdguardDNS.txt
https://v.firebog.net/hosts/Admiral.txt
https://raw.githubusercontent.com/anudeepND/blacklist/master/adservers.txt
https://s3.amazonaws.com/lists.disconnect.me/simple_ad.txt
https://v.firebog.net/hosts/Easylist.txt
https://pgl.yoyo.org/adservers/serverlist.php?hostformat=hosts&showintro=0&mimetype=plaintext
https://raw.githubusercontent.com/FadeMind/hosts.extras/master/UncheckyAds/hosts
https://raw.githubusercontent.com/bigdargon/hostsVN/master/hosts
https://v.firebog.net/hosts/Easyprivacy.txt
https://v.firebog.net/hosts/Prigent-Ads.txt
https://raw.githubusercontent.com/FadeMind/hosts.extras/master/add.2o7Net/hosts
https://raw.githubusercontent.com/crazy-max/WindowsSpyBlocker/master/data/hosts/spy.txt
https://hostfiles.frogeye.fr/firstparty-trackers-hosts.txt
https://raw.githubusercontent.com/DandelionSprout/adfilt/master/Alternate%20versions%20Anti-Malware%20List/AntiMalwareHosts.txt
https://s3.amazonaws.com/lists.disconnect.me/simple_malvertising.txt
https://v.firebog.net/hosts/Prigent-Crypto.txt
https://raw.githubusercontent.com/FadeMind/hosts.extras/master/add.Risk/hosts
https://bitbucket.org/ethanr/dns-blacklists/raw/8575c9f96e5b4a1308f2f12394abd86d0927a4a0/bad_lists/Mandiant_APT1_Report_Appendix_D.txt
https://phishing.army/download/phishing_army_blocklist_extended.txt
https://gitlab.com/quidsup/notrack-blocklists/raw/master/notrack-malware.txt
https://v.firebog.net/hosts/RPiList-Malware.txt
https://v.firebog.net/hosts/RPiList-Phishing.txt
https://raw.githubusercontent.com/Spam404/lists/master/main-blacklist.txt
https://raw.githubusercontent.com/AssoEchap/stalkerware-indicators/master/generated/hosts
https://urlhaus.abuse.ch/downloads/hostfile/
https://raw.githubusercontent.com/RPiList/specials/master/Blocklisten/child-protection
https://raw.githubusercontent.com/RPiList/specials/master/Blocklisten/gambling
https://raw.githubusercontent.com/mhhakim/pihole-blocklist/master/porn.txt
https://raw.githubusercontent.com/RPiList/specials/master/Blocklisten/pornblock2
https://raw.githubusercontent.com/RPiList/specials/master/Blocklisten/pornblock3
https://raw.githubusercontent.com/RPiList/specials/master/Blocklisten/pornblock4
https://raw.githubusercontent.com/RPiList/specials/master/Blocklisten/pornblock5
https://raw.githubusercontent.com/RPiList/specials/master/Blocklisten/pornblock6
https://raw.githubusercontent.com/StevenBlack/hosts/master/alternates/porn/hosts
https://raw.githubusercontent.com/RPiList/specials/master/Blocklisten/spam.mails
List
PiHole - Add KeepAlive on two Pi's
Setting up keepalived for dual Pi-holes requires installing the package on both machines, writing a short configuration file on each, and pointing your network/AD DNS forwarder to the shared Virtual IP (VIP).
Prerequisites & Example Values
Check your network interface name using ip a (usually eth0 for wired or wlan0 for Wi-Fi).
-
Pi-hole A (Primary):
192.168.1.10(Interface:eth0) -
Pi-hole B (Secondary):
192.168.1.11(Interface:eth0) -
Shared Virtual IP (VIP):
192.168.1.99(Choose an unused static IP outside your DHCP range)
Step 1: Install keepalived on Both Pi-holes
Run the following commands on both Pi-hole servers:
sudo apt update
sudo apt install -y keepalived
Allow the Linux kernel to bind to non-local IP addresses (needed so Pi-hole can bind to the VIP even when it's not the active master):
echo "net.ipv4.ip_nonlocal_bind=1" | sudo tee -a /etc/sysctl.d/99-keepalived.conf
sudo sysctl --system
Step 2: Configure Pi-hole A (Primary / MASTER)
Create the configuration file on Pi-hole A:
sudo nano /etc/keepalived/keepalived.conf
Paste the following configuration:
vrrp_script check_pihole {
    # Verify Pi-hole DNS service is answering queries locally
    script "dig +short +time=1 +tries=1 @127.0.0.1 google.com > /dev/null 2>&1"
    interval 2
    weight -20
}

vrrp_instance VI_PIHOLE {
    state MASTER
    interface eth0               # Replace with your interface if different (e.g., wlan0)
    virtual_router_id 51         # Must be identical on both Pis (1-255)
    priority 100                 # Higher priority = primary holder of VIP
    advert_int 1

    authentication {
        auth_type PASS
        auth_pass SecretPass123  # Must match on both Pis (max 8 chars)
    }

    virtual_ipaddress {
        192.168.1.99/24          # Your shared VIP
    }

    track_script {
        check_pihole
    }
}
Save and exit (Ctrl+O, Enter, Ctrl+X).
Step 3: Configure Pi-hole B (Secondary / BACKUP)
Create the configuration file on Pi-hole B:
sudo nano /etc/keepalived/keepalived.conf
Paste the following configuration:
vrrp_script check_pihole {
    script "dig +short +time=1 +tries=1 @127.0.0.1 google.com > /dev/null 2>&1"
    interval 2
    weight -20
}

vrrp_instance VI_PIHOLE {
    state BACKUP
    interface eth0               # Replace with your interface if different
    virtual_router_id 51         # Must match Pi-hole A
    priority 90                  # Lower priority than Master
    advert_int 1

    authentication {
        auth_type PASS
        auth_pass SecretPass123  # Must match Pi-hole A
    }

    virtual_ipaddress {
        192.168.1.99/24          # Same shared VIP
    }

    track_script {
        check_pihole
    }
}
Save and exit (Ctrl+O, Enter, Ctrl+X).
Step 4: Start and Enable the Services
Run these commands on both Pi-holes:
sudo systemctl enable keepalived
sudo systemctl restart keepalived
Step 5: Verify Failover Operation
-
Check which Pi holds the VIP: On Pi-hole A, run:
ip a show eth0You should see
inet 192.168.1.99/24listed as a secondary IP on the interface. -
Test Failover:
-
Stop the service on Pi-hole A:
sudo systemctl stop keepalived -
Run
ip a show eth0on Pi-hole B —192.168.1.99will immediately appear on Pi-hole B. -
Start
keepalivedback up on Pi-hole A:sudo systemctl start keepalived -
Pi-hole A will reclaim the VIP because its priority (
100) is higher than Pi-hole B's (90).
-
-
Update Upstream Settings: Set the DNS forwarder address on your Active Directory DNS server, Synology NAS, or pfSense/DHCP scope to point strictly to the Virtual IP (
192.168.1.99).