# NAS

# TrueNAS - Login PS1 Prompt with Warning and Bash Colors

### Change the colors of the shell do the following steps:

#### Step 1:

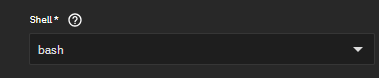
Change the shell on the user in `Credentials/Users` and then Edit the user you are using to log in and change the following.

[![image.png](https://docs.sflservicesllc.com/uploads/images/gallery/2026-03/scaled-1680-/image.png)](https://docs.sflservicesllc.com/uploads/images/gallery/2026-03/image.png)
#### Step 2:

Add the following entries to create the default files for any login

Creating Aliases

```bash
sudo cat > /etc/profile.d/custom-aliases.sh << EOF
# Common interactive aliases for all users

alias rm='rm -i'
alias cp='cp -i'
alias mv='mv -i'
alias vi='vim'
alias tailf='tail -f'
EOF
```

Server Warning

```bash
sudo tee /etc/profile.d/custom-prod-warning.sh > /dev/null << 'EOF'
# /etc/profile.d/custom-prod-warning.sh
# Production warning banner – only for real interactive logins

# 1. Exit immediately if this is not an interactive shell
[[ $- != *i* ]] && return

# 2. Exit if we don't have a real terminal
[[ -t 0 && -t 1 ]] || return

# 3. Exit if SSH is running a forced command (rsync, scp, ansible, etc.)
#    OpenSSH sets SSH_ORIGINAL_COMMAND in these cases
[[ -n "${SSH_ORIGINAL_COMMAND:-}" ]] && return

# --- Safe to show the banner from here ---

RED='\033[1;31m'
YELLOW='\033[1;33m'
NC='\033[0m'

echo
if command -v figlet >/dev/null 2>&1; then
    figlet -f big "PRODUCTION" | while IFS= read -r line; do
        printf '%b%s%b\n' "$RED" "$line" "$NC"
    done
    figlet -f big "SERVER" | while IFS= read -r line; do
        printf '%b%s%b\n' "$RED" "$line" "$NC"
    done
else
    echo -e "${RED}***** PRODUCTION SERVER!! *****${NC}"
fi

echo
echo -e "${YELLOW} *** EXTREME CAUTION REQUIRED ***${NC}"
echo -e "${RED}This is a LIVE PRODUCTION system.${NC}"
echo -e "${RED}Unauthorized access is strictly prohibited.${NC}"
echo -e "${RED}All activity is logged and monitored.${NC}"
echo -e "${YELLOW}Think twice before running commands!${NC}"
echo
EOF
```

Creating Colorful Prompts

```bash
sudo tee /etc/profile.d/custom-prompt-and-colors.sh > /dev/null << 'EOF'
# Custom LS_COLORS and improved multi-line colored prompt

# Vibrant LS_COLORS (directories bold blue on gray, etc.)
LS_COLORS='rs=0:di=01;44:ln=01;36:mh=00:pi=40;33:so=01;35:do=01;35:bd=40;33;01:cd=40;33;01:or=40;31;01:su=37;41:sg=30;43:ca=30;41:tw=30;42:ow=34;42:st=37;44:ex=01;32:*.tar=01;31:*.tgz=01;31:*.arj=01;31:*.taz=01;31:*.lzh=01;31:*.lzma=01;31:*.tlz=01;31:*.txz=01;31:*.zip=01;31:*.z=01;31:*.Z=01;31:*.dz=01;31:*.gz=01;31:*.lz=01;31:*.xz=01;31:*.bz2=01;31:*.bz=01;31:*.tbz=01;31:*.tbz2=01;31:*.tz=01;31:*.deb=01;31:*.rpm=01;31:*.jar=01;31:*.rar=01;31:*.ace=01;31:*.zoo=01;31:*.cpio=01;31:*.7z=01;31:*.rz=01;31:*.jpg=01;35:*.jpeg=01;35:*.gif=01;35:*.bmp=01;35:*.pbm=01;35:*.pgm=01;35:*.ppm=01;35:*.tga=01;35:*.xbm=01;35:*.xpm=01;35:*.tif=01;35:*.tiff=01;35:*.png=01;35:*.svg=01;35:*.svgz=01;35:*.mng=01;35:*.pcx=01;35:*.mov=01;35:*.mpg=01;35:*.mpeg=01;35:*.m2v=01;35:*.mkv=01;35:*.ogm=01;35:*.mp4=01;35:*.m4v=01;35:*.mp4v=01;35:*.vob=01;35:*.qt=01;35:*.nuv=01;35:*.wmv=01;35:*.asf=01;35:*.rm=01;35:*.rmvb=01;35:*.flc=01;35:*.avi=01;35:*.fli=01;35:*.flv=01;35:*.gl=01;35:*.dl=01;35:*.xcf=01;35:*.xwd=01;35:*.yuv=01;35:*.cgm=01;35:*.emf=01;35:*.axv=01;35:*.anx=01;35:*.ogv=01;35:*.ogx=01;35:*.aac=00;36:*.au=00;36:*.flac=00;36:*.mid=00;36:*.midi=00;36:*.mka=00;36:*.mp3=00;36:*.mpc=00;36:*.ogg=00;36:*.ra=00;36:*.wav=00;36:*.axa=00;36:*.oga=00;36:*.spx=00;36:*.xspf=00;36:'
export LS_COLORS

# Build a combined OS_NAME: Debian base + TrueNAS SCALE build
if [ -f /etc/os-release ]; then
    . /etc/os-release
    OS_NAME="${PRETTY_NAME}"
fi
if [ -f /etc/version ]; then
        TRUENAS_VER="TrueNAS SCALE ($(cat /etc/version 2>/dev/null))"
        OS_NAME="${OS_NAME} / ${TRUENAS_VER}"
fi
export OS_NAME


# Only set up the fancy colored prompt in real interactive terminals
if [[ $- == *i* ]] && [[ -t 0 && -t 1 ]] && [[ -z "${SSH_ORIGINAL_COMMAND:-}" ]]; then

    # Color and style variables
    RESET=$(tput sgr0)
    BOLD=$(tput bold)
    BG_GRAY=$(tput setab 8)
    FG_RED=$(tput setaf 1)
    FG_MAGENTA=$(tput setaf 5)
    FG_GREEN=$(tput setaf 2)
    FG_CYAN=$(tput setaf 6)

    # Multi-line prompt – all non-printing sequences wrapped in \[ \]
    PS1="\n"
    PS1+="\[${BOLD}${BG_GRAY}${FG_RED}\]\u"
    PS1+="\[${FG_MAGENTA}\]@"
    PS1+="\[${FG_RED}\]\`hostname\`"
    PS1+="\[${FG_GREEN}\] : \`uname\` : "
    PS1+="\[${FG_CYAN}\]\d \t : \${PLANTID:+\$PLANTID }"
    PS1+="\[${RESET}\]\n"
    PS1+="\[${FG_CYAN}\][\w]"
    PS1+="\[${RESET}${BOLD}\] \\$ \[${RESET}\]"

    export PS1
fi
EOF
```

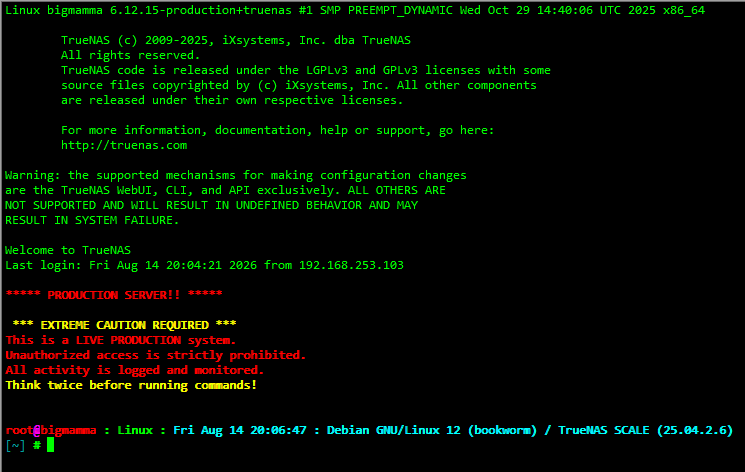
#### Result

[![image.png](https://docs.sflservicesllc.com/uploads/images/gallery/2026-08/scaled-1680-/Lmbimage.png)](https://docs.sflservicesllc.com/uploads/images/gallery/2026-08/Lmbimage.png)
# TrueNAS - SCALE Create a local Backup and Send to S3 Buckets

<span data-copy-service-computed-style="font-family: "Google Sans", Roboto, Arial, sans-serif; font-size: 16px; font-weight: 400; margin: 0px; text-decoration: none; border-bottom: 0px rgb(230, 232, 240);" data-subtree="aimfl">To automate backing up your TrueNAS configuration directly to Amazon S3 or any S3-compatible cloud storage, you need to </span><mark class="HxTRcb" data-complete="true" data-copy-service-computed-style="font-family: "Google Sans", Roboto, Arial, sans-serif; font-size: 16px; font-weight: 500; margin: 0px; text-decoration: none; border-bottom: 0px rgb(230, 232, 240);" data-sfc-inited="2" data-sfc-root="ep" data-ved="2ahUKEwjystbtspSWAxWCHNAFHWOrH1wQuJAPeggIAggBCA8QAQ" data-wiz-uids="CH3AMd_1m">create a **local backup script** and pair it with a **TrueNAS Cloud Sync task**</mark>

TrueNAS automatically saves daily configuration databases locally to your system dataset, but exporting it safely off-site requires grabbing the full archive (with the secret seed) via a middleware command (`midclt`).

#### Step 1: Create a Local Dataset and Script

<div class="n6owBd awi2gc" data-complete="true" data-copy-service-computed-style="font-family: "Google Sans", Roboto, Arial, sans-serif; font-size: 16px; font-weight: 400; margin: 12px 0px 16px; text-decoration: none; border-bottom: 0px rgb(230, 232, 240);" data-hveid="CAIIAQg8EAA" data-processed="true" data-sfc-cp="" data-sfc-root="ep" id="bkmrk-first%2C-create-an-iso" jsaction="" jscontroller="TDBkbc#Ml18Xb" jsuid="CH3AMd_2c">First, create an isolated directory on your storage pool where TrueNAS will output the configuration files before uploading them. [[1](https://www.youtube.com/watch?v=I7oH-QE_TSA)]</div>1. <span class="iNqyIf" data-complete="true" data-copy-service-computed-style="font-family: "Google Sans", Roboto, Arial, sans-serif; font-size: 16px; font-weight: 400; margin: 0px; text-decoration: none; border-bottom: 0px rgb(230, 232, 240);" data-sfc-cp="" data-sfc-root="ep">Navigate to **Storage** &gt; **Datasets** and click **Add Dataset**. Name it something distinct like `system-backups`.</span>
2. <span class="iNqyIf" data-complete="true" data-copy-service-computed-style="font-family: "Google Sans", Roboto, Arial, sans-serif; font-size: 16px; font-weight: 400; margin: 0px; text-decoration: none; border-bottom: 0px rgb(230, 232, 240);" data-sfc-cp="" data-sfc-root="ep">Open a shell or connection to your TrueNAS system. Create a script named `backup_config.sh` inside that dataset folder:</span><div class="r1PmQe" data-complete="true" data-copy-service-computed-style="font-family: "Google Sans", Roboto, Arial, sans-serif; font-size: 16px; font-weight: 400; margin: 4px 0px 0px; text-decoration: none; border-bottom: 0px rgb(230, 232, 240);" data-hveid="CAIIAQg-EAI" data-sfc-cp="" data-sfc-root="ep" data-wiz-uids="CH3AMd_40,CH3AMd_3z" jsaction="" jscontroller="HP6Sjf#lcO7sb" jsuid="CH3AMd_3y"><div data-copy-service-computed-style="font-family: "Google Sans", Roboto, Arial, sans-serif; font-size: 16px; font-weight: 400; margin: 0px; text-decoration: none; border-bottom: 0px rgb(230, 232, 240);"><div class="pHpOfb" data-animation-atomic="" data-copy-service-computed-style="font-family: "Google Sans", Roboto, Arial, sans-serif; font-size: 16px; font-weight: 400; margin: 0px; text-decoration: none; border-bottom: 1px solid rgb(44, 46, 53);"><div class="z0e9Qd" data-copy-service-computed-style="font-family: "Google Sans", Roboto, Arial, sans-serif; font-size: 16px; font-weight: 400; margin: 0px; text-decoration: none; border-bottom: 0px rgb(230, 232, 240);"><div class="vVRw1d" data-copy-service-computed-style="font-family: "Google Sans", Roboto, Arial, sans-serif; font-size: 20px; font-weight: 500; margin: 0px; text-decoration: none; border-bottom: 0px rgb(230, 232, 240);">bash</div></div><div class="pCTyYe" data-copy-service-computed-style="font-family: "Google Sans", Roboto, Arial, sans-serif; font-size: 14px; font-weight: 400; margin: 0px; text-decoration: none; border-bottom: 0px rgb(230, 232, 240);" dir="ltr"></div></div></div></div>```bash
    nano /mnt/YOUR_POOL/system-backups/backup_config.sh
    ```
3. <span class="iNqyIf" data-complete="true" data-copy-service-computed-style="font-family: "Google Sans", Roboto, Arial, sans-serif; font-size: 16px; font-weight: 400; margin: 0px; text-decoration: none; border-bottom: 0px rgb(230, 232, 240);" data-sfc-cp="" data-sfc-root="ep">Paste the following script, which requests the configuration archive from the TrueNAS API engine (`midclt`), saves it with a timestamp, and purges backups older than 30 days to avoid clutter:</span><div class="r1PmQe" data-complete="true" data-copy-service-computed-style="font-family: "Google Sans", Roboto, Arial, sans-serif; font-size: 16px; font-weight: 400; margin: 4px 0px 0px; text-decoration: none; border-bottom: 0px rgb(230, 232, 240);" data-hveid="CAIIAQg-EAY" data-sfc-cp="" data-sfc-root="ep" data-wiz-uids="CH3AMd_4a,CH3AMd_49" jsaction="" jscontroller="HP6Sjf#lcO7sb" jsuid="CH3AMd_48"><div data-copy-service-computed-style="font-family: "Google Sans", Roboto, Arial, sans-serif; font-size: 16px; font-weight: 400; margin: 0px; text-decoration: none; border-bottom: 0px rgb(230, 232, 240);"><div class="pHpOfb" data-animation-atomic="" data-copy-service-computed-style="font-family: "Google Sans", Roboto, Arial, sans-serif; font-size: 16px; font-weight: 400; margin: 0px; text-decoration: none; border-bottom: 1px solid rgb(44, 46, 53);"><div class="z0e9Qd" data-copy-service-computed-style="font-family: "Google Sans", Roboto, Arial, sans-serif; font-size: 16px; font-weight: 400; margin: 0px; text-decoration: none; border-bottom: 0px rgb(230, 232, 240);"><div class="vVRw1d" data-copy-service-computed-style="font-family: "Google Sans", Roboto, Arial, sans-serif; font-size: 20px; font-weight: 500; margin: 0px; text-decoration: none; border-bottom: 0px rgb(230, 232, 240);">bash</div></div><div class="pCTyYe" data-copy-service-computed-style="font-family: "Google Sans", Roboto, Arial, sans-serif; font-size: 14px; font-weight: 400; margin: 0px; text-decoration: none; border-bottom: 0px rgb(230, 232, 240);" dir="ltr"></div></div></div></div>```bash
    #!/bin/bash
    BACKUP_DIR="/mnt/volume1/system-backups"
    DATE=$(date +%Y%m%d-%H%M%S)
    FILENAME="truenas-config-${DATE}.tar"
    
    # 1. Request the configuration download job from the SCALE API
    JOB_DATA=$(midclt call core.download "config.save" '[{"secretseed": true}]' "${FILENAME}")
    
    # 2. Extract the download path cleanly using jq (returns: /_download/JOB_ID?auth_token=TOKEN)
    DOWNLOAD_PATH=$(echo "$JOB_DATA" | jq -r '.[1]')
    
    # 3. Pull the actual file directly using the exact path provided by the API
    curl -s -k --output "${BACKUP_DIR}/${FILENAME}" "http://127.0.0.1${DOWNLOAD_PATH}"
    
    # 4. Delete backups older than 30 days
    find "${BACKUP_DIR}" -name "truenas-config-*.tar" -type f -mtime +30 -delete
    
    ```
4. <span class="iNqyIf" data-complete="true" data-copy-service-computed-style="font-family: "Google Sans", Roboto, Arial, sans-serif; font-size: 16px; font-weight: 400; margin: 0px; text-decoration: none; border-bottom: 0px rgb(230, 232, 240);" data-sfc-cp="" data-sfc-root="ep">Make the script executable:</span><div class="r1PmQe" data-complete="true" data-copy-service-computed-style="font-family: "Google Sans", Roboto, Arial, sans-serif; font-size: 16px; font-weight: 400; margin: 4px 0px 0px; text-decoration: none; border-bottom: 0px rgb(230, 232, 240);" data-hveid="CAIIAQg-EAo" data-sfc-cp="" data-sfc-root="ep" data-wiz-uids="CH3AMd_4j,CH3AMd_4i" jsaction="" jscontroller="HP6Sjf#lcO7sb" jsuid="CH3AMd_4h"><div data-copy-service-computed-style="font-family: "Google Sans", Roboto, Arial, sans-serif; font-size: 16px; font-weight: 400; margin: 0px; text-decoration: none; border-bottom: 0px rgb(230, 232, 240);"><div class="pHpOfb" data-animation-atomic="" data-copy-service-computed-style="font-family: "Google Sans", Roboto, Arial, sans-serif; font-size: 16px; font-weight: 400; margin: 0px; text-decoration: none; border-bottom: 1px solid rgb(44, 46, 53);"><div class="z0e9Qd" data-copy-service-computed-style="font-family: "Google Sans", Roboto, Arial, sans-serif; font-size: 16px; font-weight: 400; margin: 0px; text-decoration: none; border-bottom: 0px rgb(230, 232, 240);"><div class="vVRw1d" data-copy-service-computed-style="font-family: "Google Sans", Roboto, Arial, sans-serif; font-size: 20px; font-weight: 500; margin: 0px; text-decoration: none; border-bottom: 0px rgb(230, 232, 240);">bash</div></div><div class="pCTyYe" data-copy-service-computed-style="font-family: "Google Sans", Roboto, Arial, sans-serif; font-size: 14px; font-weight: 400; margin: 0px; text-decoration: none; border-bottom: 0px rgb(230, 232, 240);" dir="ltr"></div></div></div></div>```
    chmod +x /mnt/YOUR_POOL/system-backups/backup_config.sh
    ```

#### Step 2: Automate the Script via Cron Job

<div class="n6owBd awi2gc" data-complete="true" data-copy-service-computed-style="font-family: "Google Sans", Roboto, Arial, sans-serif; font-size: 16px; font-weight: 400; margin: 12px 0px 16px; text-decoration: none; border-bottom: 0px rgb(230, 232, 240);" data-hveid="CAIIAQhAEAA" data-processed="true" data-sfc-cp="" data-sfc-root="ep" id="bkmrk-schedule-truenas-to-" jsaction="" jscontroller="TDBkbc#Ml18Xb" jsuid="CH3AMd_51">Schedule TrueNAS to execute this script automatically every day before sending the files offsite.</div>1. <span class="iNqyIf" data-complete="true" data-copy-service-computed-style="font-family: "Google Sans", Roboto, Arial, sans-serif; font-size: 16px; font-weight: 400; margin: 0px; text-decoration: none; border-bottom: 0px rgb(230, 232, 240);" data-sfc-cp="" data-sfc-root="ep">Navigate to **System** &gt; **Advanced Settings** &gt;**Cron Jobs** and click **Add**.</span>
2. <span class="iNqyIf" data-complete="true" data-copy-service-computed-style="font-family: "Google Sans", Roboto, Arial, sans-serif; font-size: 16px; font-weight: 400; margin: 0px; text-decoration: none; border-bottom: 0px rgb(230, 232, 240);" data-sfc-cp="" data-sfc-root="ep">**Description**: `Generate Daily Config Backup Archive`</span>
3. <span class="iNqyIf" data-complete="true" data-copy-service-computed-style="font-family: "Google Sans", Roboto, Arial, sans-serif; font-size: 16px; font-weight: 400; margin: 0px; text-decoration: none; border-bottom: 0px rgb(230, 232, 240);" data-sfc-cp="" data-sfc-root="ep">**Command**: `/mnt/YOUR_POOL/system-backups/backup_config.sh`</span>
4. <span class="iNqyIf" data-complete="true" data-copy-service-computed-style="font-family: "Google Sans", Roboto, Arial, sans-serif; font-size: 16px; font-weight: 400; margin: 0px; text-decoration: none; border-bottom: 0px rgb(230, 232, 240);" data-sfc-cp="" data-sfc-root="ep">**Run As User**: `root`</span>
5. <span class="iNqyIf" data-complete="true" data-copy-service-computed-style="font-family: "Google Sans", Roboto, Arial, sans-serif; font-size: 16px; font-weight: 400; margin: 0px; text-decoration: none; border-bottom: 0px rgb(230, 232, 240);" data-sfc-cp="" data-sfc-root="ep">**Schedule**: Set it to run daily (e.g., Every day at `02:00` AM).</span>
6. <span class="iNqyIf" data-complete="true" data-copy-service-computed-style="font-family: "Google Sans", Roboto, Arial, sans-serif; font-size: 16px; font-weight: 400; margin: 0px; text-decoration: none; border-bottom: 0px rgb(230, 232, 240);" data-sfc-cp="" data-sfc-root="ep">Click **Save**.</span>

#### Step 3: Link Your S3 Bucket Credentials

<div class="n6owBd awi2gc" data-complete="true" data-copy-service-computed-style="font-family: "Google Sans", Roboto, Arial, sans-serif; font-size: 16px; font-weight: 400; margin: 12px 0px 16px; text-decoration: none; border-bottom: 0px rgb(230, 232, 240);" data-hveid="CAIIAQhDEAA" data-processed="true" data-sfc-cp="" data-sfc-root="ep" id="bkmrk-now%2C-prepare-truenas" jsaction="" jscontroller="TDBkbc#Ml18Xb" jsuid="CH3AMd_65">Now, prepare TrueNAS to communicate securely with your S3 bucket. [[1](https://www.truenas.com/docs/scale/23.10/gettingstarted/configure/setupbackupscale/)]</div>1. <span class="iNqyIf" data-complete="true" data-copy-service-computed-style="font-family: "Google Sans", Roboto, Arial, sans-serif; font-size: 16px; font-weight: 400; margin: 0px; text-decoration: none; border-bottom: 0px rgb(230, 232, 240);" data-sfc-cp="" data-sfc-root="ep">Go to **Credentials** &gt; **Backup Credentials** &gt; **Cloud Credentials** and click **Add**.</span>
2. <span class="iNqyIf" data-complete="true" data-copy-service-computed-style="font-family: "Google Sans", Roboto, Arial, sans-serif; font-size: 16px; font-weight: 400; margin: 0px; text-decoration: none; border-bottom: 0px rgb(230, 232, 240);" data-sfc-cp="" data-sfc-root="ep">Name the credential (e.g., `AWS-S3-Backup`).</span>
3. <span class="iNqyIf" data-complete="true" data-copy-service-computed-style="font-family: "Google Sans", Roboto, Arial, sans-serif; font-size: 16px; font-weight: 400; margin: 0px; text-decoration: none; border-bottom: 0px rgb(230, 232, 240);" data-sfc-cp="" data-sfc-root="ep">Under **Provider**, select **Amazon S3** (or generic S3 if using Wasabi, Backblaze B2, or MinIO).</span>
4. <span class="iNqyIf" data-complete="true" data-copy-service-computed-style="font-family: "Google Sans", Roboto, Arial, sans-serif; font-size: 16px; font-weight: 400; margin: 0px; text-decoration: none; border-bottom: 0px rgb(230, 232, 240);" data-sfc-cp="" data-sfc-root="ep">Paste your cloud account's **Access Key ID** and **Secret Access Key**.</span>
5. <span aria-owns="action-menu-parent-container" class="iNqyIf" data-complete="true" data-copy-service-computed-style="font-family: "Google Sans", Roboto, Arial, sans-serif; font-size: 16px; font-weight: 400; margin: 0px; text-decoration: none; border-bottom: 0px rgb(230, 232, 240);" data-sfc-cp="" data-sfc-root="ep">Click **Verify** to confirm the handshake with AWS is successful, then click **Save**</span>

#### Step 4: Configure the Offsite S3 Cloud Sync Task

<div class="n6owBd awi2gc" data-complete="true" data-copy-service-computed-style="font-family: "Google Sans", Roboto, Arial, sans-serif; font-size: 16px; font-weight: 400; margin: 12px 0px 16px; text-decoration: none; border-bottom: 0px rgb(230, 232, 240);" data-hveid="CAIIAQhGEAA" data-processed="true" data-sfc-cp="" data-sfc-root="ep" id="bkmrk-the-final-step-uses-" jsaction="" jscontroller="TDBkbc#Ml18Xb" jsuid="CH3AMd_7d">The final step uses TrueNAS's built-in replication tools to synchronize your backup folder to the cloud. [[1](https://www.youtube.com/watch?v=wwt9dDhsgJw)]</div>1. <span class="iNqyIf" data-complete="true" data-copy-service-computed-style="font-family: "Google Sans", Roboto, Arial, sans-serif; font-size: 16px; font-weight: 400; margin: 0px; text-decoration: none; border-bottom: 0px rgb(230, 232, 240);" data-sfc-cp="" data-sfc-root="ep">Navigate to **Data Protection** &gt; **Cloud Sync Tasks** and click **Add**.</span>
2. <span class="iNqyIf" data-complete="true" data-copy-service-computed-style="font-family: "Google Sans", Roboto, Arial, sans-serif; font-size: 16px; font-weight: 400; margin: 0px; text-decoration: none; border-bottom: 0px rgb(230, 232, 240);" data-sfc-cp="" data-sfc-root="ep">**Description**: `Sync Config Backups to S3`</span>
3. <span class="iNqyIf" data-complete="true" data-copy-service-computed-style="font-family: "Google Sans", Roboto, Arial, sans-serif; font-size: 16px; font-weight: 400; margin: 0px; text-decoration: none; border-bottom: 0px rgb(230, 232, 240);" data-sfc-cp="" data-sfc-root="ep">**Direction**: Select **PUSH** (this uploads data *to* the cloud).</span>
4. <span class="iNqyIf" data-complete="true" data-copy-service-computed-style="font-family: "Google Sans", Roboto, Arial, sans-serif; font-size: 16px; font-weight: 400; margin: 0px; text-decoration: none; border-bottom: 0px rgb(230, 232, 240);" data-sfc-cp="" data-sfc-root="ep">**Transfer Mode**: Select **SYNC** (mirrors your local folder; automatically handles remote file deletion when files age out locally).</span>
5. <span class="iNqyIf" data-complete="true" data-copy-service-computed-style="font-family: "Google Sans", Roboto, Arial, sans-serif; font-size: 16px; font-weight: 400; margin: 0px; text-decoration: none; border-bottom: 0px rgb(230, 232, 240);" data-sfc-cp="" data-sfc-root="ep">**Directory/Files**: Choose your local path: `/mnt/YOUR_POOL/system-backups`.</span>
6. <span class="iNqyIf" data-complete="true" data-copy-service-computed-style="font-family: "Google Sans", Roboto, Arial, sans-serif; font-size: 16px; font-weight: 400; margin: 0px; text-decoration: none; border-bottom: 0px rgb(230, 232, 240);" data-sfc-cp="" data-sfc-root="ep">**Credential**: Select the `AWS-S3-Backup` credential you created in Step 3.</span>
7. <span class="iNqyIf" data-complete="true" data-copy-service-computed-style="font-family: "Google Sans", Roboto, Arial, sans-serif; font-size: 16px; font-weight: 400; margin: 0px; text-decoration: none; border-bottom: 0px rgb(230, 232, 240);" data-sfc-cp="" data-sfc-root="ep">**Bucket**: Select your designated target S3 bucket from the auto-populated drop-down menu.</span>
8. <span class="iNqyIf" data-complete="true" data-copy-service-computed-style="font-family: "Google Sans", Roboto, Arial, sans-serif; font-size: 16px; font-weight: 400; margin: 0px; text-decoration: none; border-bottom: 0px rgb(230, 232, 240);" data-sfc-cp="" data-sfc-root="ep">**Schedule**: Set this to run daily, at least one hour *after* the local Cron Job (e.g., Every day at `03:00` AM).</span>
9. <span aria-owns="action-menu-parent-container" class="iNqyIf" data-complete="true" data-copy-service-computed-style="font-family: "Google Sans", Roboto, Arial, sans-serif; font-size: 16px; font-weight: 400; margin: 0px; text-decoration: none; border-bottom: 0px rgb(230, 232, 240);" data-sfc-cp="" data-sfc-root="ep">Click **Save**.</span>

<div aria-level="3" class="otQkpb" data-animation-nesting="" data-complete="true" data-copy-service-computed-style="font-family: "Google Sans", Roboto, Arial, sans-serif; font-size: 20px; font-weight: 600; margin: 24px 0px 12px; text-decoration: none; border-bottom: 0px rgb(230, 232, 240);" data-processed="true" data-sfc-cp="" data-sfc-root="ep" id="bkmrk-%F0%9F%92%A1-pro-tip%3A-s3-bucket" jsaction="" jscontroller="a7qCn#ZxCkTb" jsuid="CH3AMd_dv" role="heading">💡 Pro-Tip: S3 Bucket Security</div><div aria-owns="action-menu-parent-container" class="n6owBd awi2gc" data-complete="true" data-copy-service-computed-style="font-family: "Google Sans", Roboto, Arial, sans-serif; font-size: 16px; font-weight: 400; margin: 12px 0px 16px; text-decoration: none; border-bottom: 0px rgb(230, 232, 240);" data-hveid="CAIIAQhJEAA" data-processed="true" data-sfc-cp="" data-sfc-root="ep" id="bkmrk-because-truenas-conf" jsaction="" jscontroller="TDBkbc#Ml18Xb" jsuid="CH3AMd_dw">Because TrueNAS configuration files contain your system's password hashes, API tokens, and private networking configurations, it is highly recommended to enable **Server-Side Encryption (SSE-S3)** and **Bucket Versioning** directly inside your AWS S3 Console. This adds a layer of defense against accidental deletion or ransomware targeting your NAS shares.</div>