# Microsoft
# Windows - Update additional resources
Try resetting the Windows Update Agent by running these commands from an elevated command prompt:
```
net stop wuauserv
rd /s /q %systemroot%\SoftwareDistribution
net start wuauserv
```
## Reset Windows Update components manually
1. Open a Windows command prompt. To open a command prompt, select **Start** > **Run**. Copy and paste (or type) *cmd* and then press Enter.
2. Stop the BITS service, the Windows Update service and the Cryptographic service. Type the following commands at a command prompt. Press Enter after you type each command.
ConsoleCopy
```
net stop bits
net stop wuauserv
net stop cryptsvc
```
3. Delete the *qmgr\*.dat* files. Type the following command at a command prompt, and then press Enter:
ConsoleCopy
```
Del "%ALLUSERSPROFILE%\Application Data\Microsoft\Network\Downloader\qmgr*.dat"
```
4. If it is your first attempt at resolving your Windows Update issues by using the steps in this article, go to step 5 without carrying out the steps in step 4. The steps in step 4 should only be performed at this point in the troubleshooting if you can't resolve your Windows Update issues after following all steps but step 4. The steps in step 4 are also performed by the "Aggressive" mode of the Fix it Solution above.
1. Rename the following folders to \*.BAK:
- *%Systemroot%\\SoftwareDistribution\\DataStore*
- *%Systemroot%\\SoftwareDistribution\\Download*
- *%Systemroot%\\System32\\catroot2*
To do this, type the following commands at a command prompt. Press Enter after you type each command.
ConsoleCopy
```
Ren %Systemroot%\SoftwareDistribution\DataStore DataStore.bak
Ren %Systemroot%\SoftwareDistribution\Download Download.bak
Ren %Systemroot%\System32\catroot2 catroot2.bak
```
Important
The reset step below using *sc.exe* will overwrite your existing security ACLs on the BITS and Windows Update service and set them to default. Skip this step unless the other steps to reset Windows Update components have not resolved the issue.
2. Reset the BITS service and the Windows Update service to the default security descriptor. To do this, type the following commands at a command prompt. Press Enter after you type each command.
ConsoleCopy
```
sc.exe sdset bits D:(A;CI;CCDCLCSWRPWPDTLOCRSDRCWDWO;;;SY)(A;;CCDCLCSWRPWPDTLOCRSDRCWDWO;;;BA)(A;;CCLCSWLOCRRC;;;IU)(A;;CCLCSWLOCRRC;;;SU)
sc.exe sdset wuauserv D:(A;;CCLCSWRPLORC;;;AU)(A;;CCDCLCSWRPWPDTLOCRSDRCWDWO;;;BA)(A;;CCDCLCSWRPWPDTLOCRSDRCWDWO;;;SY)
```
5. Type the following command at a command prompt, and then press Enter:
ConsoleCopy
```
cd /d %windir%\system32
```
6. Reregister the BITS files and the Windows Update files. To do this, type the following commands at a command prompt. Press Enter after you type each command.
ConsoleCopy
```
regsvr32.exe atl.dll
regsvr32.exe urlmon.dll
regsvr32.exe mshtml.dll
regsvr32.exe shdocvw.dll
regsvr32.exe browseui.dll
regsvr32.exe jscript.dll
regsvr32.exe vbscript.dll
regsvr32.exe scrrun.dll
regsvr32.exe msxml.dll
regsvr32.exe msxml3.dll
regsvr32.exe msxml6.dll
regsvr32.exe actxprxy.dll
regsvr32.exe softpub.dll
regsvr32.exe wintrust.dll
regsvr32.exe dssenh.dll
regsvr32.exe rsaenh.dll
regsvr32.exe gpkcsp.dll
regsvr32.exe sccbase.dll
regsvr32.exe slbcsp.dll
regsvr32.exe cryptdlg.dll
regsvr32.exe oleaut32.dll
regsvr32.exe ole32.dll
regsvr32.exe shell32.dll
regsvr32.exe initpki.dll
regsvr32.exe wuapi.dll
regsvr32.exe wuaueng.dll
regsvr32.exe wuaueng1.dll
regsvr32.exe wucltui.dll
regsvr32.exe wups.dll
regsvr32.exe wups2.dll
regsvr32.exe wuweb.dll
regsvr32.exe qmgr.dll
regsvr32.exe qmgrprxy.dll
regsvr32.exe wucltux.dll
regsvr32.exe muweb.dll
regsvr32.exe wuwebv.dll
```
7. Reset Winsock. Type the following command at a command prompt, and then press Enter:
ConsoleCopy
```
netsh winsock reset
```
8. If you're running Windows XP or Windows Server 2003, you have to set the proxy settings. Type the following command at a command prompt, and then press Enter:
ConsoleCopy
```
proxycfg.exe -d
```
9. Restart the BITS service, the Windows Update service and the Cryptographic service. Type the following commands at a command prompt. Press Enter after you type each command.
ConsoleCopy
```
net start bits
net start wuauserv
net start cryptsvc
```
10. If you're running Windows Vista or Windows Server 2008, clear the BITS queue. Type the following command at a command prompt, and then press Enter:
ConsoleCopy
```
bitsadmin.exe /reset /allusers
```
# Windows - How to delete the Recovery Partition
Unfortunately when there is no room on the disk to convert the drive from basic to dynamic.
Microsoft documents the problem, and notes the solution is to delete the last partition on the disk:
> [Not Enough Space Available to Upgrade to a Dynamic Disk](https://support.microsoft.com/en-us/kb/197738)
>
> RESOLUTION
>
> Start Disk Manager, right-click the last partition, and then click Delete Partition.
[](https://docs.sflservicesllc.com/uploads/images/gallery/2024-08/qRHimage.png)
It's important to note that, the recovery partition was created when Windows Retail or OEM was cleanly installed.
### Microsoft says you can use the **Create Recovery Drive** to delete a recovery partition
From [Create a USB recovery drive](http://windows.microsoft.com/en-us/windows-8/create-usb-recovery-drive), which is used to create a USB recovery drive, there is supposed to be an option at the end of the wizard to delete the recovery partition on the hard drive:
> When the process is done, do one of the following:
>
> If you want to keep the recovery partition on your PC, tap or click **Finish**.
>
> If you want to remove the recovery partition from your PC and free up disk space, tap or click **Delete the recovery partition**. Then tap or click **Delete**. This will free up the disk space used to store your recovery image. When the removal is done, tap or click **Finish**.
>
> **Note**
>
> Some PCs don't offer the option to remove a recovery partition. If you experience this, there isn't a recovery partition on your PC that's using additional disc space.
When you complete the wizard, there isn't offered the option to remove a recovery partition:
Which apparently means that my machine doesn't have a **Recovery Partition**, yet i refer you to
[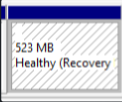](https://docs.sflservicesllc.com/uploads/images/gallery/2024-08/nMIimage.png)
### Disk Management Tool
[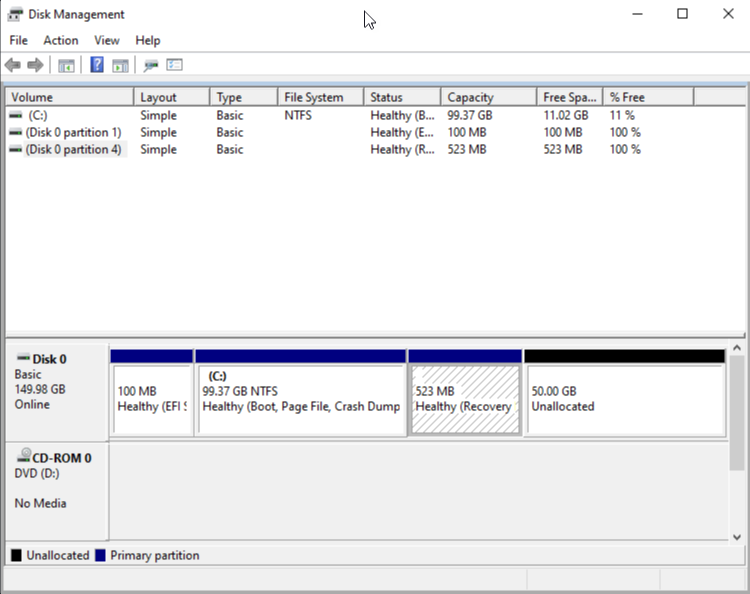](https://docs.sflservicesllc.com/uploads/images/gallery/2024-08/Mn2image.png)
As you can see the partition number is 4 in this case, which is the one we want to remove to be able to expand the drive.
### DiskPart
Using DiskPart from an elevated command prompt
```
>diskpart
DISKPART> select disk 0
DISKPART> list partition
DISKPART> select partition 4
DISKPART> delete partition override
DiskPart successfully deleted the selected partition.
```
# Windows - Set Logon Server
**How To change Logon server Name through Command Line:**
echo %logonserver%
set logonserver=\\\\server1
set logonserver
open Command Prompt
\*\*\*\*\*\*\*\*\*\*\*\*\*\*\*\*\*\*\*\*\*\*\*\*\*\*\*\*\*\*\*\*\*\*\*\*\*\*\*\*\*\*\*\*\*\*\*\*\*\*\*\*\*\*\*
Microsoft Windows \[Version 10.0.14393\]
(c) 2016 Microsoft Corporation. All rights reserved.
C:\\Users\\user>echo %logonserver%
\\\\ServerName1
C:\\Users\\user>set logonserver
LOGONSERVER=\\\\ServerName1
C:\\Users\\user>set logonserver=\\\\ServerName2
C:\\Users\\user>set logonserver
LOGONSERVER=\\\\ServerName2
C:\\Users\\user> echo %logonserver%
\\\\ServerName2
It is likely that DC2 is running your PDC Emulator role, which is why those messages are appearing on DC1.
Basically, what's happened is that the domain has reached a time period where it is no longer feasible to reconcile/merge all the USN (Update Sequence Numbers - i.e. they denote the versioning/changes on all of your AD objects) with the other DC, because it has been unavailable for replication for so long.
Here's the first few steps on TechNet:
[Technet: Forcing the Removal of a Domain Controller](https://technet.microsoft.com/en-us/library/cc794860%28v=ws.10%29.aspx)
To complete this task, perform the following procedures:
1. [Identify Replication Partners ](https://technet.microsoft.com/en-us/library/cc816761%28v=ws.10%29.aspx). Use this procedure to identify a domain controller that is a replication partner of the domain controller that you are removing. Identify a replication partner in the same site, if possible. You will connect to this domain controller when you clean up server metadata.
2. [Force Domain Controller Removal ](https://technet.microsoft.com/en-us/library/cc816826%28v=ws.10%29.aspx)
3. [Clean Up Server Metadata](https://technet.microsoft.com/en-us/library/cc816907%28v=ws.10%29.aspx)
Then, you'll need to seize FSMO roles:
[Petri: Seizing FSMO Roles ](https://www.petri.com/seizing_fsmo_roles)
After that, you can try to re-promote that DC.
Ensure that on DC1:
- Primary DNS IP on NIC is pointing to DC2
- Secondary DNS IP on NIC is pointing to 127.0.0.1
Ensure that on DC2:
- Primary DNS IP on NIC is pointing to DC1
- Secondary DNS IP on NIC is pointing to 127.0.0.1
Any new objects (computer/user accounts) that appear on DC1 and not DC2 will need to be recreated once you've got your replication back in order (or you could recreate them on DC2...either way, they'll need to be recreated). Honestly, I would export a list of user and computer objects from your DC1 that were created after the date of last replication and then go from there. There are various scripts out there that can do this.
# Windows - How To Fix DFS Replication Event 4012 on Domain Controller
### 1. Verifying Server Promotion Status
The first crucial step in resolving DFS replication Event ID 4012 is to verify the server’s promotion status. Any discrepancies in the promotion process can lead to issues with DFSR. Administrators can use tools like Active Directory Users and Computers (ADUC) or PowerShell commands to ensure that the server has been successfully promoted to a domain controller.
### 2. Adjusting MaxOfflineTimeInDays
An easy fix for Event ID 4012 involves adjusting the **MaxOfflineTimeInDays** parameter. This parameter determines the maximum duration a server can remain offline before triggering the error. If the server was offline for an extended period, increasing this threshold can resolve the issue.
#### Using WMIC Commands for MaxOfflineTimeInDays
To check the current MaxOfflineTimeInDays value, administrators can use the following command:
```shell
wmic.exe /namespace:\\root\microsoftdfs path dfsrMachineConfig get MaxOfflineTimeinDays
```
To increase the MaxOfflineTimeInDays value, use the following command, setting it to a value higher than the time the server was offline:
```shell
wmic.exe /namespace:\\root\microsoftdfs path dfsrMachineConfig set MaxOfflineTimeinDays=100
```
These commands provide a quick and efficient way to address the time constraint set by MaxOfflineTimeInDays, ensuring that the DFS Replication service can resume without encountering the 4012 error.
### 3. Initiating DFS Replication Partnerships
Starting DFS Replication Partnerships involves establishing connections to enable the synchronized replication of data between servers. One method to achieve this is by manually running DFS replication using the repadmin /syncall /AeD command or initiate it through the Active Directory Sites and Services console.
The [repadmin cmd](https://learn.microsoft.com/en-us/previous-versions/windows/it-pro/windows-server-2012-r2-and-2012/cc770963(v=ws.11)) provides a direct and efficient way to trigger synchronization across all domain controllers, aiding in the resolution of replication interruptions and maintaining consistent data distribution.
### 4. Set MaxOfflineTimeInDays Back to Default 60 Days
Once the replication is complete set MaxOfflineTimeInDays value back to default 60 Days
```shell
wmic.exe /namespace:\\root\microsoftdfs path dfsrMachineConfig set MaxOfflineTimeinDays=60
```
# Windows - Delete user Graph
[https://www.alitajran.com/remove-on-premises-directory-synchronization-service-account/](https://www.alitajran.com/remove-on-premises-directory-synchronization-service-account/)
Install-Module Microsoft.Graph -Force -Confirm:$false
Install-Module Microsoft.Graph.Beta -AllowClobber -Force -Confirm:$false
Connect-MgGraph -Scopes "User.ReadWrite.All"
Remove-MgUser -UserId "[Sync\_DC01-2019\_d5d79537b1b8@exoip365.onmicrosoft.com](mailto:Sync_DC01-2019_d5d79537b1b8@exoip365.onmicrosoft.com)"
Get-MgUser -UserId "[Sync\_DC01-2019\_d5d79537b1b8@exoip365.onmicrosoft.com](mailto:Sync_DC01-2019_d5d79537b1b8@exoip365.onmicrosoft.com)"
# Windows - How To Fix DISM Source Files Could Not Be Found In Win10
[https://sflservicesllc.atlassian.net/wiki/pages/createpage.action?spaceKey=Wiki&title=Windows%20Update%20-%20additional%20resources](https://sflservicesllc.atlassian.net/wiki/pages/createpage.action?spaceKey=Wiki&title=Windows%20Update%20-%20additional%20resources)
[https://www.minitool.com/news/fix-dism-source-files-could-not-be-found-win10.html](https://www.minitool.com/news/fix-dism-source-files-could-not-be-found-win10.html)
The DISM command “DISM / Online / Cleanup-Image / Restore Health” can be performed successfully in normal cases to repair your Windows System Image. However, some users said their DISM failed and they receive the DISM source files could not be found error message. What’s the problem with that? How to fix the issue yourself?
What is DISM?
DISM refers to DISM.exe, which is a command-line tool that can be used to service and prepare Windows images (.wim) or virtual hard disks (.vhd or .vhdx). DISM is built into all versions of Windows and you can access it from the command line or Windows PowerShell. See what you can do if [DISM /Online /Cleanup-image /Restorehealth is stuck](https://www.minitool.com/data-recovery/fix-dism-online-cleanup-image-restorehealth-stuck.html).
## DISM Source Files Could Not be Found Error
“DISM /Online /Cleanup-Image /RestoreHealth” is one of the frequently used commands to repair a Windows image. You can perform this command in Command Prompt tool easily, but people don’t always succeed. The **DISM source files could not be found** error will show up when DISM failed. It means that the DISM tool on your PC cannot find the source files needed to restore the Windows image.
[How to fix “DISM failed. No operation was performed”?](https://www.minitool.com/data-recovery/dism-failed-errors-windows.html)
The [DISM restore health](https://www.minitool.com/news/use-dism-restorehealth-command-windows.html) process could be interrupted in Windows 10 or other Windows systems. But I’ll take the failure of DISM Online Cleanup Image RestoreHealth Windows 10 as an example to show you how to fix the problem in different ways.
### Causes of “The Source Files Could Not Be Found”
The source files could not be found error message may come with an error code like 0x800f081f or 0x800f0906 or 0x800f0907. There are 4 main reasons for causing it:
- The DISM tool cannot find the files you need to repair online (in Windows Update or WSUS).
- The Windows image file (install.wim) specified as the repair source is not correct.
- The install.wim or install.esd file used as the repair source contains several install.wim files.
- The Windows.ISO file used as the repair source may be damaged or incorrect (it cannot match the version, edition, and architecture 32 or 64 bit of your installed Windows).
## Fix DISM Source Files Could Not Be Found Windows 10
What to do when encountering Windows 10 DISM source files could not be found? Please follow the fixes below.
### \#1. Use Windows Repair Upgrade
**Step 1: download Windows Repair Upgrade tool.**
1. [Visit this Microsoft page](https://www.microsoft.com/en-us/software-download/windows10).
2. Click on the **Download tool now** button to get Windows Media Creation tool.
3. Run the installer. Then, accept the license terms and conditions.
4. Click **Upgrade this PC now**.
5. Click **Next**.
6. Wait for the actions to end.
**Step 2: start the Windows repair process on your PC.**
1. Press **Windows + S**.
2. Type **cmd**.
3. Right click on **Command Prompt**.
4. Select **Run as administrator**.
5. Type **DISM /Online /Cleanup-Image /StartComponentCleanup** and press **Enter**.
6. Type **DISM /Online /Cleanup-Image /RestoreHealth** and press **Enter**.
7. Type **sfc /scannow** and press **Enter**.
[https://www.minitool.com/data-recovery/recover-files-using-cmd-001.html](https://www.minitool.com/data-recovery/recover-files-using-cmd-001.html)
### \#2. Clean & Analyze the WinSXS Folder
1. Also, you need to run Command Prompt as administrator.
2. Type **DISM /Online /Cleanup-Image /StartComponentCleanup** and press **Enter**.
3. Type **sfc /scannow** and press **Enter**.
4. Type **DISM /Online /Cleanup-Image /AnalyzeComponentStore** and press **Enter**.
5. Type **sfc /scannow** and press **Enter**.
6. Restart your computer.
### \#3. Use an Alternative Repair Source in DISM
**Step 1: check the Index number on your Windows 10.**
1. Connect the USB drive that contains the Windows installation media (or mount the ISO file) to your computer.
2. Press **Windows + E** to open File Explorer. Then, go to your USB drive.
3. Double click on the **Sources** folder to check whether it contains an **install.wim** or **install.esd** file.
4. Run Command Prompt as administrator.
5. Type **dism /Get-WimInfo /WimFile:\*:sources/install.wim** or **dism /Get-WimInfo /WimFile:\*:sources/install.esd** (\* represents the drive letter). Then, press **Enter**.
**Step 2: repair Windows 10. Please replace \* with the drive letter of your USB drive and type the correct Index Number.**
- If the Sources folder contain an install.wim: type **DISM /Online /Cleanup-Image /RestoreHealth /Source:WIM:\*:\\sources\\install.wim:IndexNumber /LimitAccess** and press **Enter**.
- If the Sources folder contain an install.esd: type **DISM /Online /Cleanup-Image /RestoreHealth /Source:ESD:\*:\\sources\\install.esd:IndexNumber /LimitAccess** and press **Enter**.
**Step 3: wait for the operation to complete.**
In addition, you can try to specify an alternative repair source by using Registry Editor or Local Group Policy Editor when system tells you the DISM source files could not be found.
[https://www.partitionwizard.com/partitionmagic/dism-error-2.html](https://www.partitionwizard.com/partitionmagic/dism-error-2.html)
# Windows - Windows Logon Service
The logon process for how a system connects to a DC is pretty striaghtforward (read: Simple, but not easy)
1. Workstation comes online and queries DNS SRV records to find all DCs
2. Workstation attempts LDAP connection to ALL DCs found.
3. Workstation queries DNS for site information.
4. Workstation compares site information received with its own network ID.
5. Workstation attempts LDAP connection to all DCs in its site
6. If no DCs in its site respond, Workstation attempts LDAP connection to all DCs in the domain
7. First DC to respond is where the Workstation attempts to authenticate.
If this is giving odd results - workstations routinely log onto DCs not in their site - check out where the DCs reside in Sites and Services and correct as needed.
It’s also possible the Workstation is on a subnet that isn’t defined to Sites & Services and this also would need to be corrected.
Check
I would recommend to ensure the below IP settings on each domain controller:
1. Each DC / DNS server points to its private IP address as primary DNS server and other internal DNS servers as secondary ones
2. Each DC has just one IP address and one network adapter is enabled (disable unused NICs).
3. If multiple NICs (enabled and disabled) are present on server, make sure the active NIC is on top in NIC binding.
4. Contact your ISP and get valid DNS IPs from them and add it in to the forwarders, Do not set public DNS server in TCP/IP setting of DC.
## How To Fix DFS Replication Event 4012 on Domain Controller
### 1. Verifying Server Promotion Status
The first crucial step in resolving DFS replication Event ID 4012 is to verify the server’s promotion status. Any discrepancies in the promotion process can lead to issues with DFSR. Administrators can use tools like Active Directory Users and Computers (ADUC) or PowerShell commands to ensure that the server has been successfully promoted to a domain controller.
### 2. Adjusting MaxOfflineTimeInDays
An easy fix for Event ID 4012 involves adjusting the **MaxOfflineTimeInDays** parameter. This parameter determines the maximum duration a server can remain offline before triggering the error. If the server was offline for an extended period, increasing this threshold can resolve the issue.
#### Using WMIC Commands for MaxOfflineTimeInDays
To check the current MaxOfflineTimeInDays value, administrators can use the following command:
```shell
wmic.exe /namespace:\\root\microsoftdfs path dfsrMachineConfig get MaxOfflineTimeinDays
```
To increase the MaxOfflineTimeInDays value, use the following command, setting it to a value higher than the time the server was offline:
```shell
wmic.exe /namespace:\\root\microsoftdfs path dfsrMachineConfig set MaxOfflineTimeinDays=400
```
These commands provide a quick and efficient way to address the time constraint set by MaxOfflineTimeInDays, ensuring that the DFS Replication service can resume without encountering the 4012 error.
### 3. Initiating DFS Replication Partnerships
Starting DFS Replication Partnerships involves establishing connections to enable the synchronized replication of data between servers. One method to achieve this is by manually running DFS replication using the repadmin /syncall /AeD command or initiate it through the Active Directory Sites and Services console.
The [repadmin cmd](https://learn.microsoft.com/en-us/previous-versions/windows/it-pro/windows-server-2012-r2-and-2012/cc770963(v=ws.11)) provides a direct and efficient way to trigger synchronization across all domain controllers, aiding in the resolution of replication interruptions and maintaining consistent data distribution.
### 4. Set MaxOfflineTimeInDays Back to Default 60 Days
Once the replication is complete set MaxOfflineTimeInDays value back to default 60 Days
```shell
wmic.exe /namespace:\\root\microsoftdfs path dfsrMachineConfig set MaxOfflineTimeinDays=60
```
# Windows - Online Repair
### Crashing Error
```shell
SFC /SCANNOW
DISM /Online /Cleanup-Image /ScanHealth
DISM /Online /Cleanup-Image /CheckHealth
DISM /Online /Cleanup-image /RestoreHealth
```
# Windows - How to Switch Domain Controller
## Find Current Domain Controller
You can grab the domain controller that the computer is currently connected to with these steps:
1. Select the “**Start**” button.
2. Type “**CMD**“.
3. Hold “**Shift**” and right-click “**Command Prompt**“.
4. Select “**Run as different user**“.
5. Type credentials for a Domain Admin user account.
6. At the Command Prompt, type:
- nltest /dsgetdc:domainname
### Switch Domain Controller Command
Actually switch the domain controller computer is using with these steps.
1. Select the “**Start**” button.
2. Type “**CMD**“.
3. Hold “**Shift**” and right-click “**Command Prompt**“.
4. Select “**Run as different user**“.
5. Type credentials for a Domain Admin user account.
6. At the command prompt, type:
- nltest /Server:ClientComputerName /SC\_RESET:DomainName\\DomainControllerName
Note: This option is not permanent, as a restart of the computer may grab a different DC.
## Set Domain Controller Via Registry
1. Hold the **Windows Key** and press “**R**” to bring up the Windows Run dialog.
2. Type “**Regedit**“, then press “**Enter**“.
3. Navigate to:
- **HKEY\_LOCAL\_MACHINE**
- **SYSTEM**
- **CurrentControlSet**
- **Services**
- **Netlogon**
- **Parameters**
4. Create a String value called “**SiteName**“, and set it to the domain controller you wish the computer to connect to. (i.e. [DC1.domain.com](http://DC1.domain.com))
# Windows 11 - Bypass Microsoft Account Requirement
Once on the following screen make sure you disconnect from the internet or have no internet connection and hit the "Shift-F10" keys to open a command prompt.
[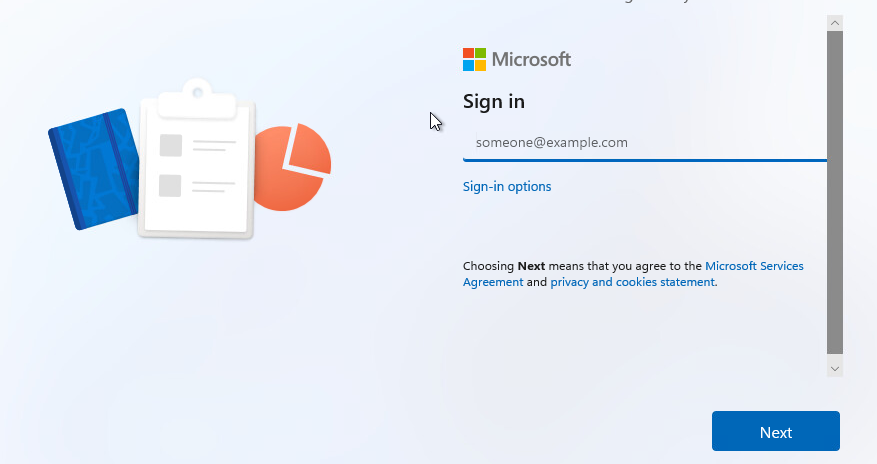](https://docs.sflservicesllc.com/uploads/images/gallery/2024-09/RDAimage.png)
Type this in the command prompt window "oobe\\bypassnro"
[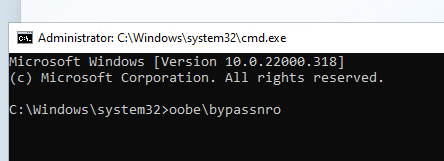](https://docs.sflservicesllc.com/uploads/images/gallery/2024-09/UN2image.png)
The computer will reboot
Once you get to this screen click on the option "I don't have internet"
[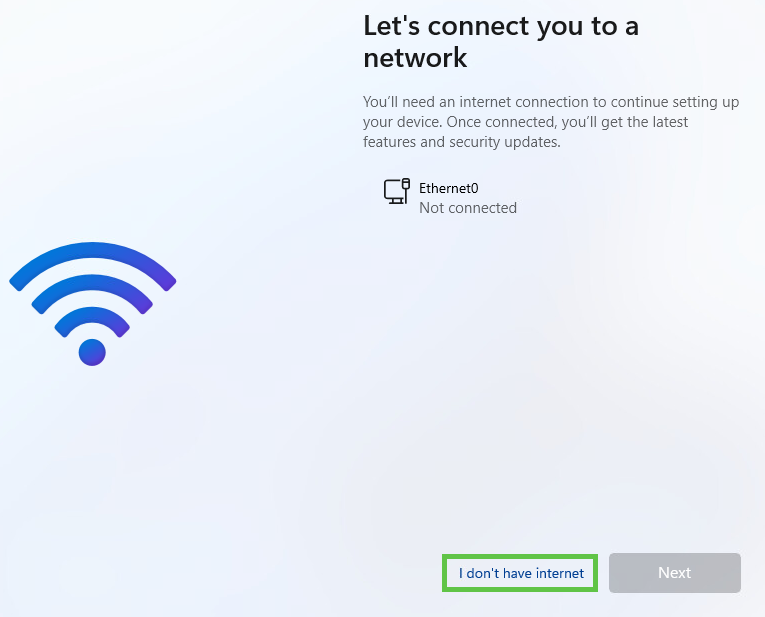](https://docs.sflservicesllc.com/uploads/images/gallery/2024-09/UOaimage.png)
Once on the next screen click on the option "Continue with limited setup"
[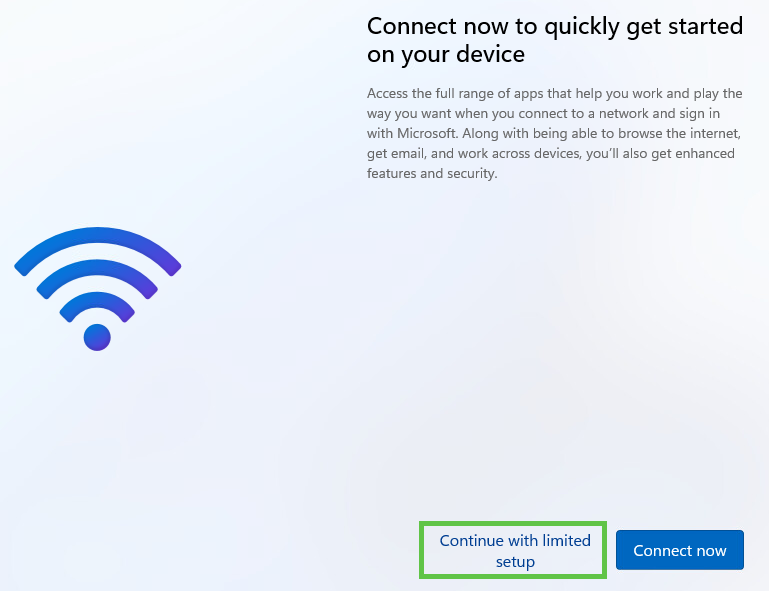](https://docs.sflservicesllc.com/uploads/images/gallery/2024-09/Mwuimage.png)
Once on the next screen add the a name to create a local account
[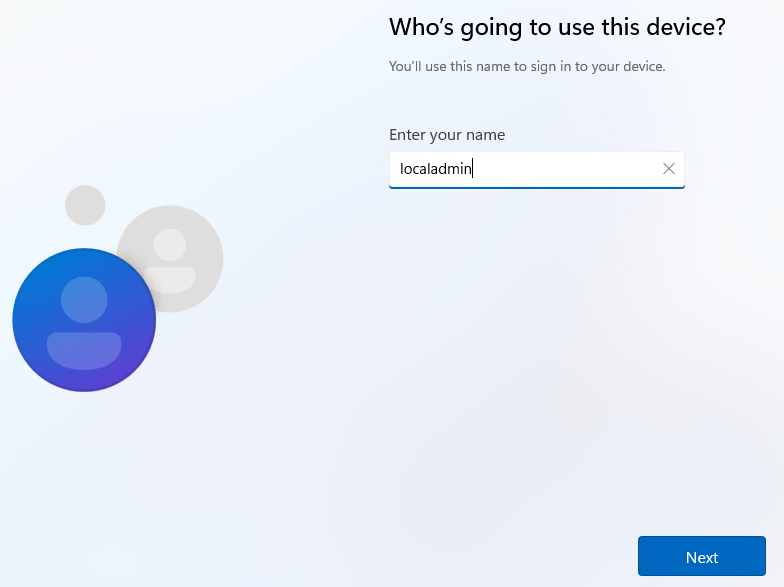](https://docs.sflservicesllc.com/uploads/images/gallery/2024-09/madimage.png)
On the next screen enter a password to use
[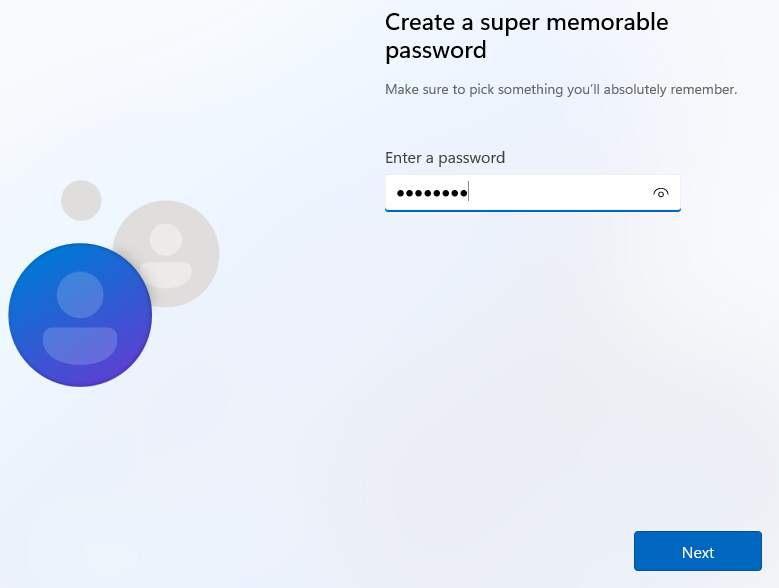](https://docs.sflservicesllc.com/uploads/images/gallery/2024-09/bDwimage.png)
# Windows - Time Zone and Language Group Policy
### Configuring the time zone using Group Policy
**Supported operating systems:** Windows 2003/XP and higher, up to and including Windows 10 and Windows Server 2016 (all versions and builds).
**Supported deployment methods:** all, including direct (*bare-metal*) installations and image-based deployments using technologies such as Citrix Machine Creation Services (MCS) and Citrix Provisioning Services (PVS).
This section deals with the configuration of the time zone settings. On a local machine, these are configured in the *Date & Time* settings. Time zone settings are system-specific and not configured per-user (although you can [redirect the local time zone](https://dennisspan.com/configuring-the-time-zone-and-code-page-with-group-policy/#RedirectTimeZone) in a remote session).

The time zone configuration is stored in the Windows registry in the **HKEY\_LOCAL\_MACHINE** hive. The exact registry key is:
**HKLM\\SYSTEM\\CurrentControlSet\\Control\\TimeZoneInformation**
The time zone settings consist of multiple values as seen in the screenshot below.
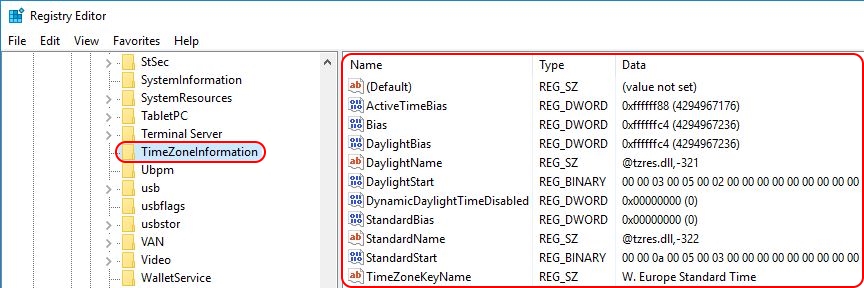
To find out the exact value for each of the ten registry entries, first set the time zone manually in the local *Date & Time* configuration. Afterwards, simply check the aforementioned registry values.
**Note:** all available time zones are also listed in the registry in the key
*HKLM\\SOFTWARE\\Microsoft\\Windows NT\\CurrentVersion\\Time Zones*.
Open your Group Policy Management Console (GPMC.msc) and navigate to *Computer Configuration \\ Preferences \\ Windows Settings \\ Registry*. Since we need to import multiple values, I suggest to use the registry wizard. With a right-mouse click on *Registry* select *New \\ Registry Wizard*.Now that we have all the information we need, we can set the correct time zone for the local machine. The easiest way to accomplish this is by using a Group Policy Preference registry item. And no, unfortunately there is no native out-of-the-box group policy setting or preference to configure the time zone. This goes for all Windows operating systems.
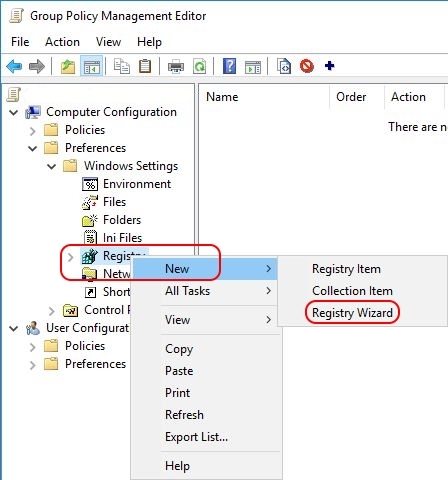
On the first page of the wizard, make sure that *Local Computer* is selected and click *Next*. On the second tab, the *Registry Browser*, navigate to the registry key *HKLM\\SYSTEM\\CurrentControlSet\\Control\\TimeZoneInformation*. Tick the box of each individual registry value (as shown in the image below). Use the scroll bar on the right to go down in the list. Unfortunately, there is no *Select All* option (@Microsoft: HINT!).

Click *Finish*. The registry values have been imported.
If you are unhappy with the organisation of the registry items, you can easily move the individual settings (in the blue box) to a new collection item.

First, we need to create a new collection item (this is basically a folder). With a right-mouse click on *Registry* select *New \\ Collection Item*. Enter a name for the collection item, for example *TimeZone*. Now you can move all individual registry items to this new collection item per drag-and-drop.
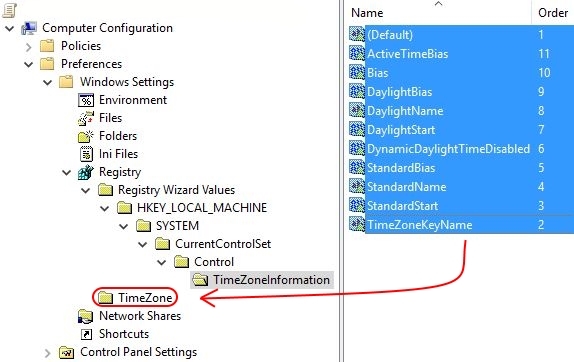
Afterwards, you can delete the collection item named *Registry Wizard Values* (all underlying folders are automatically deleted as well).
The registry item is now created and will be deployed to all machines to which the particular Group Policy applies.

**Note:** by default, the value name is used as the name of the registry item (as is visible in the image above). It is possible to rename the registry item afterwards, but please be aware that whenever you make changes to the registry item, it’s name will revert back to the value name.
After configuring the time zone, restart the machine to allow the changes to take effect.
#### Configuring the time zone using PowerShell
**Supported operating systems:** Windows 7 / Windows Server 2008 R2 and higher, up to and including Windows 10 and Windows Server 2016 (all versions and builds), with PowerShell 5.1 installed (this is a requirement!).
For those of you who want to include the configuration of the time zone in a PowerShell script, the cmdlet **Set-TimeZone** can be used. The basic command is as follows:
PowerShell
1
Set-TimeZone-Id"W. Europe Standard Time"
In case the time zone does not exist, an error is returned, which is great when using a *try/catch* statement. In the example below, I deliberately misspelled the time zone *W. Europe Standard Time* to force an error:
PowerShell
1
2
3
4
5
6
7
\[string\]$TimeZone="W. Europe Standard Timeeeeeeee"
try{
Set-TimeZone-Id$TimeZone
Write-Host"Success: the time zone $TimeZone has been set"
}Catch{
Write-Host"Error: the time zone $TimeZone does not exist!"
}
The *Set-TimeZone* cmdlet is included in PowerShell 5.1 and, exceptionally, not restricted to the newest operating systems. This cmdlet also works on Windows 7 and Windows Server 2008 R2. PowerShell 5.1 is included in the [Windows Management Framework 5.1](https://www.microsoft.com/en-us/download/details.aspx?id=54616).
**Note:** running the *Set-TimeZone* PowerShell command as a startup script may end in error 5 “access denied”. At least that is what happened when I tested it on a server running Windows Server 2016 version 1607. I do not know why this happened, especially since the group policy is executed by the local system account.
One drawback of using this method (I can’t believe I am about to say something *against* using PowerShell) is that the time zone will be hard-coded in the image. In case the time zone needs to be changed, you will have to do one (or more) of the following:
1. Update the master image.
2. Update each machine to which the master image was deployed. This only applies to direct (*bare-metal*) installations. In case you use deployment technologies such as Citrix Machine Creation Services (MCS) or Citrix Provisioning Services (PVS), you will have to update the master image and re-deploy it.
3. Use a Group Policy to change the time zone. This is the most flexible way to manage time zone settings on a multitude of machines.
#### Configuring the time zone using *tzutil.exe*
**Supported operating systems:** Windows 2003/XP and higher, up to and including Windows 10 and Windows Server 2016 (all versions and builds).
Besides the [PowerShell cmdlet](https://dennisspan.com/configuring-the-time-zone-and-code-page-with-group-policy/#ConfigTimeZonePoSH), Microsoft also offers the on-board utility **tzutil.exe** to configure the time zone. This tool has been part of the Windows operating system since Windows XP and Server 2003. Here is an example how to set the time zone to Western-Europe Standard Time:
**tzutil /s “W. Europe Standard Time”**
One drawback of using this method is that the time zone will be hard-coded in the image. Changing the time zone at a later time requires you to do one (or more) of the following:
1. Update the master image.
2. Update each machine to which the master image was deployed. This only applies to direct (*bare-metal*) installations. In case you use deployment technologies such as Citrix Machine Creation Services (MCS) or Citrix Provisioning Services (PVS), you will have to update the master image and re-deploy it.
3. Use a Group Policy to change the time zone. This is the most flexible way to manage time zone settings on a multitude of machines.
**Reference:** [https://learn.microsoft.com/en-us/previous-versions/windows/it-pro/windows-server-2012-R2-and-2012/hh875624(v=ws.11)](https://learn.microsoft.com/en-us/previous-versions/windows/it-pro/windows-server-2012-R2-and-2012/hh875624(v=ws.11))
#### Redirecting the time zone of the local client in remote sessions
In case you have users that connect from a different time zone than the server time zone, in remote sessions, you have the option to redirect the local time zone:
- [Microsoft Remote Desktop Services](https://dennisspan.com/configuring-the-time-zone-and-code-page-with-group-policy/#RDS)
- [Citrix Virtual Apps and Desktops (CVAD) / XenDesktop](https://dennisspan.com/configuring-the-time-zone-and-code-page-with-group-policy/#CVAD)
#### Microsoft Remote Desktop Services
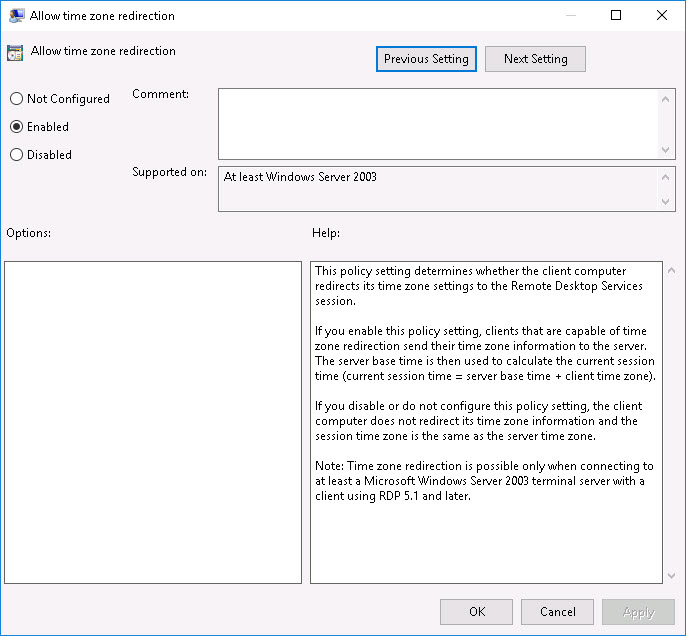
For Remote Desktop Sessions, you can enable a Microsoft group policy that redirects the time zone of the local client. You can find this policy here:
**Computer Configuration \\ Administrative Templates \\ Windows Components \\ Remote Desktop Services \\ Remote Desktop Session Host \\ Device and Resource Redirection ->** Allow time zone redirection
[](https://dennisspan.com/wp-content/uploads/2017/10/Configuring-the-time-zone-and-code-page-with-Group-Policy-Group-policy-redirect-time-zone.jpg)
#### Citrix Virtual Apps and Desktops (CVAD) / XenDesktop
For Citrix (ICA) sessions you can configure the policy *Use local time of client* to redirect the local time zone to the remote server.
[](https://dennisspan.com/wp-content/uploads/2017/10/Configuring-the-time-zone-and-code-page-with-Group-Policy-CVAD-use-local-time-of-client.jpg)
### Configuring the code page using Group Policy
**Supported operating systems:** Windows 2003/XP and higher, up to and including Windows 10 and Windows Server 2016 (all versions and builds).
**Supported deployment methods:** all, including direct (*bare-metal*) installations and image-based deployments using technologies such as Citrix Machine Creation Services (MCS) and Citrix Provisioning Services (PVS).
This section deals with the configuration of the code page (*system locale*) of the local system. The code page controls the language the system uses for non-unicode programs. On a local machine, the code page is configured on the third tab, *Administrative*, of the *Regional Settings* Control Panel item. The code page is system-specific (not configured per-user).
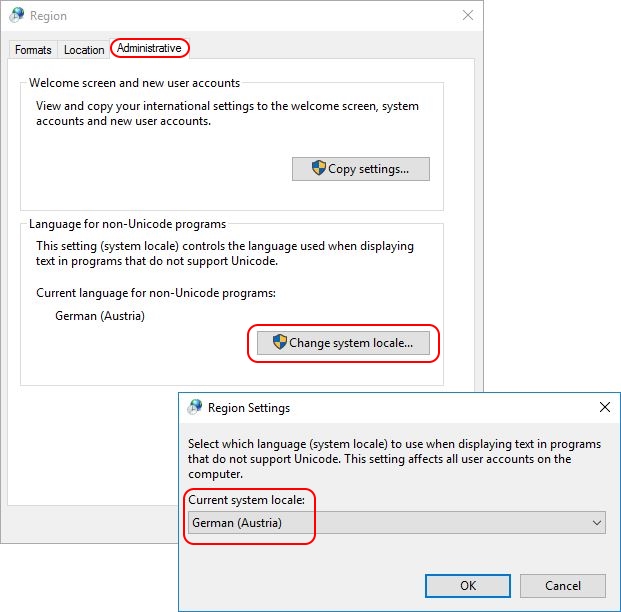
**Note:** in Windows, the code page is referred to as *system locale*. I am not in agreement with this, because the system locale also includes other components such as the display language (the Windows language) and the default input language (the keyboard layout) for the system user. These settings determine what a user sees at the Windows logon window (CTRL+ALT+DEL). In therefore in this article use the word code page and not system locale.
The code page setting is stored in the Windows registry in the **HKEY\_LOCAL\_MACHINE** hive. The exact registry key and value are:
**HKLM\\SYSTEM\\CurrentControlSet\\Control\\Nls\\Language** -> Default (REG\_SZ)

Please be aware that the value *Default* is not the same as the *(Default)* value present in every registry key. The code page is stored in the value *Default*, so this one:

Not this one:

To determine the country ID, change the code page manually on your local system. On the local system, open the *Regional Settings* in the Control Panel. The code page (*system locale*) can be changed on the third tab. After changing the code page, you will be asked to reboot the system. This is not necessary. The registry value *Default* containing the code page setting has already been modified. Go to the registry and check your country ID.
For example, when I set the code page to *German (Austria)*, the value *Default* is set to *0c07*. Before it was *0409*, which is the country ID for the United States.
Now that we have all the information we need we can set the correct code page for the local machine. The easiest way to accomplish this is by using a Group Policy Preference registry item.
Open your Group Policy Management Console (GPMC.msc) and navigate to *Computer Configuration \\ Preferences \\ Windows Settings \\ Registry*. With a right-mouse click on *Registry* select *New \\ Registry Item*. Configure the registry item as follows:
- Action: replace
- Hive: HKEY\_LOCAL\_MACHINE
- Key path: SYSTEM\\CurrentControlSet\\Control\\Nls\\Language
- Value name: Default
- Data type: REG\_SZ (= string)
- Value data: <your value>, e.g. 0c07 or 0409
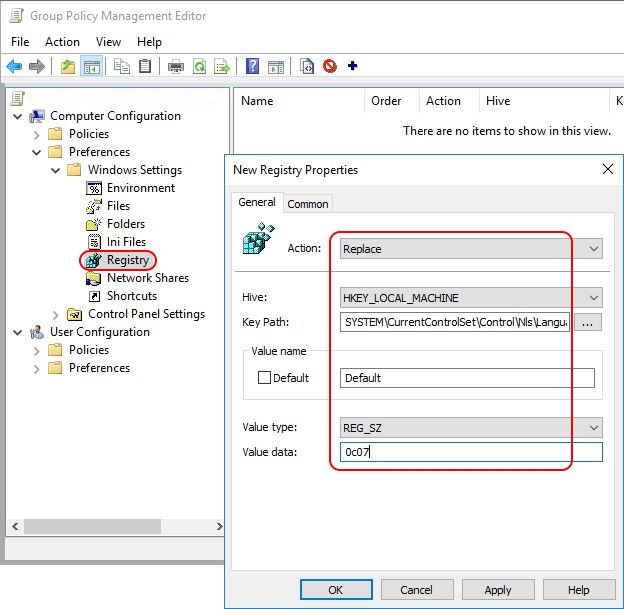
The registry item is now created and will be deployed to all machines to which the particular Group Policy applies.
**Note:** by default, the value name is used as the name of the registry item (as is visible in the image above). It is possible to rename the registry item afterwards, but please be aware that whenever you make changes to the registry item, it’s name will revert back to the value name.
After configuring the code page, restart the machine to allow the changes to take effect.
Comes from [here](https://dennisspan.com/configuring-the-time-zone-and-code-page-with-group-policy/)
# Microsoft - Add DNS GPO
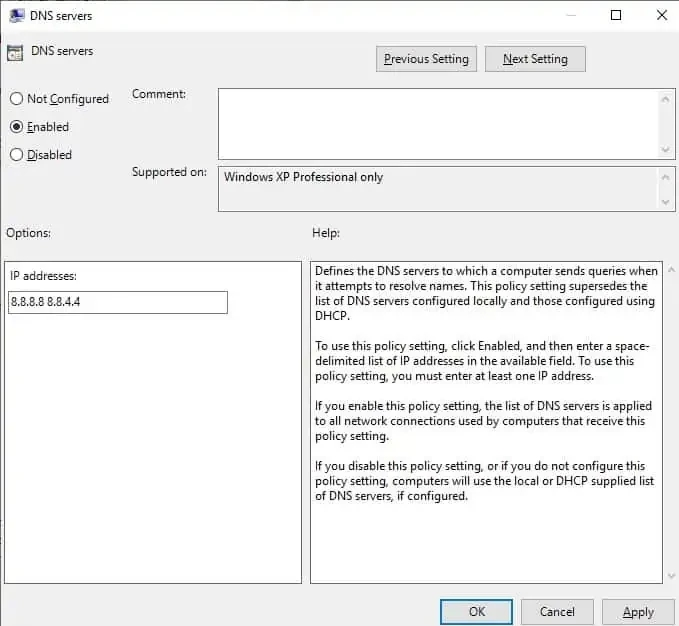
use the settings in the group policy itself to do this.
`Computer Configuration > Policies > Administrative Templates > Network > DNS Client`
[](https://docs.sflservicesllc.com/uploads/images/gallery/2024-11/image.png)
# GPO - Administrative Templates (.admx) Windows 11/10/8.1
### Downloads for all Windows 11/10/8.1 versions
**Instructions on installing ADMX Templates:**
1\. Download and unzip the template's CAB or ZIP file. Sometimes the ZIP contains a CAB file inside.
2\. Copy \*.admx files -> C:\\Windows\\PolicyDefinitions
3\. Copy admx\\***locale***\\\*.adml files -> C:\\Windows\\PolicyDefinitions\\***locale***
If you don't want the other language translations, don't transfer them.
4\. There is no version control for ADMX. Policy Editor uses the last copied file to display the template help.
5\. You can install ADMX templates for a different version of Windows or Office than what you have installed. This allows you to create a local policy file that you intend to copy to another Windows or Office build. If you configure policy settings that isn't recognized by the local host, it will be silently ignored.
6\. Export policy files to a new image using [LGPO tool](https://techcommunity.microsoft.com/t5/microsoft-security-baselines/lgpo-exe-local-group-policy-object-utility-v1-0/ba-p/701045). Copying the Windows\\System32\\GroupPolicy folder doesn't alway work because there is an unique GUID and Version saved in gpt.ini
- [Administrative Templates (.admx) for Microsoft Edge](https://www.microsoft.com/en-us/edge/business/download?cs=1873324239&form=MA13FJ)
- [Administrative Templates (.admx) for Windows 11 2024 Update (24H2)](https://www.microsoft.com/en-us/download/details.aspx?id=106254)
- [Administrative Templates (.admx) for Windows 11 2022 Update (22H2)](https://www.microsoft.com/download/104593)
- [Administrative Templates (.admx) for Windows 11 October 2021 Update (21H2)](https://www.microsoft.com/download/103507)
- [Administrative Templates (.admx) for Windows 10 November 2021 Update (21H2) - v2.0](https://www.microsoft.com/download/104042)
- [Administrative Templates (.admx) for Windows 10 November 2021 Update (21H2)](https://www.microsoft.com/download/103667)
- [Administrative Templates (.admx) for Windows 10 May 2021 Update (21H1)](https://www.microsoft.com/download/103124)
- [Administrative Templates (.admx) for Windows 10 October 2020 Update (20H2) - v2.0](https://www.microsoft.com/download/103060)
- [Administrative Templates (.admx) for Windows 10 May 2020 Update (2004)](https://www.microsoft.com/download/101445)
- [Administrative Templates (.admx) for Windows 10 November 2019 Update (1909)](https://www.microsoft.com/download/100591)
- [Administrative Templates (.admx) for Windows 10 May 2019 Update (1903)](https://www.microsoft.com/download/58495)
- [Administrative Templates (.admx) for Windows 10 October 2018 Update (1809)](https://www.microsoft.com/download/57576)
- [Administrative Templates (.admx) for Windows 10, version 1803 (April 2018 Update)](https://www.microsoft.com/download/56880)
- [Administrative Templates (.admx) for Windows 10, version 1709 (Fall Creators Update)](https://www.microsoft.com/download/56121)
- [Administrative Templates (.admx) for Windows 10, version 1703 (Creators Update)](https://www.microsoft.com/download/55080)
- [Administrative Templates (.admx) for Windows 10, version 1607 and Windows Server 2016](https://www.microsoft.com/download/53430)
- [Administrative Templates (.admx) for Windows 10 and Windows 10, version 1511](https://www.microsoft.com/download/48257)
- [Administrative Templates (.admx) for Windows 8.1 Update and Windows Server 2012 R2 Update](https://www.microsoft.com/download/43413)
- [Administrative Templates (.admx) for Windows 8.1 and Windows Server 2012 R2](https://www.microsoft.com/download/41193)
- [Administrative Templates (.admx) for Windows Server 2008 R2 and Windows 7 (archived)](https://web.archive.org/web/20200802184433/https://www.microsoft.com/en-us/download/confirmation.aspx?id=6243) - [Mirror](https://www.mediafire.com/file/n6j5ts0rng3qstl/Win7-2008R2-admx.msi/file)
- [Main Page](https://learn.microsoft.com/en-US/troubleshoot/windows-client/group-policy/create-and-manage-central-store)
- NTLite discussions - [GPO's and NTLite](https://www.ntlite.com/community/index.php?threads/fixed-gpos-and-ntlite.2806/) and [Will local GPOs stay in the image post sysprep?](https://www.ntlite.com/community/index.php?threads/will-local-gpos-stay-in-the-image-post-sysprep.3474/#post-34252)
- [Policy Templates for Mozilla Firefox](https://github.com/mozilla/policy-templates).
# Windows - OLD Drivers
Here is a list of drivers that are lost:
# BAT - Script to Map Drives
```shell
SearchCtrl+K
Chat
Ctrl+J
Voice
Files
Tasks
Projects
History
Today
This Week
July
Add logic to change the link on my pictures, my music, my videos
@echo off
echo Mapping Synology NAS drives...
:: Map Document drive
net use F: \\192.168.1.20\Documents /user:jehan0606 Password /persistent:yes
if %ERRORLEVEL% == 0 (
echo Successfully mapped Documents drive to F:
) else (
echo Failed to map Documents drive
)
:: Map Video drive
net use V: \\192.168.1.20\Video /user:jehan0606 Password /persistent:yes
if %ERRORLEVEL% == 0 (
echo Successfully mapped Video drive to M:
) else (
echo Failed to map Video drive
)
:: Map Photos drive
net use P: \\192.168.1.20\Photo /user:jehan0606 Password /persistent:yes
if %ERRORLEVEL% == 0 (
echo Successfully mapped Photos drive to P:
) else (
echo Failed to map Photos drive
)
:: Map Music drive
net use M: \\192.168.1.20\Music /user:jehan0606 Password /persistent:yes
if %ERRORLEVEL% == 0 (
echo Successfully mapped Music drive to U:
) else (
echo Failed to map Music drive
)
echo Drive mapping complete.
::pause
3 / 3
Thought for 29s
@echo off
echo Mapping Synology NAS drives...
:: Map Document drive
net use F: \192.168.1.20\Documents /user:jehan0606 Password /persistent:yes
if %ERRORLEVEL% == 0 (
echo Successfully mapped Documents drive to F:
) else (
echo Failed to map Documents drive
)
:: Map Video drive
net use V: \192.168.1.20\Video /user:jehan0606 Password /persistent:yes
if %ERRORLEVEL% == 0 (
echo Successfully mapped Video drive to V:
) else (
echo Failed to map Video drive
)
:: Map Photos drive
net use P: \192.168.1.20\Photo /user:jehan0606 Password /persistent:yes
if %ERRORLEVEL% == 0 (
echo Successfully mapped Photos drive to P:
) else (
echo Failed to map Photos drive
)
:: Map Music drive
net use M: \192.168.1.20\Music /user:jehan0606 Password /persistent:yes
if %ERRORLEVEL% == 0 (
echo Successfully mapped Music drive to M:
) else (
echo Failed to map Music drive
)
echo Drive mapping complete.
echo Changing user shell folder locations...
:: Change Documents location
reg add "HKCU\Software\Microsoft\Windows\CurrentVersion\Explorer\User Shell Folders" /v Personal /t REG_SZ /d "F:" /f
if %ERRORLEVEL% == 0 (
echo Successfully changed Documents location to F:
) else (
echo Failed to change Documents location
)
:: Change Videos location
reg add "HKCU\Software\Microsoft\Windows\CurrentVersion\Explorer\User Shell Folders" /v "My Video" /t REG_SZ /d "V:" /f
if %ERRORLEVEL% == 0 (
echo Successfully changed Videos location to V:
) else (
echo Failed to change Videos location
)
:: Change Pictures location
reg add "HKCU\Software\Microsoft\Windows\CurrentVersion\Explorer\User Shell Folders" /v "My Pictures" /t REG_SZ /d "P:" /f
if %ERRORLEVEL% == 0 (
echo Successfully changed Pictures location to P:
) else (
echo Failed to change Pictures location
)
:: Change Music location
reg add "HKCU\Software\Microsoft\Windows\CurrentVersion\Explorer\User Shell Folders" /v "My Music" /t REG_SZ /d "M:" /f
if %ERRORLEVEL% == 0 (
echo Successfully changed Music location to M:
) else (
echo Failed to change Music location
)
echo Folder location changes complete.
echo Note: You may need to restart Explorer or log off and log back in for changes to take effect.
:: Optional: Restart Explorer
:: taskkill /im explorer.exe /f
:: start explorer.exe
::pause
```
# FSMO - Transfer Seize the roles to a new server
#### Old School Way: Using Graphical Tools (MMC)
1. **Check Current Roles**: Run `netdom query fsmo` on any DC to see who holds them.
2. **Transfer Domain Roles (RID, PDC, Infrastructure)**:
- Open **Active Directory Users and Computers (ADUC)**.
- Right-click the domain name and select **Operations Masters**.
- Go to each tab (RID, PDC, Infrastructure) and click **Change** to move the role to the New DC.
3. **Transfer Schema Master Role**:
- Open **MMC**, then **Add/Remove Snap-in**.
- Add **Active Directory Schema**, then register `schmmgmt.dll` first if needed (`regsvr32 schmmgmt.dll`).
- Right-click **Active Directory Schema** and select **Operations Master**, then **Change**.
4. **Transfer Domain Naming Master Role**:
- Open **Active Directory Domains and Trusts**.
- Right-click it and select **Operations Master**, then click **Change** to move it to the New DC.
- **Check Roles**:
1. `(Get-ADDomain).PDCEmulator, (Get-ADDomain).RIDMaster, (Get-ADDomain).InfrastructureMaster`
2. `(Get-ADForest).DomainNamingMaster, (Get-ADForest).SchemaMaster`
#### New Age: Using PowerShell
1. **Check Roles**:
1. `(Get-ADDomain).PDCEmulator, (Get-ADDomain).RIDMaster, (Get-ADDomain).InfrastructureMaster`
2. `(Get-ADForest).DomainNamingMaster, (Get-ADForest).SchemaMaster`
2. **Transfer All Roles**: Run this command on the *destination* DC (or any admin machine with AD module).
3. Replace `"YourNewDCName"` with the actual server name
You can use the following to move the FSMO roles
```shell
Move-ADDirectoryServerOperationMasterRole -Identity "YourNewDCName" -OperationMasterRole SchemaMaster, DomainNamingMaster, PDCEmulator, RIDMaster, InfrastructureMaster
```
Optional: The `-Force` parameter bypasses some prompts, use carefully
```shell
Move-ADDirectoryServerOperationMasterRole -Identity "YourNewDCName" -OperationMasterRole SchemaMaster, DomainNamingMaster, PDCEmulator, RIDMaster, InfrastructureMaster -Force
```
#### Important Notes
1. Ensure the source DC is online for a clean transfer (Microsoft recommends this)
2. Verify Active Directory replication is healthy before starting
3. Only **seize** roles (using `ntdsutil` or PowerShell with `-Force`) if the old DC is permanently offline
# Windows - Glossary of Terms
AAD = Azure Active Directory
ADCS = Active Directory Certificate Services
ADDS = Active Directory Domain Services
AIA = Authority Information Access
CA = Certificate Authority
CDP = CRL Distribution Point
CRL = Certificate Revocation List
CSR = Certificate Signing Request ed25519 = Edwards-curve Digital Signature Algorithm
GPO = Group Policy Object IP = Internet Protocol
LDAP = Lightweight Directory Access Protocol
MMC = Microsoft Management Console
OCSP = Online Certificate Status Protocol
PKI = Public Key Infrastructure RSA = (Rivest-Shamir-Adleman)
SHA = Secure Hash Algorithm
SPN = Service Principal Name
TCP = Transmission Control Protocol
UPN = User Principal Name
# Event Viwer - Look at a Machine Restart
Key Event IDs for Reboot Analysis
- **[1074](https://www.google.com/search?q=1074&sca_esv=d22b1170cb5b1f6e&rlz=1C1GCEA_enUS1140US1140&sxsrf=ANbL-n72-uXVeB8qeAGXZWrFvhkjveTwdQ%3A1774791741122&ei=PSzJab-NB-aCp84P_o65gAw&biw=1920&bih=911&ved=2ahUKEwj7taODn8WTAxXDDzQIHX4zM-8QgK4QegYIAQgAEA4&uact=5&oq=restart+code+in+event+viewer&gs_lp=Egxnd3Mtd2l6LXNlcnAiHHJlc3RhcnQgY29kZSBpbiBldmVudCB2aWV3ZXIyBRAAGIAEMgYQABgFGB4yBhAAGAUYHjIGEAAYBRgeMgsQABiABBiKBRiGAzIIEAAYiQUYogQyCBAAGIkFGKIESPsXUIUJWJ0WcAJ4AZABAJgBhQGgAegHqgEDMC44uAEDyAEA-AEBmAIKoAKNCMICChAAGEcY1gQYsAPCAgYQABgHGB7CAggQABgFGAcYHsICCBAAGIAEGKIEwgIFEAAY7wWYAwCIBgGQBgiSBwMyLjigB8gwsgcDMC44uAeDCMIHBTAuNy4zyAcagAgB&sclient=gws-wiz-serp) (Planned):** Indicates a user or application initiated a restart or shutdown. It shows who did it and why.
- **[41](https://www.google.com/search?q=41&sca_esv=d22b1170cb5b1f6e&rlz=1C1GCEA_enUS1140US1140&sxsrf=ANbL-n72-uXVeB8qeAGXZWrFvhkjveTwdQ%3A1774791741122&ei=PSzJab-NB-aCp84P_o65gAw&biw=1920&bih=911&ved=2ahUKEwj7taODn8WTAxXDDzQIHX4zM-8QgK4QegYIAQgAEBA&uact=5&oq=restart+code+in+event+viewer&gs_lp=Egxnd3Mtd2l6LXNlcnAiHHJlc3RhcnQgY29kZSBpbiBldmVudCB2aWV3ZXIyBRAAGIAEMgYQABgFGB4yBhAAGAUYHjIGEAAYBRgeMgsQABiABBiKBRiGAzIIEAAYiQUYogQyCBAAGIkFGKIESPsXUIUJWJ0WcAJ4AZABAJgBhQGgAegHqgEDMC44uAEDyAEA-AEBmAIKoAKNCMICChAAGEcY1gQYsAPCAgYQABgHGB7CAggQABgFGAcYHsICCBAAGIAEGKIEwgIFEAAY7wWYAwCIBgGQBgiSBwMyLjigB8gwsgcDMC44uAeDCMIHBTAuNy4zyAcagAgB&sclient=gws-wiz-serp) (Unexpected):** The system rebooted without a clean shutdown, often due to power failure or a system crash.
- **[6008](https://www.google.com/search?q=6008&sca_esv=d22b1170cb5b1f6e&rlz=1C1GCEA_enUS1140US1140&sxsrf=ANbL-n72-uXVeB8qeAGXZWrFvhkjveTwdQ%3A1774791741122&ei=PSzJab-NB-aCp84P_o65gAw&biw=1920&bih=911&ved=2ahUKEwj7taODn8WTAxXDDzQIHX4zM-8QgK4QegYIAQgAEBI&uact=5&oq=restart+code+in+event+viewer&gs_lp=Egxnd3Mtd2l6LXNlcnAiHHJlc3RhcnQgY29kZSBpbiBldmVudCB2aWV3ZXIyBRAAGIAEMgYQABgFGB4yBhAAGAUYHjIGEAAYBRgeMgsQABiABBiKBRiGAzIIEAAYiQUYogQyCBAAGIkFGKIESPsXUIUJWJ0WcAJ4AZABAJgBhQGgAegHqgEDMC44uAEDyAEA-AEBmAIKoAKNCMICChAAGEcY1gQYsAPCAgYQABgHGB7CAggQABgFGAcYHsICCBAAGIAEGKIEwgIFEAAY7wWYAwCIBgGQBgiSBwMyLjigB8gwsgcDMC44uAeDCMIHBTAuNy4zyAcagAgB&sclient=gws-wiz-serp)**
(Unexpected):
Indicates an abnormal or "dirty" shutdown occurred, often preceding event 41.
-
**[6005](https://www.google.com/search?q=6005&sca_esv=d22b1170cb5b1f6e&rlz=1C1GCEA_enUS1140US1140&sxsrf=ANbL-n72-uXVeB8qeAGXZWrFvhkjveTwdQ%3A1774791741122&ei=PSzJab-NB-aCp84P_o65gAw&biw=1920&bih=911&ved=2ahUKEwj7taODn8WTAxXDDzQIHX4zM-8QgK4QegYIAQgCEAE&uact=5&oq=restart+code+in+event+viewer&gs_lp=Egxnd3Mtd2l6LXNlcnAiHHJlc3RhcnQgY29kZSBpbiBldmVudCB2aWV3ZXIyBRAAGIAEMgYQABgFGB4yBhAAGAUYHjIGEAAYBRgeMgsQABiABBiKBRiGAzIIEAAYiQUYogQyCBAAGIkFGKIESPsXUIUJWJ0WcAJ4AZABAJgBhQGgAegHqgEDMC44uAEDyAEA-AEBmAIKoAKNCMICChAAGEcY1gQYsAPCAgYQABgHGB7CAggQABgFGAcYHsICCBAAGIAEGKIEwgIFEAAY7wWYAwCIBgGQBgiSBwMyLjigB8gwsgcDMC44uAeDCMIHBTAuNy4zyAcagAgB&sclient=gws-wiz-serp) (Startup):** Recorded when the Event Log service starts, signifying the system has booted up.**[6006](https://www.google.com/search?q=6006&sca_esv=d22b1170cb5b1f6e&rlz=1C1GCEA_enUS1140US1140&sxsrf=ANbL-n72-uXVeB8qeAGXZWrFvhkjveTwdQ%3A1774791741122&ei=PSzJab-NB-aCp84P_o65gAw&biw=1920&bih=911&ved=2ahUKEwj7taODn8WTAxXDDzQIHX4zM-8QgK4QegYIAQgCEAM&uact=5&oq=restart+code+in+event+viewer&gs_lp=Egxnd3Mtd2l6LXNlcnAiHHJlc3RhcnQgY29kZSBpbiBldmVudCB2aWV3ZXIyBRAAGIAEMgYQABgFGB4yBhAAGAUYHjIGEAAYBRgeMgsQABiABBiKBRiGAzIIEAAYiQUYogQyCBAAGIkFGKIESPsXUIUJWJ0WcAJ4AZABAJgBhQGgAegHqgEDMC44uAEDyAEA-AEBmAIKoAKNCMICChAAGEcY1gQYsAPCAgYQABgHGB7CAggQABgFGAcYHsICCBAAGIAEGKIEwgIFEAAY7wWYAwCIBgGQBgiSBwMyLjigB8gwsgcDMC44uAeDCMIHBTAuNy4zyAcagAgB&sclient=gws-wiz-serp) (Clean Shutdown):** Recorded when the system shuts down properly.
How to Find These Events
1. Press `Win + R`, type `eventvwr`, and hit Enter.
2. Expand **Windows Logs** and select **System**.
3. Click **Filter Current Log...** in the right pane.
4. In the `` box, type the desired IDs separated by commas (e.g., `41, 1074, 6008, 6006`).
PowerShell Command for Quick Check
Use this command to quickly list recent restart events: