# Linux - Samba Setup Rocky 9

### Step 1: Install Samba on Linux

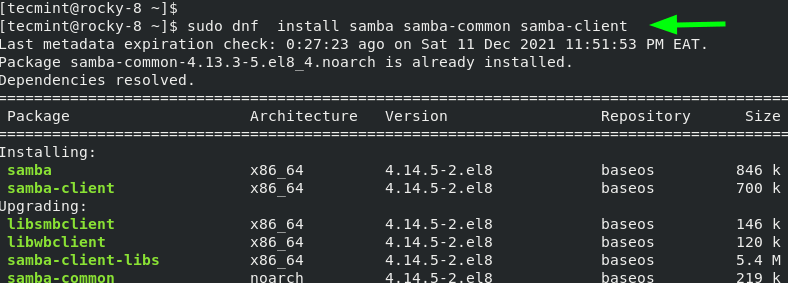
To get started out with **Samba**, install the **Samba** core packages including the client package:

```
dnf install -y samba samba-common samba-client 
```

Install-Samba in Linux

<div data-layout="center" data-node-type="mediaSingle" data-width="250" data-width-type="pixel" id="bkmrk-"><div data-alt="Install-Samba in Linux" data-collection="" data-height="283" data-id="" data-node-type="media" data-type="external" data-url="https://www.tecmint.com/wp-content/uploads/2021/12/Install-Samba-in-Linux.png" data-width="788" title="Attachment">[![gEdimage.png](https://docs.sflservicesllc.com/uploads/images/gallery/2024-09/scaled-1680-/gedimage.png)](https://docs.sflservicesllc.com/uploads/images/gallery/2024-09/gedimage.png)  
</div></div>The command installs the packages specified along with the dependencies as displayed on the output. After the installation is complete, you will get a summary of all the packages that have been installed.

Samba Installation Completes

![image.png](https://docs.sflservicesllc.com/uploads/images/gallery/2024-09/scaled-1680-/kFQimage.png)

<div data-layout="center" data-node-type="mediaSingle" data-width="250" data-width-type="pixel" id="bkmrk--2"></div>### Step 2: Create and Configure Samba Shares

Once all the **samba** packages have been installed, the next step is to configure the **samba shares**. A samba share is simply a directory that is going to be shared across client systems in the network.

Here, we are going to create a samba share called **/data** in the **/srv/tecmint/** directory path.

```
mkdir -p /srv/tecmint/data
```

Next, we will assign permissions and ownership as follows.

```
chmod -R 755 /srv/tecmint/data
chown -R  nobody:nobody /srv/tecmint/data
chcon -t samba_share_t /srv/tecmint/data
```

Create Samba Share Directory

[![image.png](https://docs.sflservicesllc.com/uploads/images/gallery/2024-09/scaled-1680-/ryyimage.png)](https://docs.sflservicesllc.com/uploads/images/gallery/2024-09/ryyimage.png)

Next, we are going to make some configurations in the **smb.conf** configuration file which is Samba’s main configuration file. But before we do so, we will back up the file by renaming it with a different file extension.

```
mv /etc/samba/smb.conf /etc/samba/smb.conf.bak
```

Next, we are going to create a new configuration file.

```
vim /etc/samba/smb.conf
```

We will define policies on who can access the samba share by adding the lines shown in the configuration file.

```
[global]
workgroup = WORKGROUP
server string = Samba Server %v
netbios name = rocky-8
security = user
map to guest = bad user
dns proxy = no
ntlm auth = true


[Public]
path =  /srv/tecmint/data
browsable =yes
writable = yes
guest ok = yes
read only = no
```

Save and exit the configuration file.

To verify the configurations made, run the command:

```
testparm
```

Verify Samba Configuration

[![image.png](https://docs.sflservicesllc.com/uploads/images/gallery/2024-09/scaled-1680-/VO4image.png)](https://docs.sflservicesllc.com/uploads/images/gallery/2024-09/VO4image.png)

<div data-layout="center" data-node-type="mediaSingle" data-width="250" data-width-type="pixel" id="bkmrk--5"><div data-alt="Verify Samba Configuration" data-collection="" data-height="415" data-id="" data-node-type="media" data-type="external" data-url="https://www.tecmint.com/wp-content/uploads/2021/12/Verify-Samba-Configuration.png" data-width="544" title="Attachment">  
</div></div>Next, start and enable Samba daemons as shown.

```
systemctl enable --now smb;systemctl enable --now nmb
```

Be sure to confirm that both the **smb** and **nmb** daemons are running.

```
systemctl status smb;systemctl status nmb
```

Verify Samba Status

[![image.png](https://docs.sflservicesllc.com/uploads/images/gallery/2024-09/scaled-1680-/0J6image.png)](https://docs.sflservicesllc.com/uploads/images/gallery/2024-09/0J6image.png)

<div data-layout="center" data-node-type="mediaSingle" data-width="250" data-width-type="pixel" id="bkmrk--7"><div data-alt="Verify Samba Status" data-collection="" data-height="500" data-id="" data-node-type="media" data-type="external" data-url="https://www.tecmint.com/wp-content/uploads/2021/12/Verify-Samba-Status.png" data-width="800" title="Attachment">  
</div></div>To enable access to samba share from remote Windows systems, you need to open the samba protocol on the firewall.

```
firewall-cmd --permanent --add-service=samba
firewall-cmd --reload
firewall-cmd --list-services
```

### Step 3: Accessing Samba Share from Windows

Thus far, we have installed **samba** and configured our **samba share**. We are now ready to access it remotely. To do this on a Windows client, press the Windows logo <span class="code" spellcheck="false">key + R</span> to launch the **Run** dialog.

In the textfield provided, enter the samba server’s IP address as shown:

```
\\server-ip
```

Access Samba Share from Windows

[![image.png](https://docs.sflservicesllc.com/uploads/images/gallery/2024-09/scaled-1680-/LWdimage.png)](https://docs.sflservicesllc.com/uploads/images/gallery/2024-09/LWdimage.png)

<div data-layout="center" data-node-type="mediaSingle" data-width="250" data-width-type="pixel" id="bkmrk--9"><div data-alt="Access Samba Share from Windows" data-collection="" data-height="203" data-id="" data-node-type="media" data-type="external" data-url="https://www.tecmint.com/wp-content/uploads/2021/12/Access-Samba-Share-from-Windows.png" data-width="399" title="Attachment">  
</div></div>The following window labeled ‘**Public**’ will pop up. Remember, this is the directory that points to our samba share in the **/srv/tecmint/data** directory.

Access Samba Share Directory on Windows

[![image.png](https://docs.sflservicesllc.com/uploads/images/gallery/2024-09/scaled-1680-/JZQimage.png)](https://docs.sflservicesllc.com/uploads/images/gallery/2024-09/JZQimage.png)

<div data-layout="center" data-node-type="mediaSingle" data-width="250" data-width-type="pixel" id="bkmrk--11"><div data-alt="Access Samba Share Directory in Windows" data-collection="" data-height="365" data-id="" data-node-type="media" data-type="external" data-url="https://www.tecmint.com/wp-content/uploads/2021/12/Access-Samba-Share-Directory-Windows.png" data-width="1067" title="Attachment">  
</div></div>Currently, our directory is empty as we have not created any files. So, we will head back to our terminal and create a few files in the samba share directory.

```
cd /srv/tecmint/data
touch file{1..3}.txt
```

Now, we will navigate to the ‘**Public**‘ folder where the files we created earlier will be displayed.

Access Samba Share Files on Windows

[![image.png](https://docs.sflservicesllc.com/uploads/images/gallery/2024-09/scaled-1680-/xr2image.png)](https://docs.sflservicesllc.com/uploads/images/gallery/2024-09/xr2image.png)

<div data-layout="center" data-node-type="mediaSingle" data-width="250" data-width-type="pixel" id="bkmrk--13"><div data-alt="Access Samba Share Files in Windows" data-collection="" data-height="358" data-id="" data-node-type="media" data-type="external" data-url="https://www.tecmint.com/wp-content/uploads/2021/12/Access-Samba-Share-Files-Windows.png" data-width="1068" title="Attachment">  
</div></div>Perfect. We have successfully managed to access our s**amba share**. However, our directory is accessible to anyone and everybody can edit and delete files at will, which is not recommended especially if you plan to host sensitive files.

In the next step, we will demonstrate how you can create and configure a secure samba share directory.

### Step 4: Secure Samba Share Directory

First, we will create a new samba user.

```
useradd smbuser
```

Next, we will configure a password for the samba user. This is the password that will be used during authentication.

```
smbpasswd -a smbuser
```

Create Samba User

[![image.png](https://docs.sflservicesllc.com/uploads/images/gallery/2024-09/scaled-1680-/vQtimage.png)](https://docs.sflservicesllc.com/uploads/images/gallery/2024-09/vQtimage.png)

<div data-layout="center" data-node-type="mediaSingle" data-width="250" data-width-type="pixel" id="bkmrk--15"><div data-alt="Create Samba User" data-collection="" data-height="145" data-id="" data-node-type="media" data-type="external" data-url="https://www.tecmint.com/wp-content/uploads/2021/12/Create-Samba-User.png" data-width="543" title="Attachment">  
</div></div>Next, we will create a new group for our secure samba share and add the new samba user.

```
groupadd smb_group
usermod -g smb_group smbuser
```

Thereafter, create yet another samba share which will be securely accessed. In our case, we have created another directory in the same path as the

```
mkdir -p  /srv/tecmint/private
```

Then configure the file permissions for the samba share

```
chmod -R 770 /srv/tecmint/private
chcon -t samba_share_t /srv/tecmint/private
chown -R root:smb_group /srv/tecmint/private
```

Once again, access the Samba configuration file.

```
$ sudo vim /etc/samba/smb.conf

```

Add these lines to define to secure samba share.

```
[Private]
path = /srv/tecmint/private
valid users = @smb_group
guest ok = no
writable = no
browsable = yes
```

Save the changes and exit.

Finally, restart all the samba daemons as shown.

```
systemctl restart smb;systemctl restart nmb
```

When you access your server this time around, you will notice an additional ‘**Private**‘ folder. To access the folder, you will be required to authenticate with the Samba user’s credentials. Provide the username and password of the user you created in the previous step and click ‘**OK**’.

Samba User Authentication

[![image.png](https://docs.sflservicesllc.com/uploads/images/gallery/2024-09/scaled-1680-/D3Jimage.png)](https://docs.sflservicesllc.com/uploads/images/gallery/2024-09/D3Jimage.png)

<div data-layout="center" data-node-type="mediaSingle" data-width="250" data-width-type="pixel" id="bkmrk--17"><div data-alt="Samba User Authentication" data-collection="" data-height="651" data-id="" data-node-type="media" data-type="external" data-url="https://www.tecmint.com/wp-content/uploads/2021/12/Samba-User-Authentication.png" data-width="1067" title="Attachment">  
</div></div>Samba Private Share Directory

[![image.png](https://docs.sflservicesllc.com/uploads/images/gallery/2024-09/scaled-1680-/Ignimage.png)](https://docs.sflservicesllc.com/uploads/images/gallery/2024-09/Ignimage.png)

<div data-layout="center" data-node-type="mediaSingle" data-width="250" data-width-type="pixel" id="bkmrk--19"><div data-alt="Samba Private Share Directory" data-collection="" data-height="440" data-id="" data-node-type="media" data-type="external" data-url="https://www.tecmint.com/wp-content/uploads/2021/12/Samba-Private-Share-Directory.png" data-width="1072" title="Attachment">  
</div></div>### Step 5: Accessing Samba Share from Linux Client

To access the share from a Linux client, first, ensure that the Samba client package is installed.

```
$ dnf install -y samba-client
```

Then use the **smbclient** command as follows

```
smbclient ‘\2.168.43.121\private’ -U smbuser
```

Access Samba Share from Linux

[![image.png](https://docs.sflservicesllc.com/uploads/images/gallery/2024-09/scaled-1680-/hqaimage.png)](https://docs.sflservicesllc.com/uploads/images/gallery/2024-09/hqaimage.png)

<div data-layout="center" data-node-type="mediaSingle" data-width="250" data-width-type="pixel" id="bkmrk--21"><div data-alt="Access Samba Share from Linux" data-collection="" data-height="199" data-id="" data-node-type="media" data-type="external" data-url="https://www.tecmint.com/wp-content/uploads/2021/12/Access-Samba-Share-from-Linux.png" data-width="691" title="Attachment">  
</div></div>And this concludes this guide on setting up **Samba** on **RHEL**, **CentOS Stream**, **Rocky Linux,** and **AlmaLinux**. Your feedback on this guide will be highly appreciated.

Some taken from [https://www.tecmint.com/install-samba-rhel-rocky-linux-and-almalinux/](https://www.tecmint.com/install-samba-rhel-rocky-linux-and-almalinux/)