Linux
Copyright Notice
SFL Services LLC has prepared this document for use only by their staff, agents, customers and prospective customers. Companies, names and data used as examples in this document are fictitious unless otherwise noted. No part of this document may be reproduced or transmitted in any form or by any means, electronic or mechanical, for any purpose, without the express written permission of SFL Services LLC, who reserve the right to change specifications and other information contained herein without prior notice. The reader should consult SFL Services LLC to determine whether any such changes have been made.
Licensing and Warranty
The terms and conditions governing the licensing of SFL Services LLC software consist solely of those set forth in the written contracts between SFL Services LLC and its customers. Except as expressly provided for in the warranty provisions of those written contracts, no representation or other affirmation of fact contained in this document, including but not limited to statements regarding capacity, suitability for use or performance of products described herein, shall be deemed to be a warranty by SFL Services LLC for any purpose, or give rise to any liability of SFL Services LLC whatsoever.
Liability
In no event shall SFL Services LLC be liable for any incidental, indirect, special or consequential damages whatsoever (including but not limited to lost profits) arising out of or related to this document or the information contained in it, even if SFL Services LLC had been advised, knew or should have known of the possibility of such damages, and even if they had acted negligently.
- Linux - Setting up a Logging Server
- Linux - Bag of Tricks
- Linux - How to Decrease an LVM Partition
- Linux - Increase the size of a LVM Partition
- Linux - Setting up an SSL secured Webserver with CentOS
- Linux - Samba Setup Rocky 9
- Linux - Setup Rocky 9 SMTP Server
Linux - Setting up a Logging Server
Summary
This is to setup a logging server to capture logs from any servers on your network.
Prerequisites
Install of a RedHat or Rocky Linux minimal install
Configuration
You will need to edit the file "/etc/rsyslog.conf"
Editing the file
vi /etc/rsyslog.confYou will need to change to the following to allow port 514 to be open
# Provides UDP syslog reception
# for parameters see http://www.rsyslog.com/doc/imudp.html
module(load="imudp") # needs to be done just once
input(type="imudp" port="514")

# Provides TCP syslog reception
# for parameters see http://www.rsyslog.com/doc/imtcp.html
module(load="imtcp") # needs to be done just once
input(type="imtcp" port="514")
Then simply restart the rsyslog deamon
systemctl restart rsyslogMulti Host Logging to one server
vi /etc/rsyslogAdd the following
Before this entry "#### RULES ####"
$template RemoteLogs,"/var/log/%HOSTNAME%/%PROGRAMNAME%.log"
. ?RemoteLogs
This will enable for all host/servers to log to their own folders
The entry should look like this
# Provides TCP syslog reception
# for parameters see http://www.rsyslog.com/doc/imtcp.html
module(load="imtcp") # needs to be done just once
input(type="imtcp" port="514")

#custom
$template RemoteLogs,"/var/log/%HOSTNAME%/%PROGRAMNAME%.log"
*.* ?RemoteLogs
& ~

#### RULES ####
The directive $template tells , rsyslog daemon to gather and write all of the received remote messages to seperate logs under /var/log, based on the hostname (client machine name) and remote client facility (program/application) that generated the messages as defined by the settings present in the template RemoteLogs. The second line “*.* ?RemoteLogs” means record messages from all facilities at all severity levels using the RemoteLogs template configuration. The third lines makes the append happen.
Setup Log Rotate
Create a log file configuration file
vi /etc/logrotate.d/sflthen add the following, and change the ending folder name(s)
/var/log/sfl*
/var/log/SFL*
/var/log/vcenter*
/var/log/MFB*
/var/log/mfb*
{
    rotate 2
    maxsize 200k
    daily
}
Run to make sure the config is good
logrotate -d /etc/logrotate.d/sflSetup Host Servers
This is what to setup on the servers you wish to log to one server
You must login to the server and then edit the following file
vi /etc/rsyslog.confOnce opened you have to add at the end of the file the following to log everything
*.* @192.168.253.86:514   # use @ for UDP Protocal
*.* @@192.168.253.86:514   # use @@ for TCP Protocal
You can also setup specific logging by doing the following
auth.* @192.168.253.86:514 # only for authentication based recordsResults
This is what your folder will look like with the host name of the server or device
drwx------  2 root   root        42 Aug 29 22:30 RT-AC5300-RANGE-25D1EC7-C
drwx------  2 root   root        82 Aug 29 22:32 SFL-LIN-000
drwx------  2 root   root        87 Aug 29 22:32 sfl-web-004
This is a look within a folder of a server
[/var/log]# cd SFL-LIN-000/

root@SFL-LIN-000.ONLING.COM : Linux : Thu Aug 29 22:35:01 :
[/var/log/SFL-LIN-000]# ls -lrt
total 16
-rw------- 1 root root 850 Aug 29 22:30 rsyslogd.log
-rw------- 1 root root  56 Aug 29 22:32 sssd_kcm.log
-rw------- 1 root root 948 Aug 29 22:32 systemd.log
-rw------- 1 root root 251 Aug 29 22:32 CROND.log
Linux - Bag of Tricks
Introduction
This document has many useful command.
Linux Set Time Examples
You can also simplify format using following syntax:
date +%Y%m%d -s "20081128"To set time use the following syntax:
date +%T -s "10:13:13"Use the following syntax to set new data and time:
date --set="STRING"For example, set new data to 2 Oct 2006 18:00:00, type the following command as root user:
date -s "2 OCT 2006 18:00:00"OR
date --set="2 OCT 2006 18:00:00"Rsync Copy Examples
This is to move files from one server to another
Ending the folder WITHOUT a “/” slash means copy that folder everything in that folder
Ending the folder WITH a “/” slash means copy everything within that folder
Example for “remote to local” location
rsync -chavzP --stats --progress -e ssh user@remote_host:/remote_folder/dir1/ /local_folder/dir1/Example for “local to remote” location
rsync -chavzP --stats --progress -e ssh /local_folder/dir1/ user@remote_host:/remote_folder/dir1/Rsync Auto Login while sending
Example to add a Rsync key on the remote server
On the local server simply login as a given user ex: ROOT or USER
ssh-keygen -t rsaIf it already exists simply hit "n"
| Generating public/private rsa key pair. Enter file in which to save the key (/root/.ssh/id_rsa): /root/.ssh/id_rsa already exists. Overwrite (y/n)? |
If not then simply hit enter through all options
Example: of using ROOT
| Generating public/private rsa key pair. Enter file in which to save the key (/root/.ssh/id_rsa): Enter passphrase (empty for no passphrase): Enter same passphrase again: Your identification has been saved in /root/.ssh/id_rsa Your public key has been saved in /root/.ssh/id_rsa.pub The key fingerprint is: SHA256:JoMN/cxvsqZWBHws4eyrU5Q0F0qRe//44qdrrjiQmbU root@DSS-US-TMAP-XXX The key's randomart image is: +---[RSA 3072]----+ | .+=.. | | =B.+ | | ..=O | | ==+o | | = E=... | | o... oo | | ..o..++ o | | .oo+o==*. | +----[SHA256]-----+ You have mail in /var/spool/mail/root |
Run the following to add the key to the remote server, you can also use IP instead of host name
ssh-copy-id -i ~/.ssh/id_rsa.pub remuser@sfl-lin-001Example of using a USER you will have to enter yes and the USER password
|
/usr/bin/ssh-copy-id: INFO: Source of key(s) to be installed: "/root/.ssh/id_rsa.pub" Number of key(s) added: 1 Now try logging into the machine, with: "ssh 'remuser@sfl-lin-020'" |
Optional: If the command cannot be run above you can copy the key to the remote server manually into the “authorized_keys” file
cd
cd .ssh
vi authrized_keys
Optional: Change the permissions on the local server
chmod 600 ~/.ssh/*
chmod 711 ~/.ssh
chmod 711 ~
Synology Rsync
rsync -aXHmS --syno-acl /volum1/[xxx] /volume2/[xxx]-a, --archive archive mode; equals -rlptgoD (no -H,-A,-X)
-p, --perms preserve permissions
-X, --xattrs preserve extended attributes
-o, --owner preserve owner (super-user only)
-g, --group preserve group
--syno-acl copy Synology ACL data
I use the following options myself:
rsync -avhxWog --stats --backup --suffix $OLDSUFFIX --exclude-from=$RSYEXCL --syno-pseudo-root
No idea why I list options "og" since they're implied by -a, but it works...
Regards, Arild
PS: "rsync --help" lists all available options for rsync
Find and Replace String with sed
There are several versions of sed, with some functional differences between them. macOS uses the BSD version, while most Linux distributions come with GNU sed pre-installed by default. We’ll use the GNU version.
The general form of searching and replacing text using sed takes the following form:
sed -i 's/SEARCH_REGEX/REPLACEMENT/g' INPUTFILECop
-
-i - By default, sed writes its output to the standard output. This option tells sed to edit files in place. If an extension is supplied (ex -i.bak), a backup of the original file is created.
-
s - The substitute command, probably the most used command in sed.
-
/ / / - Delimiter character. It can be any character but usually the slash (/) character is used.
-
SEARCH_REGEX - Normal string or a regular expression to search for.
-
REPLACEMENT - The replacement string.
-
g - Global replacement flag. By default, sed reads the file line by line and changes only the first occurrence of the SEARCH_REGEX on a line. When the replacement flag is provided, all occurrences are replaced.
-
INPUTFILE - The name of the file on which you want to run the command.
Find and Replace String with sed within vi
This is to search and replace a file globally withing vi
:%s/search_string/replacement_string/gKill Users in Linux
This is to be used when trying to kill users using the connection, replace the ? with the number of the session.
pkill -KILL -t pts/?Create a CERT
First, you need to generate the private key and the Certificate Signing Request (CSR). You can do this via the openssl command:
openssl req -nodes -newkey rsa:2048 -keyout privatekey.key -out mail.csr Then, generate a signing request
openssl x509 -req -days 365 -in mail.csr -signkey privatekey.key -out secure.crtCreate a localhost cert on the server
openssl req -newkey rsa:2048 -nodes -keyout /etc/pki/tls/private/localhost.key -x509 -days 365 -out /etc/pki/tls/certs/localhost.crtMariadb Log Rotate
If log file is large, try if the logrotate
logrotate --force /etc/logrotate.d/mariadb
MySQL Fail to Start
If MySQL does not restart, it probably will not as the index of the log files will not be changed
|
cd /var/lib/mysql |
Configure Rsync
Useful for system migrations
Create a “/etc/rsyncd.conf” containing:
[root]
exclude = /dev /etc/fstab /proc /sys
path = /
read only = yes
list = yes
uid = root
gid = root
Enable and start:
systemctl enable rsyncd.service
systemctl start rsyncd.service
Change Run level
systemctl set-default multi-user.target
To switch from graphical to multi-user:
systemctl isolate multi-user.target;
Change Local settings
# timedatectl set-timezone Europe/London
# localectl set-locale LANG=en_GB.UTF-8
# localectl set-keymap uk
Temporary change
$ loadkeys us
Configure Alternate Authentication
authconfig-tui
SSD Considerations
Change the value of “issue_discards” option from 0 to 1 in “/etc/lvm/lvm.conf”
#
systemctl enable fstrim.timer
Adjust “/etc/fstab”
/dev/mapper/xxx /XXX xfs defaults,noatime,discard 0 0
Optionally set /tmp in RAM
# systemctl enable tmp.mount
Adding a Disk
# parted /dev/sdx
mklabel gpt
unit s
mkpart primary 2048s 100%
set 1 lvm on
quit
# pvcreate /dev/sdx1
# vgcreate rl_ssd /dev/sdx1
# lvcreate –L 50GB -n mysql rl_ssd
# mkfs.xfs /dev/rl-ssd/mysql
# blkid /dev/sdc
# chown mysql:mysql /var/lib/mysql
Growing a lvm partition
# parted /dev/sdc
(parted) unit b
(parted) print free
Number Start End Size Type File system Flags
1 31744B 5368709119B 5368677376B primary
5368709120B 21474836479B 16106127360B Free Space
(parted) resizepart 1 21474836479B
(parted) quit
# pvresize /dev/sdc1
Updating Bootloader configuration
/etc/default/grub
grub2-mkconfig -o /boot/grub2/grub.cfg
NMAP Scan for all Open Ports
TCP
sudo nmap -sT -p- onling.comUDP
sudo nmap -sU -p- onling.comLinux - How to Decrease an LVM Partition
Note: In this example we are working in CentOS 7, some commands may differ in different Linux distributions. As of CentOS 7 the default file system is XFS which is not currently possible to shrink, this example is working with the ext4 file system.
In this example we will work through shrinking logical volume /var/centos/var from 10GB to 5GB.
Overview of Logical Volume Manager (LVM)
Before working through the resizing process it’s important you first understand some basic concepts around physical volumes, volume groups, logical volumes, and the file system.
-
Physical Volume (PV): This can be created on a whole physical disk (think /dev/sda) or a Linux partition.
-
Volume Group (VG): This is made up of at least one or more physical volumes.
-
Logical Volume (LV): This is sometimes referred to as the partition, it sits within a volume group and has a file system written to it.
-
File System: A file system such as ext4 will be on the logical volume.
LVM Resize – How to decrease or shrink the logical volume
To decrease the size of an LVM partition you must first decrease the file system within in order to avoid possible data corruption. As there is the potential for this to happen if you enter the command incorrectly, it is strongly recommended that you have a full backup of your data before proceeding. Shrinking a logical volume will give you more space in the volume group, meaning that you could instead extend another logical volume with this new found space.
The first step will depend on if you’re looking to shrink a LVM root volume, or non-root volume.
Shrinking a root volume
The root volume would typically be the logical volume that is mounted to /. You cannot unmount this to shrink it as it’s in use by the running operating system meaning that you will have to first boot from a Live CD to complete this. Once booted into the Live CD, you may first need to run the below command to pick up LVM volumes, however this usually happens during boot so may not be required, if in doubt just run it.
vgchange -a yShrinking a non-root volume
Alternatively if the volume you are shrinking is a non-root volume, that is any other volume not mounted to the root of the file system, you can unmount the volume as shown below to proceed. Please note that when you unmount the volume the data will not be available, so you may need to schedule down time and stop running applications that use data from it prior to unmounting. Unmount by specifying either the logical volume or the location it’s currently mounted to, in the below example we specify the logical volume which can be found in /dev/(vg-name)/(lv-name).
umount /dev/centos/varAll following steps now apply to both a root or non-root volume.
Before being able to attempt to shrink the size of an LVM volume, you must first run a file system check on it. If you don’t do this, you will get an error message and will not be able to proceed. This is a required step as resizing a file system in a bad state could cause data corruption. The -f flag makes the check run even if the file system appears clean, while -y assumes yes to all questions and will respond if asked to fix a problem.
e2fsck -fy /dev/centos/varNext you need to shrink the file system, to be safe we’re going to shrink the file system lower than what the logical volume will shrink to. This is because we don’t want to accidentally shrink the logical volume to a size lower than the file system in the next step, as this can result in corruption and data loss. Don’t worry, we’ll reclaim the space at the end.
The command below will shrink the file system so that it is only 4G in size total, note that what ever size you specify to shrink to you must have in free space within the file system otherwise you must first delete data.
resize2fs /dev/centos/var 4GOnce the file system has been reduced, we can shrink the size of the logical volume with the lvreduce command. Reduce this to the size that you want the volume to be, as specified by the -L flag. Instead if you want to reduce by a specified size, simply put a – in front of the size. Both are shown below for completeness, however you only need to run one.
To reduce to 5G
lvreduce -L 5G /dev/vg/disk-nameTo reduce by 5G
lvreduce -L -5G /dev/vg/disk-nameOnce you execute the lvreduce command you will get a warning advising the size you have chosen to reduce to so use this as a chance to confirm you’re shrinking the logical volume to a size that is NOT smaller than the size you previously shrunk the file system to. Once you have confirmed it’s fine to proceed enter ‘y’ and press enter.
After the logical volume has been lowered to the required size, run resize2fs on the volume as this will extend the file system to use all available space within the logical volume. This makes use of all remaining free space so that none is wasted from when we previously shrunk the file system to a lower size than the logical volume.
resize2fs /dev/centos/varAt this point all that’s left to do is mount the volume. If this was a root volume and you’re working within a Live CD, simply boot back into your primary Linux operating system.
If this was a non-root volume and you unmounted it to complete the reduction, simply mount it back. You can do this with ‘mount -a’ assuming you have the configuration already set in /etc/fstab, otherwise specify the logical volume and where it should mount to. Here we’re manually mounting to /mnt just for testing.
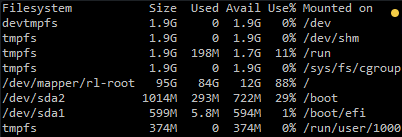
mount /dev/centos/var /mntAfter you’ve either booted back to primary operating system or completed the mount, check the space shown with the ‘df’ command to confirm it has been decreased as expected.
[root@CentOS7 /]# df -h
Filesystem               Size  Used Avail Use% Mounted on
/dev/mapper/centos-root  9.8G  1.4G  8.5G  14% /
devtmpfs                 908M     0  908M   0% /dev
tmpfs                    914M     0  914M   0% /dev/shm
tmpfs                    914M  8.6M  905M   1% /run
tmpfs                    914M     0  914M   0% /sys/fs/cgroup
/dev/sda1                497M   96M  402M  20% /boot
/dev/mapper/centos-var  4.8G   20M  4.6G   1% /mnt
In this example /dev/centos/var is correctly showing as shrunk down from the original 10G.
Linux - Increase the size of a LVM Partition
This will cover how to increase the disk space for a VMware virtual machine running Linux that is using logical volume manager (LVM). Firstly we will be increasing the size of the actual disk on the VMware virtual machine, so at the hardware level – this is the VM’s .vmdk file. Once this is complete we will get into the virtual machine and make the necessary changes through the operating system in order to take advantage of the additional space that has been provided by the hard drive being extended. This will involve creating a new partition with the new space, expanding the volume group and logical group, then finally resizing the file system.
Important Note: Be very careful when working with the commands in this article as they have the potential to cause a lot of damage to your data. If you are working with virtual machines make sure you take a snapshot of your virtual machine beforehand, or otherwise have some other form of up to date backup before proceeding. Note that a snapshot must not be taken until after the virtual disk has been increased, otherwise you will not be able to increase it. It could also be worth cloning the virtual machine first and testing out this method on the clone.
Prerequisites: As this method uses the additional space to create a primary partition, you must not already have 4 partitions as you will not be able to create more than 4. If you do not have space for another partition then you will need to consider a different method, there are some others in the above list.
Throughout examples we will be working with a VMware virtual machine running Debian 6, this was set up with a 20gb disk and we will be increasing it by 10gb for a total final size of 30gb.
Identifying the partition type
As this method focuses on working with LVM, we will first confirm that our partition type is actually Linux LVM by running the below command.
fdisk -l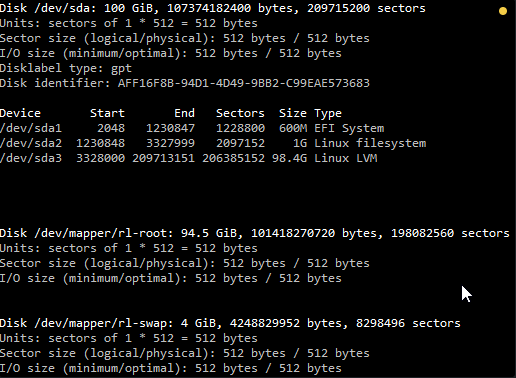
As you can see in the above image /dev/sda3 is listed as “Linux LVM” and it has the ID of 8e. The 8e hex code shows that it is a Linux LVM, while 83 shows a Linux native partition. Now that we have confirmed we are working with an LVM we can continue. For increasing the size of a Linux native partition (hex code 83).
Below is the disk information showing that our initial setup only has the one 95gb disk currently, which is under the logical volume named /dev/mapper/rl-root – this is what we will be expanding with the new disk.
Note: that /dev/mapper/rl-root is the volume made up from /dev/sda3 currently – this is what we will be expanding.
Increasing the virtual hard disk
First off we increase the allocated disk space on the virtual machine itself. This is done by right clicking the virtual machine in vSphere, selecting edit settings, and then selecting the hard disk. In the below image I have changed the previously set hard disk of 100gb to 350gb while the virtual machine is up and running. Once complete click OK, this is all that needs to be done in VMware for this process.
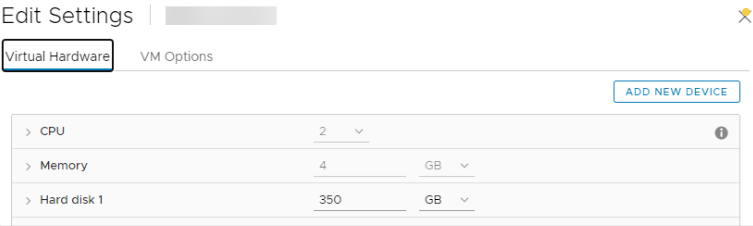
If you are not able to modify the size of the disk, the provisioned size setting is greyed out. This can happen if the virtual machine has a snapshot in place, these will need to be removed prior to making the changes to the disk. Alternatively you may need to shut down the virtual machine if it does not allow you to add or increase disks on the fly, if this is the case make the change then power it back on.
Detect the new disk space
Once the physical disk has been increased at the hardware level, we need to get into the operating system and create a new partition that makes use of this space to proceed.
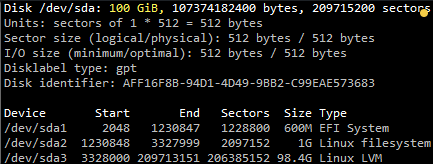
Before we can do this we need to check that the new unallocated disk space is detected by the server, you can use “fdisk -l” to list the primary disk. You will most likely see that the disk space is still showing as the same original size, at this point you can either reboot the server and it will detect the changes on boot or you can rescan your devices to avoid rebooting by running the below command. Note you may need to change host0 depending on your setup.
echo "- - -" > /sys/class/scsi_host/host0/scanBelow is an image after performing this and confirming that the new space is displaying.
Partition the new disk space
As outlined in my previous images the disk in my example that I am working with is /dev/sda, so we use fdisk to create a new primary partition to make use of the new expanded disk space. Note that we do not have 4 primary partitions already in place, making this method possible.
fdisk /dev/sdaWe are now using fdisk to create a new partition, the inputs I have entered in are shown below in bold. Note that you can press ‘m’ to get a full listing of the fdisk commands.
‘n’ was selected for adding a new partition.
Welcome to fdisk (util-linux 2.32.1).
Changes will remain in memory only, until you decide to write them.
Be careful before using the write command.

GPT PMBR size mismatch (209715199 != 734003199) will be corrected by write.
The backup GPT table is not on the end of the device. This problem will be corrected by write.

Command (m for help):
As I already have /dev/sda1, sda2 and sda3 as shown in previous images, I have gone with using ‘4’ for this new partition which will be created as /dev/sda4
Enter the “n” for new partition and enter for the rest of the defaults
Command (m for help): n
Partition number (4-128, default 4):
First sector (209713152-734003166, default 209713152):
Last sector, +sectors or +size{K,M,G,T,P} (209713152-734003166, default 734003166):

Created a new partition 4 of type 'Linux filesystem' and of size 250 GiB.

Command (m for help):
‘p’ to view the current changes in the session
Command (m for help): p
Disk /dev/sda: 350 GiB, 375809638400 bytes, 734003200 sectors
Units: sectors of 1 * 512 = 512 bytes
Sector size (logical/physical): 512 bytes / 512 bytes
I/O size (minimum/optimal): 512 bytes / 512 bytes
Disklabel type: gpt
Disk identifier: AFF16F8B-94D1-4D49-9BB2-C99EAE573683

Device         Start       End   Sectors  Size Type
/dev/sda1       2048   1230847   1228800  600M EFI System
/dev/sda2    1230848   3327999   2097152    1G Linux filesystem
/dev/sda3    3328000 209713151 206385152 98.4G Linux LVM
/dev/sda4  209713152 734003166 524290015  250G Linux filesystem

Command (m for help):
As you can see the new partition of 150gb is a 8e meaning a Linux file system which is correct, older version we needed to change this.
‘w’ is used to write the table to disk and exit, basically all the changes that have been done will be saved and then you will be exited from fdisk.
Command (m for help): w
The partition table has been altered.
Syncing disks.
You will see a warning which basically means in order to use the new table with the changes a system reboot is required. If you can not see the new partition using “fdisk -l” you may be able to run “partprobe -s” to rescan the partitions. In my test I did not require either of those things at this stage (I do a reboot later on), straight after pressing ‘w’ in fdisk I was able to see the new /dev/sda3 partition of my 10gb of space as displayed in the below image.
That’s all for partitioning, we now have a new partition which is making use of the previously unallocated disk space from the increase in VMware.
Increasing the logical volume
We use the pvcreate command which creates a physical volume for later use by the logical volume manager (LVM). In this case the physical volume will be our new /dev/sda4 partition.
pvcreate /dev/sda4
  Physical volume "/dev/sda4" successfully created.
Next we need to confirm the name of the current volume group using the vgdisplay command. The name will vary depending on your setup, for me it is the name of my test server. vgdisplay provides lots of information on the volume group, I have only shown the name and the current size of it for this example.
vgdisplay
  --- Volume group ---
  VG Name               rl
  System ID
  Format                lvm2
  Metadata Areas        1
  Metadata Sequence No  3
  VG Access             read/write
  VG Status             resizable
  MAX LV                0
  Cur LV                2
  Open LV               2
  Max PV                0
  Cur PV                1
  Act PV                1
  VG Size               98.41 GiB
  PE Size               4.00 MiB
  Total PE              25193
  Alloc PE / Size       25193 / 98.41 GiB
  Free  PE / Size       0 / 0
  VG UUID               16Qr51-iLg8-HDNB-MkUc-TB5c-dL9j-rnpHUE
Now we extend the ‘rl’ volume group by adding in the physical volume of /dev/sda4 which we created using the pvcreate command earlier.
vgextend rl /dev/sda4
  Volume group "rl" successfully extended
Using the pvscan command we scan all disks for physical volumes, this should confirm the original /dev/sda5 partition and the newly created physical volume /dev/sda4
pvscan
  PV /dev/sda3   VG rl              lvm2 [98.41 GiB / 0    free]
  PV /dev/sda4   VG rl              lvm2 [<250.00 GiB / <250.00 GiB free]
  Total: 2 [<348.41 GiB] / in use: 2 [<348.41 GiB] / in no VG: 0 [0   ]
Next we need to increase the logical volume (rather than the physical volume) which basically means we will be taking our original logical volume and extending it over our new partition/physical volume of /dev/sda4.
Firstly confirm the path of the logical volume using lvdisplay. This path name will vary depending on your setup.
lvdisplay
  --- Logical volume ---
  LV Path                /dev/rl/root
  LV Name                root
  VG Name                rl
  LV UUID                mb2gT4-2oqM-8icq-B8S6-A3lZ-9Ivi-scDZqS
  LV Write Access        read/write
  LV Creation host, time mfb-us-lin-001, 2022-10-08 19:34:32 -0400
  LV Status              available
  # open                 1
  LV Size                94.45 GiB
  Current LE             24180
  Segments               1
  Allocation             inherit
  Read ahead sectors     auto
  - currently set to     8192
  Block device           253:0

  --- Logical volume ---
  LV Path                /dev/rl/swap
  LV Name                swap
  VG Name                rl
  LV UUID                NWNCL3-rzD7-av3v-lRP0-OQy9-4CcE-phna9T
  LV Write Access        read/write
  LV Creation host, time mfb-us-lin-001, 2022-10-08 19:34:33 -0400
  LV Status              available
  # open                 2
  LV Size                <3.96 GiB
  Current LE             1013
  Segments               1
  Allocation             inherit
  Read ahead sectors     auto
  - currently set to     8192
  Block device           253:1
The logical volume is then extended using the lvextend command.
lvextend /dev/rl/root /dev/sda4
  Size of logical volume rl/root changed from 94.45 GiB (24180 extents) to <344.45 GiB (88179 extents).
  Logical volume rl/root successfully resized
There is then one final step which is to resize the file system so that it can take advantage of this additional space, this is done using the xfs_growfs command. Note that this may take some time to complete, it took about 30 seconds for my additional space.
xfs_growfs /dev/rl/root
meta-data=/dev/mapper/rl-root    isize=512    agcount=4, agsize=6190080 blks
         =                       sectsz=512   attr=2, projid32bit=1
         =                       crc=1        finobt=1, sparse=1, rmapbt=0
         =                       reflink=1    bigtime=0 inobtcount=0
data     =                       bsize=4096   blocks=24760320, imaxpct=25
         =                       sunit=0      swidth=0 blks
naming   =version 2              bsize=4096   ascii-ci=0, ftype=1
log      =internal log           bsize=4096   blocks=12090, version=2
         =                       sectsz=512   sunit=0 blks, lazy-count=1
realtime =none                   extsz=4096   blocks=0, rtextents=0
data blocks changed from 24760320 to 90295296
That’s it, now with the ‘df’ command we can see that the total available disk space has been increased.
df -h
Filesystem           Size  Used Avail Use% Mounted on
devtmpfs             1.8G     0  1.8G   0% /dev
tmpfs                1.8G     0  1.8G   0% /dev/shm
tmpfs                1.8G  8.7M  1.8G   1% /run
tmpfs                1.8G     0  1.8G   0% /sys/fs/cgroup
/dev/mapper/rl-root  345G   85G  260G  25% /
/dev/sda2           1014M  319M  696M  32% /boot
/dev/sda1            599M  5.8M  594M   1% /boot/efi
tmpfs                367M     0  367M   0% /run/user/0
260gb more drive space, aaaaaaah 🙂
Linux - Setting up an SSL secured Webserver with CentOS
This guide will explain how to set up a site over https. The tutorial uses a self signed key so will work well for a personal website or testing purposes. This is provided as is so proceed at your own risk and take backups!
1. Getting the required software
For an SSL encrypted web server you will need a few things. Depending on your install you may or may not have OpenSSL and mod_ssl, Apache's interface to OpenSSL. Use yum to get them if you need them.
yum install mod_ssl opensslYum will either tell you they are installed or will install them for you.
2. Generate a self-signed certificate
Using OpenSSL we will generate a self-signed certificate. If you are using this on a production server you are probably likely to want a key from a Trusted Certificate Authority, but if you are just using this on a personal site or for testing purposes a self-signed certificate is fine. To create the key you will need to be root so you can either su to root or use sudo in front of the commands
# Generate private key
openssl genrsa -out ca.key 2048

# Generate CSR
openssl req -new -key ca.key -out ca.csr

# Generate Self Signed Key
openssl x509 -req -days 365 -in ca.csr -signkey ca.key -out ca.crt

# Copy the files to the correct locations
cp ca.crt /etc/pki/tls/certs
cp ca.key /etc/pki/tls/private/ca.key
cp ca.csr /etc/pki/tls/private/ca.csr|
WARNING: Make sure that you copy the files and do not move them if you use SELinux. Apache will complain about missing certificate files otherwise, as it cannot read them because the certificate files do not have the right SELinux context. |
||
If you have moved the files and not copied them, you can use the following command to correct the SELinux contexts on those files, as the correct context definitions for /etc/pki/* come with the bundled SELinux policy.
restorecon -RvF /etc/pkiThen we need to update the Apache SSL configuration file
vi +/SSLCertificateFile /etc/httpd/conf.d/ssl.confChange the paths to match where the Key file is stored. If you've used the method above it will be
SSLCertificateFile /etc/pki/tls/certs/ca.crtThen set the correct path for the Certificate Key File a few lines below. If you've followed the instructions above it is:
SSLCertificateKeyFile /etc/pki/tls/private/ca.keyQuit and save the file and then restart Apache
/etc/init.d/httpd restartAll being well you should now be able to connect over https to your server and see a default Centos page. As the certificate is self signed browsers will generally ask you whether you want to accept the certificate.
3. Setting up the virtual hosts
Just as you set VirtualHosts for http on port 80 so you do for https on port 443. A typical VirtualHost for a site on port 80 looks like this
<VirtualHost *:80>
        <Directory /var/www/vhosts/yoursite.com/httpdocs>
        AllowOverride All
        </Directory>
        DocumentRoot /var/www/vhosts/yoursite.com/httpdocs
        ServerName yoursite.com
</VirtualHost>
To add a sister site on port 443 you need to add the following at the top of your file
NameVirtualHost *:443and then a VirtualHost record something like this:
<VirtualHost *:443>
        SSLEngine on
        SSLCertificateFile /etc/pki/tls/certs/ca.crt
        SSLCertificateKeyFile /etc/pki/tls/private/ca.key
        <Directory /var/www/vhosts/yoursite.com/httpsdocs>
        AllowOverride All
        </Directory>
        DocumentRoot /var/www/vhosts/yoursite.com/httpsdocs
        ServerName yoursite.com
</VirtualHost>
Restart Apache again using
/etc/init.d/httpd restart
4. Configuring the firewall
You should now have a site working over https using a self-signed certificate. If you can't connect you may need to open the port on your firewall. To do this amend your iptables rules:
iptables -A INPUT -p tcp --dport 443 -j ACCEPT
/sbin/service iptables save
iptables -L -v
Linux - Samba Setup Rocky 9
Step 1: Install Samba on Linux
To get started out with Samba, install the Samba core packages including the client package:
dnf install -y samba samba-common samba-client Install-Samba in Linux
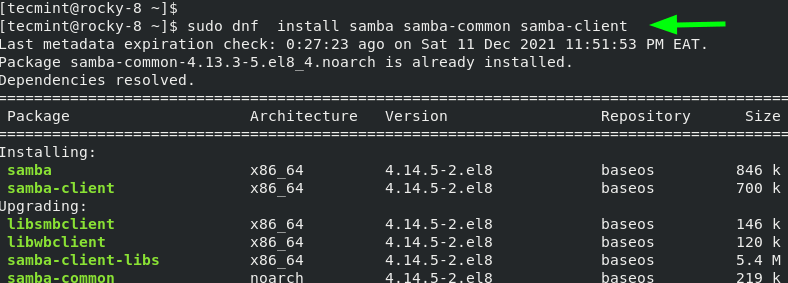
The command installs the packages specified along with the dependencies as displayed on the output. After the installation is complete, you will get a summary of all the packages that have been installed.
Samba Installation Completes

Step 2: Create and Configure Samba Shares
Once all the samba packages have been installed, the next step is to configure the samba shares. A samba share is simply a directory that is going to be shared across client systems in the network.
Here, we are going to create a samba share called /data in the /srv/tecmint/ directory path.
mkdir -p /srv/tecmint/dataNext, we will assign permissions and ownership as follows.
chmod -R 755 /srv/tecmint/data
chown -R  nobody:nobody /srv/tecmint/data
chcon -t samba_share_t /srv/tecmint/data
Next, we are going to make some configurations in the smb.conf configuration file which is Samba’s main configuration file. But before we do so, we will back up the file by renaming it with a different file extension.
mv /etc/samba/smb.conf /etc/samba/smb.conf.bakNext, we are going to create a new configuration file.
vim /etc/samba/smb.confWe will define policies on who can access the samba share by adding the lines shown in the configuration file.
[global]
workgroup = WORKGROUP
server string = Samba Server %v
netbios name = rocky-8
security = user
map to guest = bad user
dns proxy = no
ntlm auth = true


[Public]
path =  /srv/tecmint/data
browsable =yes
writable = yes
guest ok = yes
read only = no
Save and exit the configuration file.
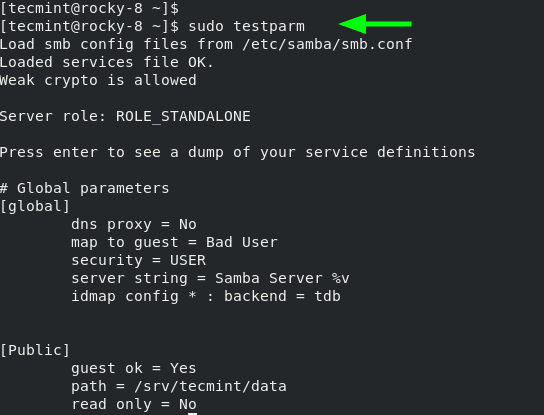
To verify the configurations made, run the command:
testparmVerify Samba Configuration
Next, start and enable Samba daemons as shown.
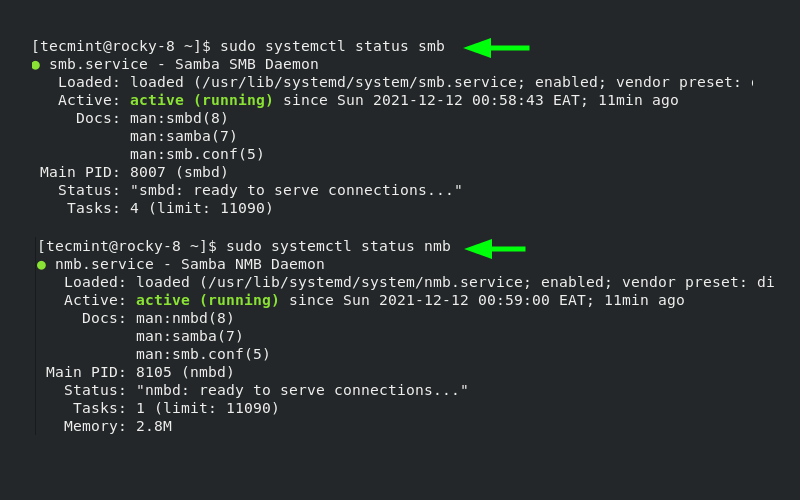
systemctl enable --now smb;systemctl enable --now nmbBe sure to confirm that both the smb and nmb daemons are running.
systemctl status smb;systemctl status nmbVerify Samba Status
To enable access to samba share from remote Windows systems, you need to open the samba protocol on the firewall.
firewall-cmd --permanent --add-service=samba
firewall-cmd --reload
firewall-cmd --list-services
Step 3: Accessing Samba Share from Windows
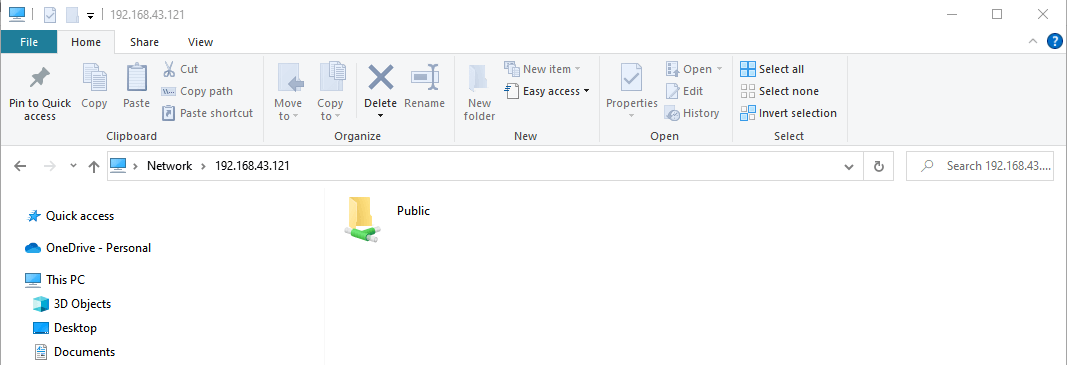
Thus far, we have installed samba and configured our samba share. We are now ready to access it remotely. To do this on a Windows client, press the Windows logo key + R to launch the Run dialog.
In the textfield provided, enter the samba server’s IP address as shown:
\\server-ip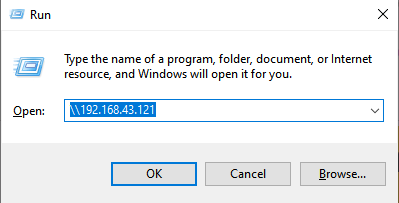
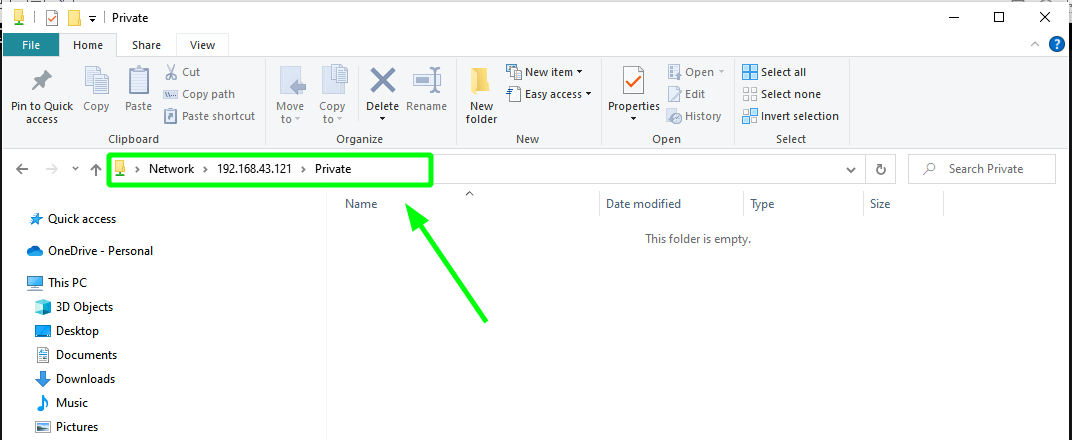
The following window labeled ‘Public’ will pop up. Remember, this is the directory that points to our samba share in the /srv/tecmint/data directory.
Currently, our directory is empty as we have not created any files. So, we will head back to our terminal and create a few files in the samba share directory.
cd /srv/tecmint/data
touch file{1..3}.txt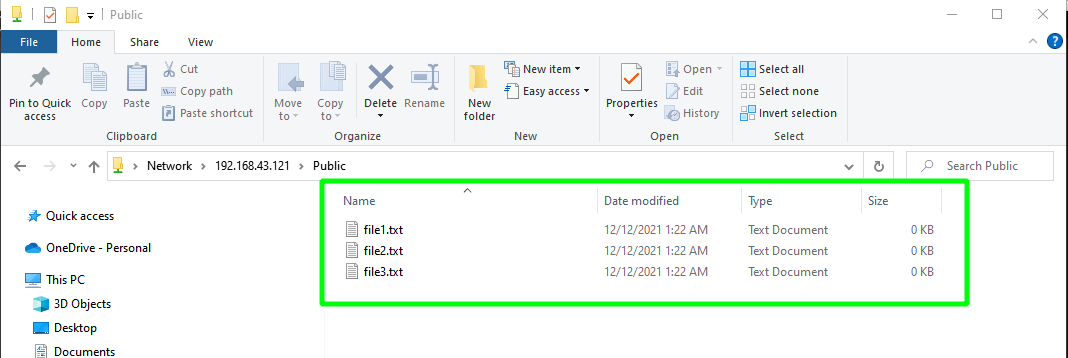
Perfect. We have successfully managed to access our samba share. However, our directory is accessible to anyone and everybody can edit and delete files at will, which is not recommended especially if you plan to host sensitive files.
In the next step, we will demonstrate how you can create and configure a secure samba share directory.
Step 4: Secure Samba Share Directory
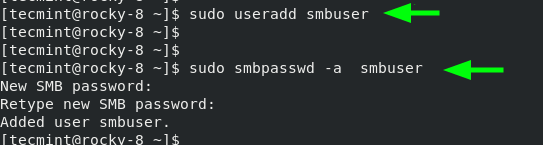
First, we will create a new samba user.
useradd smbuserNext, we will configure a password for the samba user. This is the password that will be used during authentication.
smbpasswd -a smbuserCreate Samba User
Next, we will create a new group for our secure samba share and add the new samba user.
groupadd smb_group
usermod -g smb_group smbuser
Thereafter, create yet another samba share which will be securely accessed. In our case, we have created another directory in the same path as the
mkdir -p /srv/tecmint/privateThen configure the file permissions for the samba share
chmod -R 770 /srv/tecmint/private
chcon -t samba_share_t /srv/tecmint/private
chown -R root:smb_group /srv/tecmint/private
Once again, access the Samba configuration file.
$ sudo vim /etc/samba/smb.conf
Add these lines to define to secure samba share.
[Private]
path = /srv/tecmint/private
valid users = @smb_group
guest ok = no
writable = no
browsable = yes
Save the changes and exit.
Finally, restart all the samba daemons as shown.
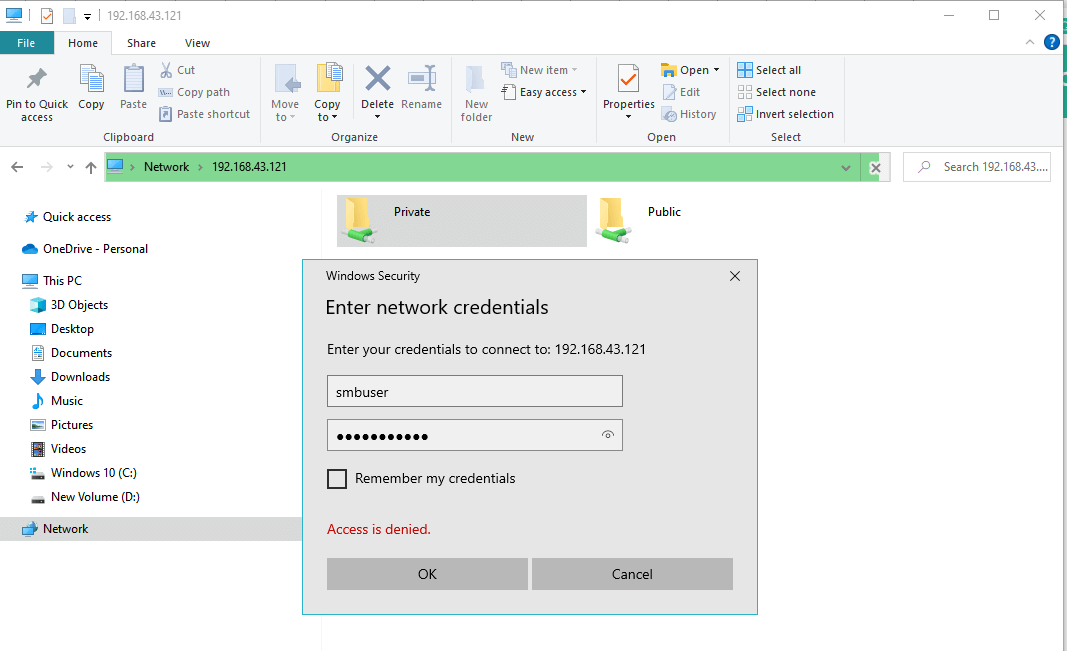
systemctl restart smb;systemctl restart nmbWhen you access your server this time around, you will notice an additional ‘Private‘ folder. To access the folder, you will be required to authenticate with the Samba user’s credentials. Provide the username and password of the user you created in the previous step and click ‘OK’.
Samba User Authentication
Step 5: Accessing Samba Share from Linux Client
$ dnf install -y samba-clientThen use the smbclient command as follows
smbclient ‘\2.168.43.121\private’ -U smbuser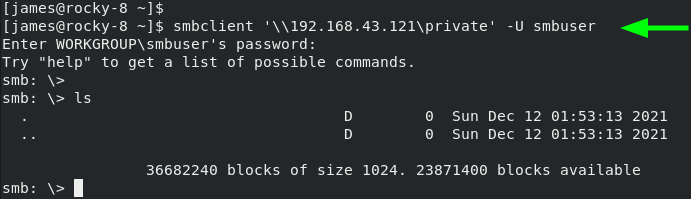
And this concludes this guide on setting up Samba on RHEL, CentOS Stream, Rocky Linux, and AlmaLinux. Your feedback on this guide will be highly appreciated.
Some taken from https://www.tecmint.com/install-samba-rhel-rocky-linux-and-almalinux/
Linux - Setup Rocky 9 SMTP Server
System Configuration
Upgrade Current System
dnf install epel-release -y
dnf upgrade -y
Configure SELinux
setenforce 0
sed -i 's/^SELINUX=.*/SELINUX=disabled/g' /etc/selinux/config
Disable Firewall
systemctl disable firewalld.serviceInstall Core Tools
dnf install bind-utils bzip2 cups cifs-utils enscript ftp gdb ghostscript java-1.8.0-openjdk-headless java-11-openjdk-headless krb5-workstation ksh lftp lrzsz lsof libnsl lzop mariadb-server mlocate mutt ncompress net-tools net-snmp net-snmp-utils net-tools nfs-utils nmap nvme-cli openldap-clients openssh-clients psmisc realmd rsync samba-client strace sysstat tcpdump telnet telnet-server tmux unix2dos vim vim-enhanced vsftpd wget xfsdump vsftpd htop mc rsyslog rsyslog-doc postfix dbus-daemon s-nail dovecot -yConfigure Virtual Tool
dnf install open-vm-tools -y
sysctl vm.swappiness=10
Time Sync
systemctl enable --now chronydConfigure Postfix
Postfix Settings
We now have to configure Postfix. One thing to keep in mind is that we're configuring Postfix to only send email, not receive it (as that is a far more complicated topic that requires considerable setup time and understanding to prevent the server from becoming an open relay, which could lead to a serious spam issue). Because of this, we can skip setting up Postfix to listen and instead go right to the hostname.
The Postfix hostname must be set to match the system hostname. We'll use the mail.example.com address (so make sure to change this to match your hostname). Set that hostname with the command:
sudo postconf -e "myhostname = mail.yourdomain.com"Make sure to check that the apex domain (aka root domain) is correct with the command:
postconf mydomainThe apex domain for our example should be listed as http://example.com . If not, set it with:
sudo postconf -e "mydomain = example.com"Set the myorigin parameter with:
sudo postconf -e "myorigin = $mydomain"Set to allow all IP to access the server with:
sudo postconf -e "inet_interfaces = all"Set to only allow IPv4 to use this server with:
sudo postconf -e "inet_protocols = ipv4"Set the mydestination parameter with:
sudo postconf -e "mydestination = $myhostname, localhost.$mydomain, localhost, $mydomain"Set the allowed IP address to relay on this server with:
sudo postconf -e "mynetworks = 127.0.0.0/8, 10.0.0.0/24, 192.168.0.0/16"Set the mail folder with:
sudo postconf -e "home_mailbox = Maildir/"sudo postconf -e "smtpd_banner = $myhostname ESMTP"Set to disable verify with:
sudo postconf -e "disable_vrfy_command = yes"Set to require the HELO for senders with:
sudo postconf -e "smtpd_helo_required = yes"Set the message limit for example 10MB with:
sudo postconf -e "message_size_limit = 10240000"Set SMTP Authentication with:
sudo postconf -e "smtpd_sasl_type = dovecot"
sudo postconf -e "smtpd_sasl_path = private/auth"
sudo postconf -e "smtpd_sasl_auth_enable = yes"
sudo postconf -e "smtpd_sasl_security_options = noanonymous"
sudo postconf -e "smtpd_sasl_local_domain = $myhostname"
sudo postconf -e "smtpd_recipient_restrictions = permit_mynetworks, permit_auth_destination, permit_sasl_authenticated, reject"
With these taken care of, restart Postfix with:
sudo systemctl restart postfixExtra Authentications
Configure additional settings for Postfix if you need.
It's possible to reject many spam emails with the settings below.
However, you should consider to apply the settings, because sometimes normal emails are also rejected with them. Especially, there are SMTP servers that forward lookup and reverse lookup of their hostnames on DNS do not match even if they are not spammers.
sudo postconf -e "smtpd_client_restrictions = permit_mynetworks, reject_unknown_client_hostname, permit"
sudo postconf -e "smtpd_sender_restrictions = permit_mynetworks, reject_unknown_sender_domain,reject_non_fqdn_sender"
sudo postconf -e "smtpd_helo_restrictions = permit_mynetworks, reject_unknown_hostname,reject_non_fqdn_hostname, reject_invalid_hostname, permit"
Enable Postfix
sudo systemctl enable --now postfixConfigure Dovecot
Dovecot Settings
This example shows to configure to provide SASL function to Postfix.
vi /etc/dovecot/dovecot.conf and uncomment and if not use IPv6, remove [::]
listen = *, ::vi /etc/dovecot/conf.d/10-auth.conf and uncomment and change for the case you allow plain text auth
disable_plaintext_auth = noand then add login to
auth_mechanisms = plain loginvi /etc/dovecot/conf.d/10-mail.conf and uncomment and add
mail_location = maildir:~/Maildirvi /etc/dovecot/conf.d/10-master.conf and uncomment and add like follows Postfix smtp-auth
  unix_listener /var/spool/postfix/private/auth {
    mode = 0666
    user = postfix
    group = postfix
  }
vi /etc/dovecot/conf.d/10-ssl.conf and change to use SSL if available but not require SSL
ssl = yesEnable Dovecot
sudo systemctl enable --now dovecotTest the setup
Now that everything is set up, test Postfix by sending an email from the command line like so:
echo "Rocky Linux Rocks" | sendmail EMAILWhere EMAIL is a valid email address.
If you receive the email, congratulate yourself on a job well done. If the email fails to arrive, you might need to verify if your DNS records are correct and the changes have taken effect (they can take up to 24 hours). You can also check the maillog with a command like:
tail -f /var/log/maillogWith the tail running, open another terminal window and attempt to send another email to see what kind of logs are written. From that information, you can start troubleshooting any issues that are causing problems.
Used ref from
https://www.server-world.info/en/note?os=Rocky_Linux_8&p=mail&f=1
https://www.server-world.info/en/note?os=Rocky_Linux_8&p=mail&f=2