Kiwiplan
NOTICE: AS OF AND INCLUDING 6/9/25
Please call Advantive support for any further support.
Copyright Notice
SFL Services LLC has prepared this document for use only by their staff, agents, customers and prospective customers. Companies, names and data used as examples in this document are fictitious unless otherwise noted. No part of this document may be reproduced or transmitted in any form or by any means, electronic or mechanical, for any purpose, without the express written permission of SFL Services LLC, who reserve the right to change specifications and other information contained herein without prior notice. The reader should consult SFL Services LLC to determine whether any such changes have been made.
Licensing and Warranty
The terms and conditions governing the licensing of SFL Services LLC software consist solely of those set forth in the written contracts between SFL Services LLC and its customers. Except as expressly provided for in the warranty provisions of those written contracts, no representation or other affirmation of fact contained in this document, including but not limited to statements regarding capacity, suitability for use or performance of products described herein, shall be deemed to be a warranty by SFL Services LLC for any purpose, or give rise to any liability of SFL Services LLC whatsoever.
Liability
In no event shall SFL Services LLC be liable for any incidental, indirect, special or consequential damages whatsoever (including but not limited to lost profits) arising out of or related to this document or the information contained in it, even if SFL Services LLC had been advised, knew or should have known of the possibility of such damages, and even if they had acted negligently.
- Kiwiplan - VUE with systemd
- Kiwiplan - Business Rules Book
- Kiwiplan - KDW Data Warehouse
- Kiwiplan - Upgrade Shortcut Switches
- Kiwiplan - Bag of Tricks for ESP and MAP/MES
- Kiwiplan - Supplying Product Designs
- Kiwiplan - Multi-Plant Harmonization
- Kiwiplan - ULT Interface to Warehouse and Carriers
- Kiwiplan - ESP Stock Transfer
- Linux Server - Install RedHat 9.4
- Linux Server - Install RedHat 8.6
- Linux Server - Install Rocky 9.4
- Kiwiplan - Classic Purge Parameter Defaults
- Kiwiplan - Costing
- Kiwiplan - Farmout Routes in ESP
- Script - Import Data Script for Internal Customer Servers
- Kiwiplan - Box Plant Classic/Refresh To VUE Master Parameters
- Kiwiplan - Sheet Plant VUE Master Parameters
- SFL - Post-Site Audit Installation
- Kiwiplan - Conversion Tables for VUE (Microns)
- Kiwiplan - JAVA openJDK Install for Oracle Licensing Issues
- Script - Data Dump Script for Internal Customer Servers
- Script - Test Server .bash_profile
- Kiwiplan - ULT/VUE Setup a New Machine for Outside Farmout
- Kiwiplan - ESP Consignment Store
- Kiwiplan - ESP Crystal Reports Standards and Help Hints
- Kiwiplan - MAP Variables
- Kiwiplan - Add Printer for Classic and Refresh Sites
- Kiwiplan - MySQL log is fill or filled the drive
- Kiwiplan - Install Web Launcher
- Script - Deleting a KDE server from the Database
- Kiwiplan - KIDSENV Settings
- Kiwiplan - Server Load Monitor
- MySQL - Parameters Explained
- Dataset - Restrict Date in MAP MES VUE ESP
- Kiwiplan - Setup ULT for ESP
- Kiwiplan - Template Variables
Kiwiplan - VUE with systemd
Introduction
This document it to setup auto restart of the VUE services after a server restart.
Create The Following Files
kiwiplan@.service
sudo vi /etc/systemd/system/kiwiplan@.servicePlace the following in the file
[Unit]
Description=Kiwiplan services for %I
After=network-online.target mariadb.target
[Service]
Type=simple
User=remuser
Group=kiwiplan
ExecStart=/KIWI/services/servers.sh start %i
ExecStop=/KIWI/services/servers.sh stop %i
RemainAfterExit=true
PrivateTmp=false
LimitNOFILE=32768
LimitNPROC=32768
Environment=TERM=vt100
[Install]
WantedBy=multi-user.targetReload the changes
sudo systemctl daemon-reloadservers.sh
vi /KIWI/services/servers.shPlace the following in the file
#!/bin/bash
if [ $# -gt 1 ]; then
export TERM=vt100
export LOG=/tmp/kiwiplan.$2.log
echo $(date +'%Y-%m-%d %H:%M:%S') - $1 >> $LOG
case "$1" in
start)
/KIWI/services/sites/$2/current/bin/startservers.sh >> $LOG 2>&1
;;
stop)
/KIWI/services/sites/$2/current/bin/stopservers.sh >> $LOG 2>&1
;;
*)
exit 1
;;
esac
exit 0
else
echo "No Site passed"
exit 1
fiMake the file executable
chmod +x /opt/kiwi/services/servers.shRun Configurations
For the VUE site named 'vue' use the following:
To have it start on boot run :
systemctl enable kiwiplan@vue.service To stop it from starting at boot time :
systemctl disable kiwiplan@vue.serviceTo start :
systemctl start kiwiplan@vue.serviceTo stop :
systemctl stop kiwiplan@vue.serviceTo view status :
systemctl -l status kiwiplan@vue.serviceKiwiplan - Business Rules Book
Business Rules
The business rule engine is custom main but it uses part of the following logic:
Ternary Conditional Operand/Operator
Kiwiplan Document Generator
The KDG software back end is built using the following engine:
Unit Load (StimulSoft/KDG)
Reconstructing the SSCC barcode_key of the unit (barcode_key) is not imported into ESP with the unit. Will use this when creating auto interplant units in Plant ULT, so that the producing plants barcode can be scanned when unit arrives in .
"[$s1]:=""0019419839""
[$s2]:=format([uniqueid],""000000000"")
[$barcode]:=[$s1]&[$s2]
[$d12]:=val(substring([$s2],2,1))
[$d13]:=val(substring([$s2],3,1))*3
[$d14]:=val(substring([$s2],4,1))
[$d15]:=val(substring([$s2],5,1))*3
[$d16]:=val(substring([$s2],6,1))
[$d17]:=val(substring([$s2],7,1))*3
[$d18]:=val(substring([$s2],8,1))
[$d19]:=val(substring([$s2],9,1))*3
[$chkdigit]:=[$d12] + [$d13]+ [$d14]+ [$d15] + [$d16]+[$d17]+ [$d18] + [$d19] +78
[$d20]:=(roundup([$chkdigit]/10)*10)-[$chkdigit]
[Userfieldul2]:=[$barcode]&[$d20]"Kiwiplan - KDW Data Warehouse
Introduction
The document assumes that you have the server build with a Kiwiplan environment.
These are things that need to be done on after the installation of KDW.
These instructions may not follow the same folder setup our was installed using the “KDW” site name.
Environment
Add these to the environment to make it easier to navigate to the folders
export KIWIBASE=/KIWI
export KIWI=${KIWI:-/KIWI/site_$PLANTID}
export KBIN=${KBIN:-${KIWIBASE}/services/etl/kdw/current/kiwiplan/bin}
export KLOG=${KLOG:-${KIWIBASE}/services/etl/kdw/current/kiwiplan/log}
export KCONF=${KCONF:-${KIWIBASE}/services/etl/kdw/current/kiwiplan/conf}Logout and log back in to get the variables and be able to use them
Admin Console prep
You need to add the dashboard to the the pam authentication
cd $KCONF
sudo cp kdw-adminconsole_eample /etc/pam.d/kdw-adminconsoleDatabase Readiness
Run this to make sure there are no table lock.
USE master;
GO
ALTER DATABASE [kdw_master_datawarehouse]
SET SINGLE_USER
WITH ROLLBACK IMMEDIATE;
GO
ALTER DATABASE [kdw_master_datawarehouse] SET READ_COMMITTED_SNAPSHOT ON;
GO
ALTER DATABASE [kdw_master_datawarehouse]
SET MULTI_USER;
GOUSE master;
GO
ALTER DATABASE [kdw_working_datawarehouse]
SET SINGLE_USER
WITH ROLLBACK IMMEDIATE;
GO
ALTER DATABASE [kdw_working_datawarehouse] SET READ_COMMITTED_SNAPSHOT ON;
GO
ALTER DATABASE [kdw_working_datawarehouse]
SET MULTI_USER;
GOMySQL Connector
https://dev.mysql.com/downloads/connector/j/
For 9.80.x revision you must use 5.41 as version 8.x.x do not work.
Extract the file and then copy the .jar to the DIST folder.
[/KIWI/services/etl/kdw/current/kiwiplan/dist]$
mysql-connector-java-5.1.44-bin.jarSetting Console
cd /opt/kiwi/services/etl/kdw/current/kiwiplan/conf
cp kdw-adminconsole_example /etc/pam.d/kdw-adminconsole
chmod 777 /etc/pam.d/kdw-adminconsoleExtra Executors
To setup extra executors to reduce the time of execution for each system.
You will need to copy the executor properties files to another by adding a numeric value to the name
[/KIWI/services/etl/kdw/current/kiwiplan/conf]$
cp application_executor.properties application_executor1.propertiesThe new file needs to be edited and this value changed
## KDW executer name
kdw.executor-name=Main_ExecutorTo the following value
kdw.executor-name=Main_Executor1Revision 9.8.x
Make sure you un the following.
[/KIWI/services/etl/kdw/current/kiwiplan/bin]$
dwdate_initialization.shRestart Script
You can create a restart.sh script with the following
[/KIWI/services/etl/kdw/current/kiwiplan/bin]$
vi restart.shThen add this in the file
:
./stopExecutors.sh
./stopSchedulers.sh
./startSchedulers.sh
sleep 15
./startExecutors.shMake the file executable for the system
[/KIWI/services/etl/kdw/current/kiwiplan/bin]$
chmod 777 restart.shKiwiplan - Upgrade Shortcut Switches
These are placed on the shortcut of the upgrade.exe.
Upgrade Options Only (depreciated 7.80)
Evaluator:
Option: 1 Will show you the available revisions to upgrade from for the revision you are trying to upgrade to if it fails, it returns database versions though, not msi versions.
(Depricated) Espdatapurge:
This is now on a service setup.
Purge data in ESP before upgrading, it uses different datetime fields depending on the record, and depends on the statuses of some objects to determine if the transactional record is purged
NOTE: If a docket is older than your purge time, if it is in printed status, it will not purge
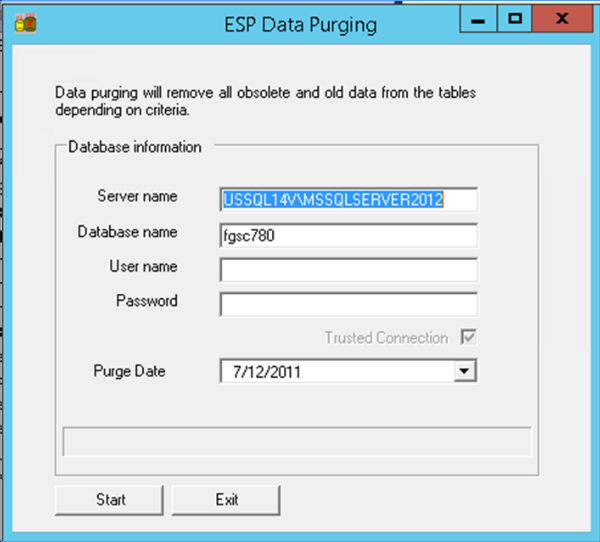
Upgrade Options Only
Applyscriptfolder:
This is to point the upgrade to look at another script folder but will bypass version checking so you can break things. C:\Kiwiplan\EspServ\Upgrade.exe applyscriptfolder
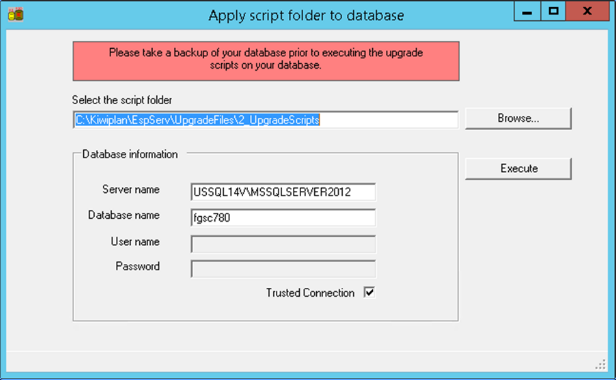
Importactivedirectory:
This is to import and sync the Active Directory after the upgrade completes. C:\Kiwiplan\EspServ\Upgrade.exe importactivedirectory
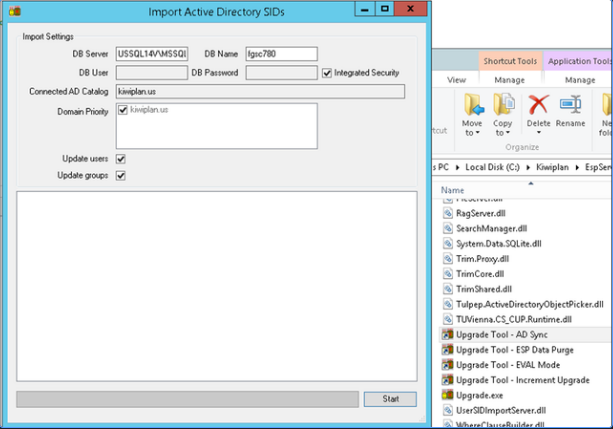
C:\Kiwiplan\EspServ\Upgrade.exe espdatapurge
C:\Kiwiplan\EspServ\Upgrade.exe evaluator:1
Kiwiplan - Bag of Tricks for ESP and MAP/MES
Agents
Agents
ESP Agent Retry Errors Setup
Agent can be set up to retry errors so that the system reprocesses failed requests.
InfClient/Section/Agent General
Name Scope Value
Restart Error Text whole Automation error
Maximum Automatic Retry Count For Failed Requests whole 3
InfClient/Section/Agent Errors To Retry
Name Scope Value
Agent exited without completing request whole Agent exited
Cannot find matching dockets whole Cannot find matching dockets
changed by another user whole changed by another user
Clipboard whole Clipboard
Deadlock whole deadlock
Execution canceled whole Execution canceled
Operation Cancelled whole Operation canceled
PalletMovement whole PalletMovement
Updated by another user whole Updated by another user
Application Shortcut Line Options
The 1 equals true and the 0 equals false. You can also use True or False those will also turn these options on or off.
All of these options have the semicolon to separate the option with the True or False
Ex: PrintToFile:1 or PrintToFile:True
KiwiXplor & Agent Options
DBServer:
This is the hostname of the SQL server.
DBName:
This is the DataBase name to use on the SQL server.
DBPassword:
This is to specify a SQL DataBase password to log into SQL server.
DBLogin:
This is to specify a NT/Network SQL DataBase Login to log into SQL server.
NTLogin:
Replaces the Domain user name to the one specified.
Plant:
Is the plant code (from MAP) in GEN/PL
SQLLog:
This enables logging of calls to the SQL DataBase
Width:
Is the width of the ESP window that opens by default
Height:
Is the length of the ESP window that opens by default
Object Log:
Logs object usage in ESP, an interval defined in seconds
HostDebugLevel:
Is the Tcp connection between ESP and the Unix system (aka KIDS) debugging level 0 - 5 (5 = most detailed)
KiwiXplor Options Only
HostName:
This is to change the Linux server
HostDataSet:
This is to access the MAP DataSet that is specified in the KIDSENV file. For more info on this parameter look at the “First Time Installation Guide”.
HostUser:
This is to specify the Unix server login name to log into the MAP DataSet.
HostPassword:
This is to specify the Unix server login password to log into the MAP DataSet.
DBTimeOut:
Is a setting for the amount of time in seconds before the database should give up waiting for a reply from the SQL DataBase.
Agent Options Only (depreciated after 7.80)
AgentNumber:
This is used when more than one Agent has been setup in ESP to handle different types of requests
PrintToFile:
This is used if printing documents to a file instead of physically printing (good for testing).
ShowWord:
This is used if Word is to display the populating of templates as Word documents are printing
Freeze a ESP dataset in time
Freezes your dataset in time. To use this you will have to create a file in the ESPServ folder and call it “profile.ini” and then add the following within the file
[SheetPlant]
StartDateTime=10/30/2014 16:25:25
TimeZone=Eastern Standard Time
LocaleID=1033
[CHH]
StartDateTime=02/10/03 14:45:00
TimeZone=New Zealand Standard Time
LocaleID=5129Using this option on the properties command line you have to use it like this
profilesection:CHHReference https://kall.kiwiplan.co.nz/kall/kiwiplan/issueViewer.do?action=viewIssue&searchId=7&issueId=72725
Example of KiwiXplor Options
KiwiXplor Target Line
Example of a target:
“K:\Kiwiplan\Kiwiplan\KiwiXplor.exe” HOSTUSER:john HOSTPASSWORD:doe HOSTNAME:192.168.242.129 HOSTDATASET:Cinncinati DBSERVER:172.16.6.16 DBNAME:espboxNote: Make sure that there is a space between each of the options e.g.: HOSTUSER:john(space)
Example of Agent Options
Agent Target Line
Example of a target:
K:\Kiwiplan\Kiwiplan\EspAgent.exe AgentNumber:3Tricks & Shortcuts
Main Keys
F4 is a shortcut key used to display a combo field box (drop down box).
Simply click into the field and hit F4.
F5 is a shortcut key used to bring up another window from within the current one you are in.
Simply click into the field (even if it is grayed out) and hit F5
E.g.: If you are in the Product Design window you can click on the company field, press F5, and another window will open, displaying the company.
F8 is a shortcut key used to bring up special instructions in any Comment or Special Instruction field. These special instructions are stored in the Macro section of the relevant application.
Simply click into the field and hit F8
Alternative Manual Invoice/Credit Parameter
Several of the external Word docs in ESP are designed to allow for multiple templates of the same document. For example, it’s possible to have many different invoices. The standard invoice template is used unless a different template file is specified on the Documentation tab on the Company form for a particular company. This is the same for order confirmations, price lists, dockets etc.
The manual invoice and credit are not set up this way. You cannot attach a different manual invoice template or manual credit template to a customer. However, there are two parameters that allow for the use of alternative template files for manual invoices and credits:
EspClient/Invoicing/ Alternative Manual Invoice Template Formula
EspClient/Invoicing/ Alternative Manual Credit Template Formula These parameters specify the template to be used for the manual invoice and manual credit using a business rule in the Value field.
Example:
If the parameter has the value:
iif([company.region]="Export", "ExportInvoice", iif([productcode]="Tool", "ServiceInvoice", "ManualInvoice"))Then:
-
If the region for the company is set to Export, then the ExportInvoice template is used.
-
If the region is not set to Export and the Product code is Tool then the ServiceInvoice template is used.
-
In all other cases, the ManualInvoice template is used.
Kiwiplan - Supplying Product Designs
This section describes how to set up one product design to be supplied by another. This scenario is needed when goods are produced for stock, but must be erected/finished at a future unknown date. This means we need a means of tracking stock of the unfinished product and finished product.
ESP and MAP provide a solution for this using two stock PD’s. The first one (unfinished) is converted and booked into store. When the last conversion process is required, a topup of the second (finished) PD is placed. The feedback of this topup order will automatically decrease the stock of the first PD.
Parameters, Store and Machine Setup
Machine Setup
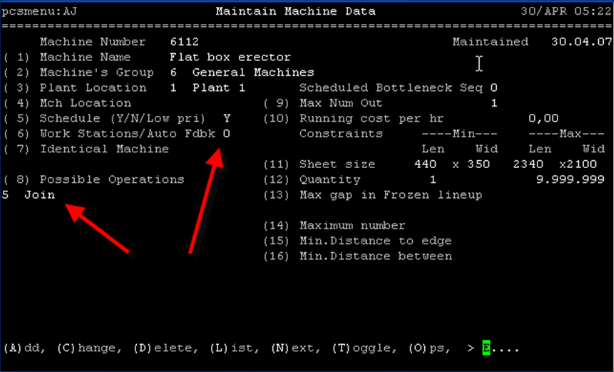
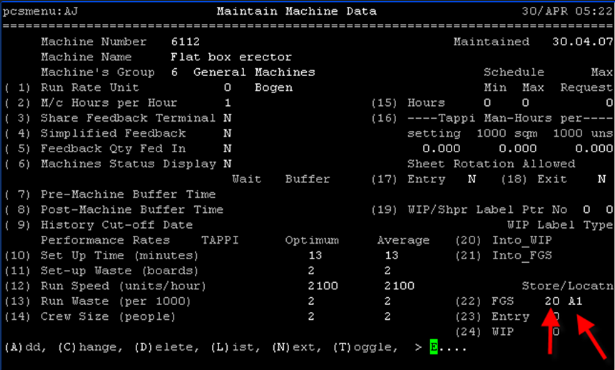
For this to work there are two machines that must be set up correctly. There must be a Supply From Stock machine. This machine should have the Supply operation 17, and be set to auto-feedback, triggered by feedback of the next step.
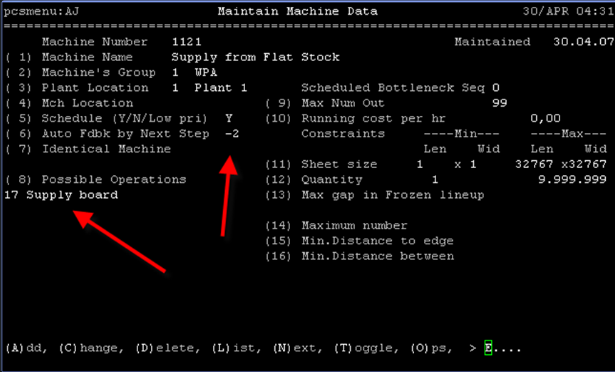
The second machine is the conversion machine that finishes the product. This machine should have standard feedback, the operations that are required to finish the product, and be attached to the store and location where the unfinished product will be stored.
Store Setup
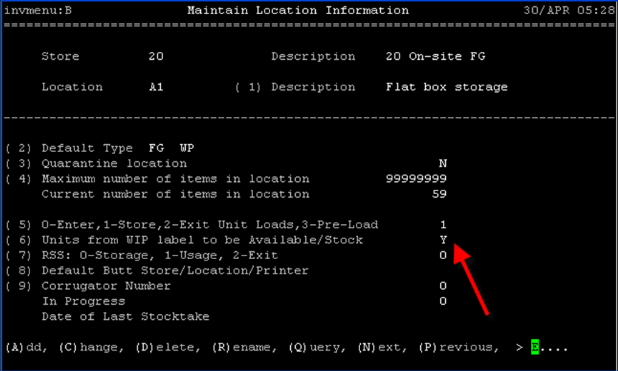
The store location where the unfinished product is stored must have ‘Units from WIP label to be Available/Stock’ set to Y.
Parameters
Two parameters need to be set in MAP:
-
PCS FB 57 “Auto Board Xfers for Hort Jobs” = Y
-
GEN PL 33 “FGS Supply Machine for Hort.” = machine number for Supply From Stock machine
Product Design Setup
Unfinished Product Design
This PD must have a stock line for the store that was specified on the finishing machine described previously in this section.
The machine route should be set up as normal, without the finishing step.
Finished Product Design
The finished PD must also have a stock line.
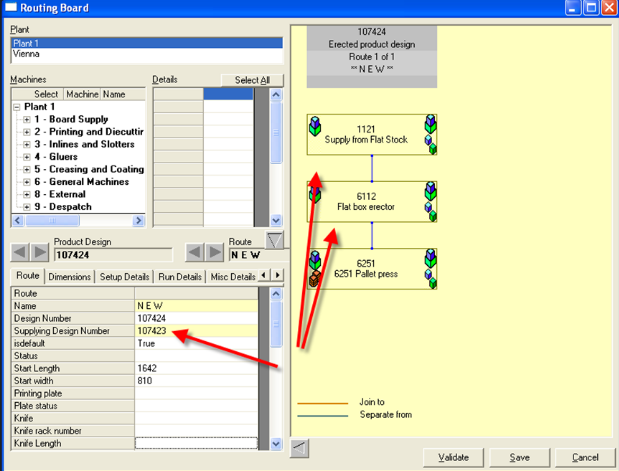
The machine route should be the Supply from Stock machine, the finishing machine and the strapper, so the operations on the PD need to be Supply board, whatever finishing operations are required, and strapping.
The machine route should have the unfinished PD number specified in the ‘supplying design number’ field.
Business Rule for Special Instruction
There is currently nothing on the order for the finished PD to indicate that it is being supplied by another PD. However this can be easily remedied by writing a business rule to the Order business class that adds the supplying PD number to the special instructions.
Expression:
[Specialinstructions]:=[Specialinstructions] & iif([Ordertype]<>"calloff" AND isobjectvalid([Route.SupplyingProductDesign])=true AND findcount("to supply this order",[specialinstructions])=0," !!!!! Please use PD" & [Route.SupplyingProductDesign.Designnumber] & " to supply this order !!!!!","")
This rule appends a message to the existing special instructions, but only if the following conditions are true:
-
the order is not a calloff
-
the route attached to the order has a supplying PD number
-
the message isn’t already in the special instructions
The message that is added to the special instructions:
!!!!! Please use PD**** to supply this order !!!!!
where **** is the supplying PD number from the machine route.
Ordering, Feedback and Delivery
Here is the sequence of events for this scenario:
-
topup is placed for the unfinished PD to increase the stock. It is converted and booked into store
-
topup is placed for the finished PD
-
the finishing step is fed back
-
this automatically feeds back the Supply from Stock step, drops the unfinished stock levels and increases the finished stock levels
-
calloff order is placed for delivery of finished product
Kiwiplan - Multi-Plant Harmonization
What fields and areas that need to be standardize in ESP and MAP.
This section was put together from the aspect if we were going forward either with one MAP database or Multi-MAP databases scenario.
All plants in one ESP database
Here is a list of fields/lookups that need to be standardized in the ESP database
-
Destination Codes
-
Styles for Descriptions and print outs
-
Stacking Patterns shared with MAP parameters
All countries/states/provinces in a separate MAP Database
Here is a list of fields/lookups that need to be standardized all across the MAP databases
-
Colors
-
Pallet Types
-
Top Board Codes
-
Closure Codes
-
Strapping Codes
-
Stacking Patterns shared with ESP
-
Tab Types
-
Score Types
-
Ink Types
10) Tools Types
11) Tool Names when the tool is shared
12) Machine Operations
13) Unit Descriptions
14) Basic Board Codes
15) Downtime Codes
16) Waste Codes
17) Machine numbers
18) BRD-ST, Material Status
19) CORR-FL, Corrugator flutes
20) CSC-BS, Board structure
21) CSC-CC, Coating codes
22) CSC-OS, Order status codes and desc
23) CSC-PC, Paper class
24) GEN-FB, Default waste codes
25) GEN-LT, Label types
26) GEN-QC, Down time categories
27) GEN-UM, Units of measure
28) GEN-WC, Waste code classes
29) PCS-QE, PCS - machine groups
30) PCS-QO, PCS - order status
31) PCS-QR, PCS - run rate units
32) Label Formats
33) Board Code
Board Codes
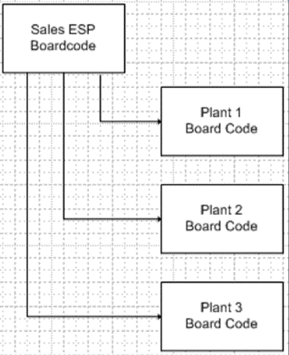
The image below shows how we would setup board codes to be used in MAP. The ESP sales board code would only be seen in ESP for costing and sale purposes. The plant board code would only be seen on the production side and used to produce the item. Depending on the local plant’s available papers the combination would change at every plant. The producing plant’s combination would be setup in the CSC system to have an upgrade downgrade path to the top board code from sale board code.
NOTE: There is currently a limit to 16 upgrade and downgrade paths.
Kiwiplan - ULT Interface to Warehouse and Carriers
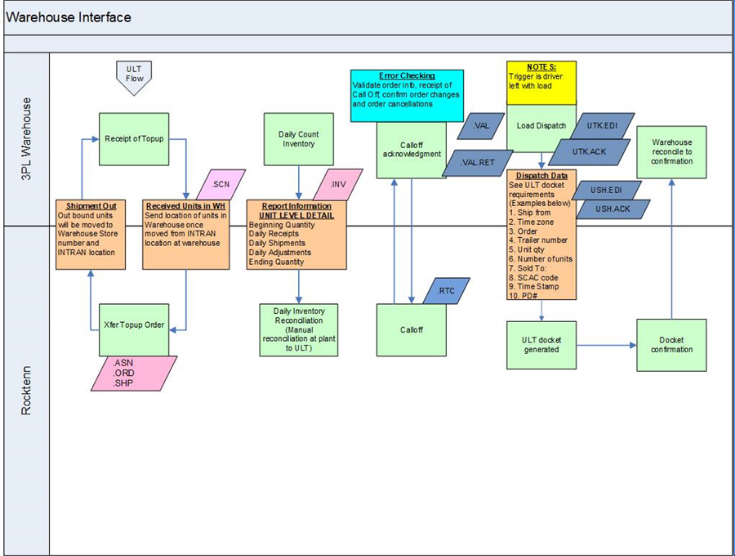
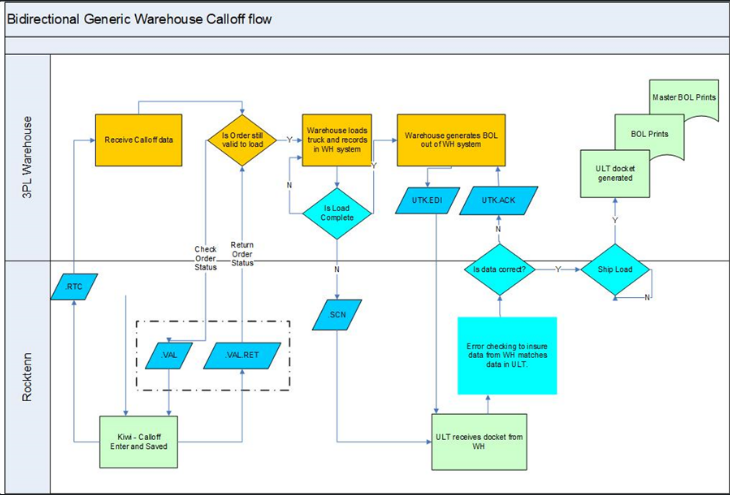
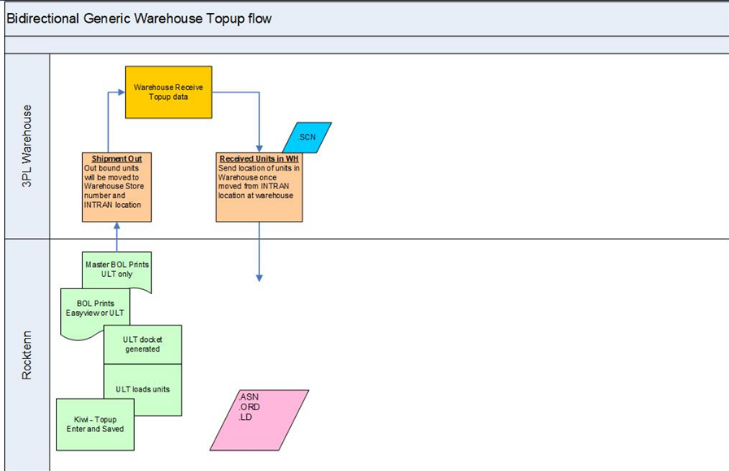
This is an interface that can be used to import loaded trucks at a remote location and also be able to ship them in ULT.
Reference
https://kall.kiwiplan.co.nz/kall/kiwiplan/issueViewer.do?id=5447259
Programs
imptruck
This program imports the jobs and units that would be on the remote load
shptruck
This program ships the truck in ULT.
NOTE: You can also unship and undesptch via the interface to undo loads.
Example of an interface running in Canada
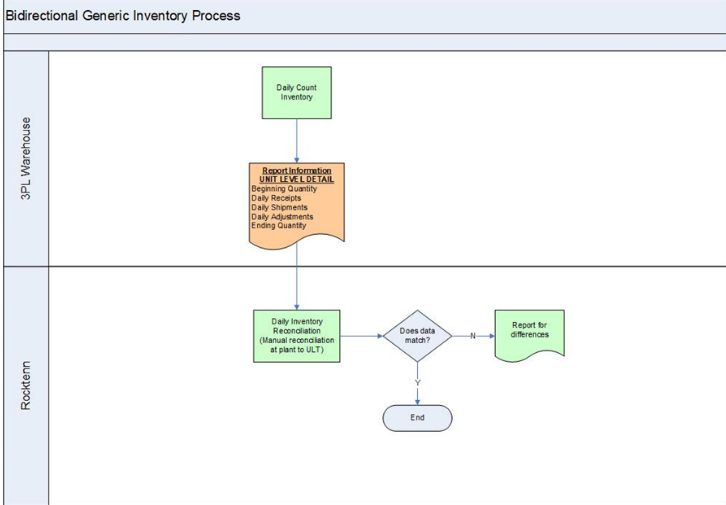
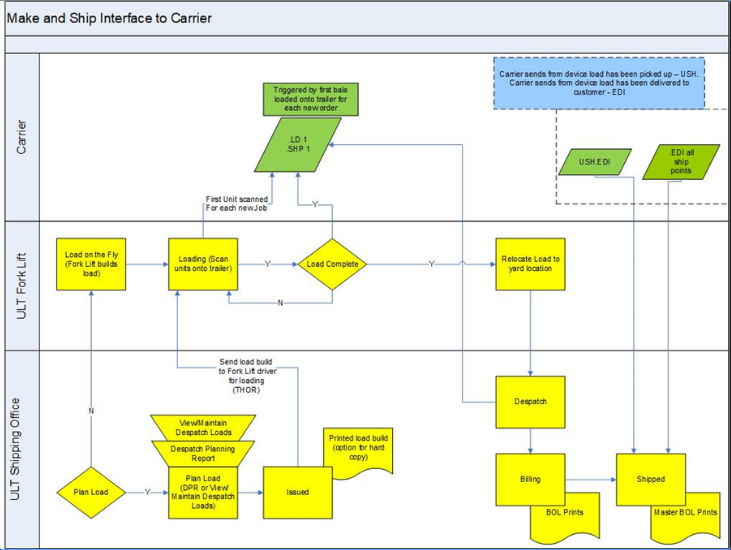
Kiwiplan - ESP Stock Transfer
This is to be able to print out a stock transfer docket.
ULT Setup
Set the following MAP parameters to enable export of transfer data:
GEN/EE/Layout Version for ULTDLD (ULT Export) to 2
pcsmenu:AP MAINTAIN PARAMETERS 13/Sun 13:48
================================================================================
System Description V/M
GEN General for many systems
Prefix Description View_Mnt Default_key Many_records_allowed
EE Electronic Data Export M Y
Number Parameter Value
1 Data Type ULTDLD
2 Description Docket Export
3 Directory Name /app01/kiwi/site_0068/work/ultdld/
4 Last File Number Used 3
5 Script name for File Export EspRenameDkt
6 Fixed record length 0=variable 0
7 File Name (optional)
8 Layout Version 2
INV/DL/Allow File Export (Y/N) to Y
kwutils:C MAINTAIN PARAMETERS 13/Sun 13:50
================================================================================
System Description V/M
INV Inventory Management/Tracking
Prefix Description View_Mnt Default_key Many_records_allowed
DL Despatch Load Parameters M PARAMS N
Number Parameter Value
1 Key PARAMS
6 Allow File Export (Y/N) Y
INV/DL/Include in export transfer to Y
kwutils:C MAINTAIN PARAMETERS 13/Sun 13:51
================================================================================
System Description V/M
INV Inventory Management/Tracking
Prefix Description View_Mnt Default_key Many_records_allowed
DL Despatch Load Parameters M PARAMS N
Number Parameter Value
35 Include in export transfer Y
INV/DL/When set Load to "Shipped" Generate GLBOL export to Y
kwutils:C MAINTAIN PARAMETERS 13/Sun 13:51
================================================================================
System Description V/M
INV Inventory Management/Tracking
Prefix Description View_Mnt Default_key Many_records_allowed
DL Despatch Load Parameters M PARAMS N
Number Parameter Value
33 When set Load to "Shipped"
34 Generate DLBOL export Y
ESP Setup
Ensure your FGS/Stores parameters in ESP are set correctly, in particular FGS/Stores/Store x - FGS stk store xfer machine number for each store you are transferring to and from.
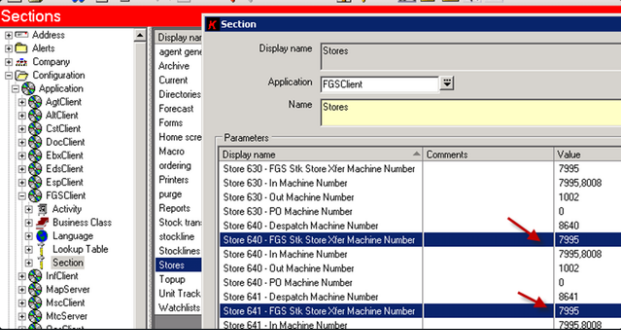
Verify you store locations and added highlighted (FGS Stk Store, In Machine & Out Machine)
invmenu:C Select Store 13/Sun 14:18
================================================================================
Total Stores = 14
Idx Store Description 1_L Plant Items Off Address Line 1
5 80 WINSTON-SALEM MAIN FG STO N 1 0 8080 N. Point Blvd
6 81 Westpoint Warehouse N 1 0 3946 Westpoint Blvd
7 124 Reynolds Packaging N 1 0 2249 Virginia Ave
8 125 Richmond Corrugated N 1 0 5301 Corrugated Rd
9 126 Carolina Container N 1 0 5701 Quality Way
10 127 South Atlantic N 1 0 3932 Westpoint Blvd
11 128 Phoenix Packaging N 1 0 125 E. 9th St.
12 129 Driscoll Group N 1 0 1084 W. 4th St.
13 130 RKT Latta N 1 0 4461 Hwy 301 S
14 143 Freeman Container N 1 0 121 Freeman Park Drive
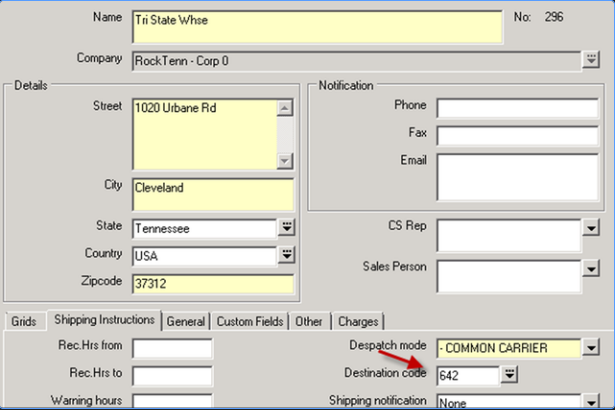
You must add the FROM and TO store number of the stores that will be used in the transfers in the despatchmode lookup table.
Once the store numbers are in the despatchmode lookup table then you must go to the relative address. To do this SEARCHàAddressàStore Number and enter the store number for the FROM and also on the TO and set the drop down for the despatchmode.
FROM
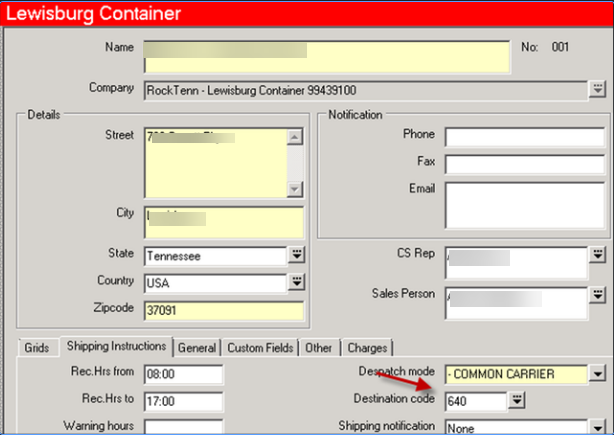
TO
Linux Server - Install RedHat 9.4
Summary
Instructions on the install and configuration of a Linux server for Kiwiplan.
Details
Prerequisites
VMware, KVM, Hyper-V machine to host the installation
You will need to use the following command when you vi your files as you cut and paste:
Once in vi you have to hit the colon and then type “set paste”
:set pasteThis will not mess with the paste you put in.
Instructions
Preparing the OS
This is to install the OS on a VmWare
VMWare Setup using GUI
Boot ISO

Select “Install RedHat Linux”

Select Language

Then Select “Network & Hostname” from install menu.

Set hostname and hit apply
Click Configure and set the IP
Click on IPv6 Settings and disable it


Select “Installation Destination”
Make sure you select custom to configure the drives and click done

Click on the blue link to auto configure them

Make sure the /home drive is highlighted and click the “-“ minus sign to remove that drive

Add the pink value of the space available after the delete of the home folder.
Enter “350 GiB” (total of drive space you created for the VM), this will recalculate the size of the drive and then hit “Done”.

Hit “Accept Changes”
Click on the “Root Password” and click “Allow root SSH login with password” and then click “Done”

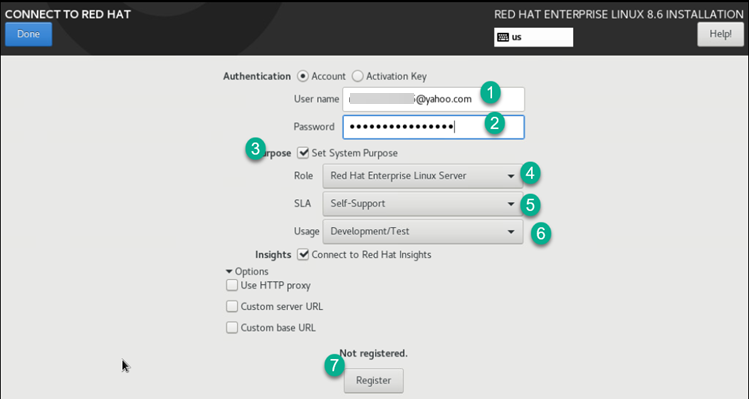
Click “Connect to Redhat”
Enter you Account details unless you are building a VM template, if not then select the purpose of the server then click on “Register”

Click on “Done”


Click “Software Selection” and select “Minimal Install”

Click “Begin Installation”

When finished click on “Reboot System”
Network Text GUI
Login with root
NOTE: Run # nmtui Only if you did not do the GUI version

Select Edit connection

Select interface and hit enter

IPV4 change to manual and select show, fill in the information
IPV6 Change to disabled, press OK
Highlight Automatically connect and press the space bar
press OK
Start setup Instructions for RedHat Linux
Connect to the Server
Use a SSH connection to the server the remaining of the commands in order to cut and pates them in instead of using the VM interface.
Commands to run
This will show all command that need to be ran to update within the OS to start the configuration.
All the command are within each box
Update the System
After install update system packages for the needed configuration.
dnf upgrade -yDisable SeLinux
setenforce 0
sed -i 's/^SELINUX=.*/SELINUX=disabled/g' /etc/selinux/configDisable firewall
systemctl disable firewalld.serviceEpel Release
subscription-manager repos --enable codeready-builder-for-rhel-9-$(arch)-rpms
dnf install https://dl.fedoraproject.org/pub/epel/epel-release-latest-9.noarch.rpm -yAfter Epel installation rerun the upgrade to update if any are needed
dnf upgrade -yInstall core software
Install Packages
Add the needed packages
Install required system packages
dnf install bind-utils bzip2 cups cifs-utils enscript ftp gdb ghostscript java-1.8.0-openjdk-headless java-11-openjdk-headless krb5-workstation ksh lftp lrzsz lsof libnsl lzop mlocate mutt ncompress net-tools net-snmp net-snmp-utils net-tools nfs-utils nmap nvme-cli openldap-clients openssh-clients psmisc realmd rsync samba-client strace sysstat tcpdump telnet telnet-server tmux unix2dos vim vim-enhanced vsftpd wget xfsdump vsftpd htop mc rsyslog rsyslog-doc postfix dbus-daemon s-nail dovecot cyrus-sasl cyrus-sasl-lib cyrus-sasl-plain tree figlet toilet coreutils rclone nano -yIf you are running on a virtual machine run the following
Install VM Tools
dnf install open-vm-tools -ySwap Settings
sysctl: The administrative utility used to modify Linux kernel parameters at runtime.vm.swappiness: The specific virtual memory parameter that controls the balance between swapping application memory (anonymous pages) and clearing disk caches (file-backed pages).=10: The assigned value on a scale from 0 to 100sysctl vm.swappiness=10Install vim color for scripting
dnf install git -y
git clone https://github.com/flazz/vim-colorschemes ~/.vim/
cp ~/.vim/colors/desert.vim /etc/vimrc.localConfigure Installed Packages
Configure the packages
Enable Telnet run the following to enable and start the packages
systemctl enable telnet.socket
systemctl restart telnet.socketONLY CHANGE FOR OLDER SSH ALGORYTHM IF NEEDED FOR LEGACY DEVICES
CONTINUE HERE IF SSH LEGACY IS NOT NEEDED
Enable Time Synchronization run the the following and add your domain time server
vi /etc/chrony.confAdd your server below the following and make sure you change the domain name from sflservicesllc.com
# These servers were defined in the installation:
#server _gateway iburst
server domain.sflserviesllc.com iburst preferEnable Time Synchronization
systemctl enable --now chronydNote: Time-zone changes are made with the command
timedatectlEnable FTP run the following
sudo sed -i 's/^anonymous_enable=.*/anonymous_enable=NO/' /etc/vsftpd/vsftpd.conf
sudo sed -i 's/^local_umask=.*/local_umask=002/' /etc/vsftpd/vsftpd.conf
sudo sed -i 's/^#ascii_upload_enable=.*/ascii_upload_enable=YES/' /etc/vsftpd/vsftpd.conf
sudo sed -i 's/^#ascii_download_enable=.*/ascii_download_enable=YES/' /etc/vsftpd/vsftpd.confStart and Enable FTP for transfer in and out for us or other vendors
systemctl enable --now vsftpd.serviceONLY CHANGE THE FOLLOWING IF YOU HAVE REMOTE LOGGING
Remote Logging
Then add the following at the end of the file but make sure you update the IP address and replace the XXX's
sudo tee -a /etc/rsyslog.conf > /dev/null << 'EOF'
# Forwarding Rules
*.* @192.168.XXX.XXX:514 # use @ for UDP Protocol
*.* @@192.168.XXX.XXX:514 # use @@ for TCP Protocol
auth.* @192.168.XXX.XXX:514 # only for authentication based records
EOFCONTINUE HERE IF NOT REMOTE LOGGING
Enable Rsyslog to enable logging locally and remotely
systemctl enable --now rsyslogEmailing backup the original file
cp /etc/postfix/main.cf /etc/postfix/main.cf.bakUpdate the following with a remote or local email server and make sure you change the domain name from sflservicesllc.com
# Set host, domain, and relayhost
sudo postconf -e "myhostname = sflservicesllc.com"
sudo postconf -e "mydomain = sflservicesllc.com"
sudo postconf -e "relayhost = mail.sflservicesllc.com"
# Check for syntax/configuration errors
sudo postfix check
# Reload Postfix to apply the configuration changes live
sudo postfix reload
# Check the specific parameters
postconf myhostname mydomain relayhostOptional: Update the following for no email server and make sure you change the domain name from sflservicesllc.com and only allow certain networks
# Set mynetworks
sudo postconf -e "mynetworks = 127.0.0.0/8, 168.100.189.0/28"
# Verify the updated parameter
postconf mynetworks
# Check syntax and reload Postfix
sudo postfix check
sudo postfix reloadEnable Postfix
systemctl enable --now postfixTest your config this way
echo "Install of Linux Rocks $HOSTNAME" | sendmail steve.ling@sflservicesllc.comLocale add-ons to make sure that ANSI applications display correctly so edit the following and replace all of the values with the following
Edit the following:
sudo cat > /etc/locale.conf << EOF
LANG="en_US"
SUPPORTED="en_GB:en_GB-.UTF-8:en_US:en_US.UTF-8:de_DE:de_DE.UTF-8"
SYSFONT="latarcyrheb-sun16"
EOFONCE ADDED THE ABOVE CONFIGURATION THEN EXIT AND LOG BACK IN
Bash colors and Prompt
Bash for root for color edit the following:
Dependent on
dnf install figlet toilet -yCreating Aliases
sudo cat > /etc/profile.d/custom-aliases.sh << EOF
# Common interactive aliases for all users
alias rm='rm -i'
alias cp='cp -i'
alias mv='mv -i'
alias vi='vim'
alias tailf='tail -f'
EOFServer Warning
sudo tee /etc/profile.d/custom-prod-warning.sh > /dev/null << 'EOF'
# /etc/profile.d/custom-prod-warning.sh
# Production warning banner – only for real interactive logins
# 1. Exit immediately if this is not an interactive shell
[[ $- != *i* ]] && return
# 2. Exit if we don't have a real terminal
[[ -t 0 && -t 1 ]] || return
# 3. Exit if SSH is running a forced command (rsync, scp, ansible, etc.)
# OpenSSH sets SSH_ORIGINAL_COMMAND in these cases
[[ -n "${SSH_ORIGINAL_COMMAND:-}" ]] && return
# --- Safe to show the banner from here ---
RED='\033[1;31m'
YELLOW='\033[1;33m'
NC='\033[0m'
echo
if command -v figlet >/dev/null 2>&1; then
figlet -f big "PRODUCTION" | while IFS= read -r line; do
printf '%b%s%b\n' "$RED" "$line" "$NC"
done
figlet -f big "SERVER" | while IFS= read -r line; do
printf '%b%s%b\n' "$RED" "$line" "$NC"
done
else
echo -e "${RED}***** PRODUCTION SERVER!! *****${NC}"
fi
echo
echo -e "${YELLOW} *** EXTREME CAUTION REQUIRED ***${NC}"
echo -e "${RED}This is a LIVE PRODUCTION system.${NC}"
echo -e "${RED}Unauthorized access is strictly prohibited.${NC}"
echo -e "${RED}All activity is logged and monitored.${NC}"
echo -e "${YELLOW}Think twice before running commands!${NC}"
echo
EOFCreating Colorful Prompts
sudo tee /etc/profile.d/custom-prompt-and-colors.sh > /dev/null << 'EOF'
# Custom LS_COLORS and improved multi-line colored prompt
# Vibrant LS_COLORS (directories bold blue on gray, etc.)
LS_COLORS='rs=0:di=01;44:ln=01;36:mh=00:pi=40;33:so=01;35:do=01;35:bd=40;33;01:cd=40;33;01:or=40;31;01:su=37;41:sg=30;43:ca=30;41:tw=30;42:ow=34;42:st=37;44:ex=01;32:*.tar=01;31:*.tgz=01;31:*.arj=01;31:*.taz=01;31:*.lzh=01;31:*.lzma=01;31:*.tlz=01;31:*.txz=01;31:*.zip=01;31:*.z=01;31:*.Z=01;31:*.dz=01;31:*.gz=01;31:*.lz=01;31:*.xz=01;31:*.bz2=01;31:*.bz=01;31:*.tbz=01;31:*.tbz2=01;31:*.tz=01;31:*.deb=01;31:*.rpm=01;31:*.jar=01;31:*.rar=01;31:*.ace=01;31:*.zoo=01;31:*.cpio=01;31:*.7z=01;31:*.rz=01;31:*.jpg=01;35:*.jpeg=01;35:*.gif=01;35:*.bmp=01;35:*.pbm=01;35:*.pgm=01;35:*.ppm=01;35:*.tga=01;35:*.xbm=01;35:*.xpm=01;35:*.tif=01;35:*.tiff=01;35:*.png=01;35:*.svg=01;35:*.svgz=01;35:*.mng=01;35:*.pcx=01;35:*.mov=01;35:*.mpg=01;35:*.mpeg=01;35:*.m2v=01;35:*.mkv=01;35:*.ogm=01;35:*.mp4=01;35:*.m4v=01;35:*.mp4v=01;35:*.vob=01;35:*.qt=01;35:*.nuv=01;35:*.wmv=01;35:*.asf=01;35:*.rm=01;35:*.rmvb=01;35:*.flc=01;35:*.avi=01;35:*.fli=01;35:*.flv=01;35:*.gl=01;35:*.dl=01;35:*.xcf=01;35:*.xwd=01;35:*.yuv=01;35:*.cgm=01;35:*.emf=01;35:*.axv=01;35:*.anx=01;35:*.ogv=01;35:*.ogx=01;35:*.aac=00;36:*.au=00;36:*.flac=00;36:*.mid=00;36:*.midi=00;36:*.mka=00;36:*.mp3=00;36:*.mpc=00;36:*.ogg=00;36:*.ra=00;36:*.wav=00;36:*.axa=00;36:*.oga=00;36:*.spx=00;36:*.xspf=00;36:'
export LS_COLORS
# Only set up the fancy colored prompt in real interactive terminals
if [[ $- == *i* ]] && [[ -t 0 && -t 1 ]] && [[ -z "${SSH_ORIGINAL_COMMAND:-}" ]]; then
# Color and style variables
RESET=$(tput sgr0)
BOLD=$(tput bold)
BG_GRAY=$(tput setab 8)
FG_RED=$(tput setaf 1)
FG_MAGENTA=$(tput setaf 5)
FG_GREEN=$(tput setaf 2)
FG_CYAN=$(tput setaf 6)
# Multi-line prompt – all non-printing sequences wrapped in \[ \]
PS1="\n"
PS1+="\[${BOLD}${BG_GRAY}${FG_RED}\]\u"
PS1+="\[${FG_MAGENTA}\]@"
PS1+="\[${FG_RED}\]\`hostname\`"
PS1+="\[${FG_GREEN}\] : \`uname\` : "
PS1+="\[${FG_CYAN}\]\d \t : \${PLANTID:+\$PLANTID }"
PS1+="\[${RESET}\]\n"
PS1+="\[${FG_CYAN}\][\w]"
PS1+="\[${RESET}${BOLD}\] \\$ \[${RESET}\]"
export PS1
fi
EOFDatabase Install and Configuration
Configure MariaDB
OPTIONAL ADD THE MARIADB REPO TO GET THE LATES REVISION
MARIADB REPORTED A PROBLEM WITH 10.5, YOU SHOULD CONSIDER UPGRADING TO 10.11
Install the new Repo for MariaDB
curl -sLS https://downloads.mariadb.com/MariaDB/mariadb_repo_setup | sudo bashThis is the location of
vi /etc/yum.repos.d/mariadb.repoYou have to change the yellow below to get the desired version
10.11 Revision
|
[mariadb-main]
|
You will have to remove the current one installed if it exists and then install the new one
dnf remove mariadb-server -y
dnf install mariadb-server -yRun the following to edit the MariaDB service file
# Edit the file
sudo tee /etc/systemd/system/mariadb.service.d/override.conf > /dev/null << 'EOF'
[Service]
LimitNOFILE=32768
EOF
# 1. Tell systemd to scan for unit updates
sudo systemctl daemon-reload
# 2. Restart MariaDB to apply the new open file limits
sudo systemctl restart mariadb
# 3. Verify the applied LimitNOFILE setting for the running process
sudo systemctl show mariadb -p LimitNOFILERun the following to add the client socket to the [client] section
sudo awk '
/^\[client\]/ { print; print "socket=/var/lib/mysql/mysql.sock"; added=1; next }
{ print }
END { if (!added) print "\n[client]\nsocket=/var/lib/mysql/mysql.sock" }
' /etc/my.cnf.d/client.cnf | sudo tee /etc/my.cnf.d/client.cnf.tmp > /dev/null \
&& sudo mv /etc/my.cnf.d/client.cnf.tmp /etc/my.cnf.d/client.cnfVerify the following
cat /etc/my.cnf.d/client.cnfRun the following
vi /etc/my.cnf.d/server.cnfAdd the following below the [mysqld] section and you will have to use the :set paste command or it will not paste correctly
BELOW IS FOR SERVER 8CPU AND 64GIG MEMORY
#Custom
performance_schema = ON
tmpdir = /run/mariadb
thread_cache_size = 4
table_open_cache = 16384
table_definition_cache = 8384
sql_mode = ERROR_FOR_DIVISION_BY_ZERO,NO_AUTO_CREATE_USER,NO_ENGINE_SUBSTITUTION
query_cache_type = 0
query_cache_size = 0
query_cache_limit = 128M
query_cache_strip_comments = 1
tmp_table_size = 512M
max_heap_table_size = 512M
max_connections = 750
max_allowed_packet = 24M
sort_buffer_size = 24M
join_buffer_size = 48M
innodb_buffer_pool_size = 48G # 65-75% of RAM for InnoDB cache --> Keeping some for VUE
innodb_buffer_pool_instances = 6 # One instance per CPU core --> Keeping some for VUE 2 out of 8
innodb_flush_method = O_DIRECT # Reduce I/O overhead
innodb_flush_log_at_trx_commit = 2 # Balance performance and durability
innodb_log_buffer_size = 16M # Buffer for transaction logs
innodb_thread_concurrency = 0 # Let MySQL manage threads (0 = unlimited)
innodb_io_capacity = 2000 # Adjust based on storage IOPS
innodb_io_capacity_max = 4000 # Max IOPS for bursts
innodb_use_native_aio = 1
innodb_flush_log_at_trx_commit = 2 # Balance performance and durability --> Changed from 0
innodb_file_per_table
innodb_log_file_size = 2G # Larger logs for better write performance --> Changed from 512
#Optional configuration for transaction logging Change for mysql or mariadb
#log_bin = /var/log/mariadb/mariadb.log
#expire_logs_days = 2Reload the changes
systemctl daemon-reloadEnable and start MySQL/MariaDB on boot
systemctl enable --now mariadb.serviceRun the following
mysqlThen execute the following statements also make sure to (change passwords as needed XXXXXX but NOT the users names)
DROP USER 'kiwisql'@'%';
FLUSH PRIVILEGES;
CREATE USER 'kiwisql'@'%' IDENTIFIED BY 'XXXXXX';
GRANT all ON *.* TO 'kiwisql'@'%' WITH GRANT OPTION;
DROP USER 'kiwisql'@'localhost';
FLUSH PRIVILEGES;
CREATE USER 'kiwisql'@'localhost' IDENTIFIED BY 'XXXXXX';
GRANT all ON *.* TO 'kiwisql'@'localhost' WITH GRANT OPTION;
DROP USER 'kiwilive'@'localhost';
FLUSH PRIVILEGES;
CREATE USER 'kiwilive'@'localhost' IDENTIFIED BY 'XXXXXX';
GRANT all ON *.* TO 'kiwilive'@'localhost';
DROP USER 'remuser'@'%';
FLUSH PRIVILEGES;
CREATE USER 'remuser'@'%' IDENTIFIED BY 'XXXXXX';
GRANT all ON *.* TO 'remuser'@'%' WITH GRANT OPTION;
DROP USER 'remuser'@'localhost';
FLUSH PRIVILEGES;
CREATE USER 'remuser'@'localhost' IDENTIFIED BY 'XXXXXX';
GRANT all ON *.* TO 'remuser'@'localhost' WITH GRANT OPTION;
DROP USER 'reports'@'%';
FLUSH PRIVILEGES;
CREATE USER 'reports'@'%' IDENTIFIED BY 'readonly';
GRANT SHOW DATABASES, SELECT, EXECUTE, PROCESS, SHOW VIEW ON *.* TO 'reports'@'%';
FLUSH PRIVILEGES;
quitBuild skeleton for the Kiwiplan Environment
Command to Run
Setup the user environment
Remember to change the remuser & esp password
ESP username password is the global password store in ESP to let it connect and is unfortunately visible to an admin user but please make sure to (change passwords as needed XXXXXX but NOT the users names)
groupadd kiwiplan
mkdir /opt/kiwi
ln -s /opt/kiwi/ /KIWI
mkdir /opt/kiwi/{home,rev}
mkdir /opt/kiwi/rev/{map,mes}
useradd -g kiwiplan -G wheel -d /KIWI/home/remuser/ remuser
echo XXXXXXXXXX | passwd --stdin remuser
useradd -g kiwiplan -d /KIWI/home/esp/ esp
echo XXXXXXXXXX | passwd --stdin esp
chown -R remuser:kiwiplan /opt/kiwi
mkdir /etc/kiwiplan
chown remuser:kiwiplan /etc/kiwiplanSystemd Socket Implementation For KIDD
Configure kidd.stocket
Remember your :set paste command
Create a socket file and the following
vi /lib/systemd/system/kidd.socketThen add the following
[Unit]
Description=KIDD
[Socket]
ListenStream=2326
Accept=yes
[Install]
WantedBy=sockets.targetCreate a service file by editing the following
vi /lib/systemd/system/kidd@.serviceThen add the following
[Unit]
Description=Kidd Server
[Service]
ExecStart=/KIWI/rev/current/progs/kidd -a -p -F 1
User=root
Group=root
StandardInput=socket
StandardOutput=socket
# Resource configuration
LimitNOFILE=8192
LimitNPROC=4096
# MaxConnections=nnn - The maximum number of connections to simultaneously run services instances for
# when Accept=true is set. nnn should be sized accordingly for the implementation.
MaxConnections=200
# The maximum number of connections for a service per source IP address.
# This is very similar to the MaxConnections= directive above. Disabled by default.
MaxConnectionsPerSource=80Start the service and enable on reboot
systemctl start kidd.socket
systemctl enable kidd.socketThis will only work once you have the Kiwiplan environment configured/installed
VUE Installation Configurations
Adjust system limits for VUE products
Edit the following
sudo tee -a /etc/security/limits.d/20-nproc.conf > /dev/null << 'EOF'
# Soft process limit for kiwiplan group
@kiwiplan soft nproc 32768
EOFVerify the edit
cat /etc/security/limits.d/20-nproc.confEdit the following
sudo tee -a /etc/security/limits.conf > /dev/null << 'EOF'
# Open file limits for kiwiplan group
@kiwiplan - nofile 32768
EOFVerify the edit
cat /etc/security/limits.confInstalling MsSQL Tool
Configure MsSQL tools
Install the repo for the MsSQL service/connection
curl https://packages.microsoft.com/config/rhel/9/prod.repo > /etc/yum.repos.d/msprod.repoThis will only work once you have the Kiwiplan environment configured/installed
Install the packages make sure you answer/type YES to all
dnf remove mssql-tools unixODBC-utf16-devel
dnf install mssql-tools unixODBC-devel -ySTOP HERE FOR YOUR TEMPLATE BUILD
RESTART FROM HERE AFTER TEMPLATE BUILD
Linux RedHat Registration
Re-Register the server with RedHat if you entered initial credentials to add the server
You need to run the nmtui command to bring up the menu from above in this documentation and then simply change the IP and also the hostname
Run the following and this will change the subscription details
subscription-manager register --force
subscription-manager attach --autoActivate Directory Setup
Using SSSD
Install the following packages
yum install sssd sssd-tools realmd samba-common-tools oddjob oddjob-mkhomedir adcli samba -yRun this just in-case your domain is still using RC4
update-crypto-policies --set DEFAULT:AD-SUPPORTConfigure KRB5
Edit the following file and make sure the following is added/changed
vi /etc/krb5.confAdd or changed the following below make sure yo change the ONLING.COM to your domain name
|
# To opt out of the system crypto-policies configuration of krb5, remove the [logging] [libdefaults] dns_canonicalize_hostname = fallback qualify_shortname = "" default_realm = ONLING.COM
[realms] [domain_realm] |
Join the server to the domain
Configurating the SSSD (in yellow update to site specific) (in green needs to be capitalized)
You must have the access to add to the AD server or the server has to be add first before you run the following command.
For the join you may need to specify the -OU's for the specific location
|
# realm discover onling.com # realm join -U administrator@ONLING.COM --verbose domain_controller.onling.com # authselect select sssd with-mkhomedir # authselect apply-changes |
Copy from below and make changes
realm discover onling.com
realm join -U administrator@ONLING.COM --verbose domain_controller.onling.com
authselect select sssd with-mkhomedir
authselect apply-changesUpdate SSSD config
Once joined then you can change or add the following parameters
vi /etc/sssd/sssd.conf|
[sssd] domains = onling.com config_file_version = 2 services = nss, pam
[domain/onling.com] default_shell = /bin/bash ad_server = sfl-dom-001.onling.com krb5_store_password_if_offline = True cache_credentials = True krb5_realm = ONLING.COM realmd_tags = manages-system joined-with-adcli id_provider = ad fallback_homedir = /home/%d/%u ad_domain = onling.com use_fully_qualified_names = false ldap_id_mapping = True access_provider = ad override_gid = 1000 |
Restarting SSSD
systemctl stop sssd; sss_cache -E; systemctl start sssdStop Here
Optional SSSD configurations
Defaults to no Shell Access, allows short usernames
Optional (Group allow) additional parameters and changes
|
simple_allow_groups = sssd-users OR simple_allow_groups = gg-C3193???-KiwiTS_access |
Add users to SSSD
Optional grant shell access and force primary group to kiwiplan, change john.doe to the username
sss_override user-add john.doe -g $(getent group kiwiplan | cut -d: -f3) -s /bin/bash -h /KIWI/home/john.doeLinux Server - Install RedHat 8.6
Summary
Instructions on the install and configuration of a Linux server for Kiwiplan.
Details
Prerequisites
VMware, KVM, Hyper-V machine to host the installation
You will need to use the following command when you vi your files as you cut and paste:
Once in vi you have to hit the colon and then type “set paste”
:set pasteThis will not mess with the paste you put in.
Instructions
Preparing the OS
This is to install the OS on a VmWare
VMWare Setup using GUI
Boot ISO

Select “Install RedHat Linux”

Select Language

Then Select “Network & Hostname” from install menu.

Set hostname and hit apply
Click Configure and set the IP
Click on IPv6 Settings and disable it


Register Redhat

Software Selection
Select Minimal install with nothing else checked

Select “Installation Destination

Make sure you select custom to configure the drives and click done
Click on the Hyper Link

Click on the /home folder and then the minus sign

Enter the total original in the Desired Capacity

Click on any of the drives and the screen will recalculate the space to the “/” folder which is what we need.

Accept Changes

Root Password

Set “root” Password
Click “Begin Installation”
When finished click on “Reboot System”
Connect to the Server
Use a SSH connection to the server the remaining of the commands in order to cut and pates them in instead of using the VM interface.
Commands to run
This will show all command that need to be ran to update within the OS to start the configuration.
All the command are within each box
Update the System
After install update system packages for the needed configuration.
dnf upgrade -yDisable SeLinux
setenforce 0
sed -i 's/^SELINUX=.*/SELINUX=disabled/g' /etc/selinux/configOptional: Manually adjust the file which is located here if you wish to edit manually
vi /etc/sysconfig/selinuxDisable firewall
systemctl disable firewalld.serviceEpel Release
subscription-manager repos --enable codeready-builder-for-rhel-8-$(arch)-rpms
dnf install https://dl.fedoraproject.org/pub/epel/epel-release-latest-8.noarch.rpmAfter Epel installation rerun the upgrade to update if any are needed
dnf upgrade -yInstall core software
Install Packages
Add the needed packages
Install required system packages
dnf install bind-utils bzip2 cups cifs-utils enscript ftp gdb ghostscript java-1.8.0-openjdk-headless java-11-openjdk-headless krb5-workstation ksh lftp lrzsz lsof libnsl lzop mariadb-server mlocate mutt ncompress net-tools net-snmp net-snmp-utils net-tools nfs-utils nmap nvme-cli openldap-clients openssh-clients psmisc realmd rsync samba-client strace sysstat tcpdump telnet telnet-server tmux unix2dos vim vim-enhanced vsftpd wget xfsdump vsftpd htop mc rsyslog rsyslog-doc postfix dbus-daemon s-nail dovecot cyrus-sasl cyrus-sasl-lib cyrus-sasl-plain tree figlet toilet coreutils -yIf you are running on a virtual machine run the following
dnf install open-vm-tools -y
sysctl vm.swappiness=10Install vim color for scripting
dnf install git -y
git clone https://github.com/flazz/vim-colorschemes ~/.vim/
cp ~/.vim/colors/desert.vim /etc/vimrc.localConfigure Installed Packages
Configure the packages
Enable Telnet run the following to enable and start the packages
systemctl enable telnet.socket
systemctl restart telnet.socketEnable Time Synchronization run the the following and add your domain time server
vi /etc/chrony.confAdd your server below the following and make sure you change the domain name from sflservicesllc.com
# These servers were defined in the installation:
#server _gateway iburst
server domain.sflserviesllc.com iburstEnable Time Synchronization
systemctl enable --now chronydNote: Time-zone changes are made with the command
timedatectlEnable FTP run the following
vi /etc/vsftpd/vsftpd.confMake the following changes within the file
anonymous_enable=NO
local_umask=002
ascii_upload_enable=YES
ascii_download_enable=YESStart and Enable FTP for transfer in and out for us or other vendors
systemctl enable --now vsftpd.serviceIf you have a remote logging server setup then edit the following command
vi /etc/rsyslog.confThen add the following at the end of the file but make sure you update the IP address and replace the XXX's
*.* @192.168.XXX.XXX:514 # use @ for UDP Protocal
*.* @@192.168.XXX.XXX:514 # use @@ for TCP ProtocalEnable Rsyslog to enable logging locally and remotely
systemctl enable --now rsyslogConfigure Postfix for Email run the following
vi /etc/postfix/main.cfUpdate the following with your email server
relayhost = [ENTER IP or SMTP SERVER] or [sflservicesllc-com.mail.protection.outlook.com]:25Optional if you want to hardcode a domain name run the following
vi /etc/postfix/main.cfUpdate the following with a remote or local email server and make sure you change the domain name from sflservicesllc.com
myhostname = sflservicesllc.com
mydomain = sflservicesllc.com
mydestination =
relayhost = [ENTER IP or SMTP SERVER] or [sflservicesllc-com.mail.protection.outlook.com]:25Optional f you do not have a email remote/local server
vi /etc/postfix/main.cfUpdate the following for no email server and make sure you change the domain name from sflservicesllc.com
myhostname = sflservicesllc.com
mydomain = sflservicesllc.com
mail_spool_directory = /var/mail
mynetworks = 127.0.0.0/8, 168.100.189.0/28Enable Postfix
systemctl enable --now postfixTest your config this way
echo "Install of Linux Rocks $HOSTNAME" | sendmail steve.ling@sflservicesllc.comLocale add-ons to make sure that ANSI applications display correctly so edit the following and replace all of the values with the following
Edit the following:
vi /etc/locale.confChange the following:
sudo cat > /etc/locale.conf << EOF
LANG="en_US"
SUPPORTED="en_GB:en_GB-.UTF-8:en_US:en_US.UTF-8:de_DE:de_DE.UTF-8"
SYSFONT="latarcyrheb-sun16"
EOFOnce added the locals exit and telnet back into the server to take the update
Bash colors and Prompt
Bash for root for color edit the following
Dependent on
dnf install figlet toilet -yCreating Aliases
sudo cat > /etc/profile.d/custom-aliases.sh << EOF
# Common interactive aliases for all users
alias rm='rm -i'
alias cp='cp -i'
alias mv='mv -i'
alias vi='vim'
alias tailf='tail -f'
EOFServer Warning
sudo tee /etc/profile.d/custom-prod-warning.sh > /dev/null << 'EOF'
# Colorful PRODUCTION warning banner for interactive logins
if [[ -n "$PS1" && -t 0 && -t 1 ]]; then # Interactive terminal with stdin/stdout
RED='\033[1;31m' # Bold red
YELLOW='\033[1;33m' # Bold yellow
NC='\033[0m' # No color
echo
if command -v figlet >/dev/null 2>&1; then
figlet -f big "PRODUCTION" | while IFS= read -r line; do
printf '%b%s%b\n' "$RED" "$line" "$NC"
done
figlet -f big "SERVER" | while IFS= read -r line; do
printf '%b%s%b\n' "$RED" "$line" "$NC"
done
else
echo -e "${RED}***** PRODUCTION SERVER!! *****${NC}"
fi
echo
echo -e "${YELLOW} *** EXTREME CAUTION REQUIRED ***${NC}"
echo -e "${RED}This is a LIVE PRODUCTION system.${NC}"
echo -e "${RED}Unauthorized access is strictly prohibited.${NC}"
echo -e "${RED}All activity is logged and monitored.${NC}"
echo -e "${YELLOW}Think twice before running commands!${NC}"
echo
# Pause briefly to ensure user sees the warning
read -t 5 -p "Press Enter to continue (auto-continue in 5 seconds)... " || true
echo
fi
EOFCreating Colorful Prompts
sudo tee /etc/profile.d/custom-prompt-and-colors.sh > /dev/null << 'EOF'
# Custom LS_COLORS and improved multi-line colored prompt
# Vibrant LS_COLORS (directories bold blue on gray, etc.)
LS_COLORS='rs=0:di=01;44:ln=01;36:mh=00:pi=40;33:so=01;35:do=01;35:bd=40;33;01:cd=40;33;01:or=40;31;01:su=37;41:sg=30;43:ca=30;41:tw=30;42:ow=34;42:st=37;44:ex=01;32:*.tar=01;31:*.tgz=01;31:*.arj=01;31:*.taz=01;31:*.lzh=01;31:*.lzma=01;31:*.tlz=01;31:*.txz=01;31:*.zip=01;31:*.z=01;31:*.Z=01;31:*.dz=01;31:*.gz=01;31:*.lz=01;31:*.xz=01;31:*.bz2=01;31:*.bz=01;31:*.tbz=01;31:*.tbz2=01;31:*.tz=01;31:*.deb=01;31:*.rpm=01;31:*.jar=01;31:*.rar=01;31:*.ace=01;31:*.zoo=01;31:*.cpio=01;31:*.7z=01;31:*.rz=01;31:*.jpg=01;35:*.jpeg=01;35:*.gif=01;35:*.bmp=01;35:*.pbm=01;35:*.pgm=01;35:*.ppm=01;35:*.tga=01;35:*.xbm=01;35:*.xpm=01;35:*.tif=01;35:*.tiff=01;35:*.png=01;35:*.svg=01;35:*.svgz=01;35:*.mng=01;35:*.pcx=01;35:*.mov=01;35:*.mpg=01;35:*.mpeg=01;35:*.m2v=01;35:*.mkv=01;35:*.ogm=01;35:*.mp4=01;35:*.m4v=01;35:*.mp4v=01;35:*.vob=01;35:*.qt=01;35:*.nuv=01;35:*.wmv=01;35:*.asf=01;35:*.rm=01;35:*.rmvb=01;35:*.flc=01;35:*.avi=01;35:*.fli=01;35:*.flv=01;35:*.gl=01;35:*.dl=01;35:*.xcf=01;35:*.xwd=01;35:*.yuv=01;35:*.cgm=01;35:*.emf=01;35:*.axv=01;35:*.anx=01;35:*.ogv=01;35:*.ogx=01;35:*.aac=00;36:*.au=00;36:*.flac=00;36:*.mid=00;36:*.midi=00;36:*.mka=00;36:*.mp3=00;36:*.mpc=00;36:*.ogg=00;36:*.ra=00;36:*.wav=00;36:*.axa=00;36:*.oga=00;36:*.spx=00;36:*.xspf=00;36:'
export LS_COLORS
# Color and style variables (cached tput calls for speed)
RESET=$(tput sgr0)
BOLD=$(tput bold)
BG_GRAY=$(tput setab 8)
FG_RED=$(tput setaf 1)
FG_MAGENTA=$(tput setaf 5)
FG_GREEN=$(tput setaf 2)
FG_CYAN=$(tput setaf 6)
# Multi-line prompt
PS1="\n${BOLD}${BG_GRAY}${FG_RED}\\u${FG_MAGENTA}@${FG_RED}\`hostname\`${FG_GREEN} : \`uname\` : ${FG_CYAN}\\d \\t : \${PLANTID:+\$PLANTID }\n${FG_CYAN}[\\w]${RESET}${BOLD} \\\$ ${RESET}"
export PS1
EOFDatabase Install and Configuration
Configure MariaDB
Optional: To add the MariadB repo to get the latest revision other then the one that is included in the RedHat
MySQL/MariaDB reported a problem with 10.5, you should consider upgrading to 10.6
Install the new Repo for MariaDB
curl -sS https://downloads.mariadb.com/MariaDB/mariadb_repo_setup | sudo bashThis is the location of
vi /etc/yum.repos.d/MariaDB.repoYou have to change the yellow below to get the desired version
| [mariadb] name = MariaDB baseurl = https://rpm.mariadb.org/10.6/rhel/$releasever/$basearch gpgkey= https://rpm.mariadb.org/RPM-GPG-KEY-MariaDB gpgcheck=1 |
Done with Optional
Run the following
systemctl edit mariadb.serviceThen add the following to the file in between these lines or if blank just add and save
### Editing /etc/systemd/system/mariadb.service.d/override.conf
### Anything between here and the comment below will become the new contents of the file
[Service]
LimitNOFILE=32768
### Lines below this comment will be discardedRun the following
vi /etc/my.cnf.d/client.cnfAdd the following below the [client] section
socket=/var/lib/mysql/mysql.sockRun the following
vi /etc/my.cnf.d/mariadb-server.cnfAdd the following below the [mysqld] section and you will have to use the :set paste command or it will not paste correctly
#Custom
performance_schema = ON
tmpdir = /run/mariadb
thread_cache_size = 4
table_open_cache = 16384
table_definition_cache = 8384
sql_mode = ERROR_FOR_DIVISION_BY_ZERO,NO_AUTO_CREATE_USER,NO_ENGINE_SUBSTITUTION
query_cache_type = 0
query_cache_size = 0
query_cache_limit = 128M
query_cache_strip_comments = 1
tmp_table_size = 512M
max_heap_table_size = 512M
max_connections = 512
max_allowed_packet = 24M
sort_buffer_size = 24M
join_buffer_size = 48M
innodb_buffer_pool_size = 4G
innodb_buffer_pool_instances = 4
innodb_use_native_aio = 1
innodb_flush_log_at_trx_commit = 0
innodb_file_per_table
innodb_log_file_size = 512M
#Optional configuration for transaction loggin
log_bin = /var/log/mariadb/mariadb.log
expire_logs_days = 2Reload the changes
systemctl daemon-reloadEnable and start MySQL/MariaDB on boot
systemctl enable --now mariadb.serviceRun the following
mysqlThen execute the following statements also make sure to (change passwords as needed XXXXXXXXXX but NOT the users names)
CREATE USER 'kiwisql'@'%' IDENTIFIED BY 'XXXXXXXXXX';
GRANT all ON *.* TO 'kiwisql'@'%' WITH GRANT OPTION;
CREATE USER 'kiwisql'@'localhost' IDENTIFIED BY 'XXXXXXXXXX';
GRANT all ON *.* TO 'kiwisql'@'localhost' WITH GRANT OPTION;
CREATE USER 'kiwilive'@'localhost' IDENTIFIED BY 'XXXXXXXXXX';
GRANT all ON *.* TO 'kiwilive'@'localhost';
CREATE USER 'remuser'@'localhost' IDENTIFIED BY 'XXXXXXXXXX';
GRANT all ON *.* TO 'remuser'@'localhost' WITH GRANT OPTION;
CREATE USER 'reports'@'%' IDENTIFIED BY 'XXXXXXXXXX';
GRANT SHOW DATABASES, SELECT, EXECUTE, PROCESS, SHOW VIEW ON *.* TO 'reports'@'%';
FLUSH PRIVILEGES;
QuitBuild skeleton for the Kiwiplan Environment
Command to Run
Setup the user environment
Remember to change the remuser & esp password
ESP username password is the global password store in ESP to let it connect and is unfortunately visible to an admin user but please make sure to (change passwords as needed XXXXXXXXXX but NOT the users names)
groupadd kiwiplan
mkdir /opt/kiwi
ln -s /opt/kiwi/ /KIWI
mkdir /opt/kiwi/{home,rev}
mkdir /opt/kiwi/rev/{map,mes}
useradd -g kiwiplan -G wheel -d /KIWI/home/remuser/ remuser
echo XXXXXXXXXX | passwd --stdin remuser
useradd -g kiwiplan -d /KIWI/home/esp/ esp
echo XXXXXXXXXX | passwd --stdin esp
chown -R remuser:kiwiplan /opt/kiwi
mkdir /etc/kiwiplan
chown remuser:kiwiplan /etc/kiwiplanConfigure kidds
Remember your :set paste command
Edit xinetd.conf:
vi /etc/xinetd.confAdd the following ad the end of the # Define access restriction defaults section
instances = 200
per_source = 80Should look like this:
|
# defaults # Define general logging characteristics. # Define access restriction defaults # Address and networking defaults # setup environmental attributes # Generally, banners are not used. This sets up their global defaults includedir /etc/xinetd.d |
Append to end of the services:
kidd 2326/tcp # Kiwiplan Interface DaemonRun the following to add the kidds service:
sudo tee /etc/xinetd.d/kidd <<EOF
# default: on
# description: The kidd server serves kidd sessions; it uses \
# unencrypted username/password pairs for authentication.
service kidd
{
disable = no
flags = REUSE
socket_type = stream
wait = no
user = root
server = /KIWI/rev/current/progs/kidd
server_args = -a -p -F 1
log_on_failure += USERID
env = HOME=/tmp
}
EOFStart the service:
systemctl start kidd.socket
systemctl enable kidd.socketThe above will only work once you have the Kiwiplan environment configured/installed
VUE Installation Configurations
Adjust system limits for VUE products
Edit the following
vi /etc/security/limits.d/20-nproc.confAdd the following
@kiwiplan soft nproc 32768Edit the following
vi /etc/security/limits.confThen add the following before the #End of file
@kiwiplan - nofile 32768Installing MsSQL Tool
Configure MsSQL tools
Install the repo for the MsSQL service/connection
curl https://packages.microsoft.com/config/rhel/8/prod.repo > /etc/yum.repos.d/msprod.repoThis will only work once you have the Kiwiplan environment configured/installed
Install the packages make sure you answer/type YES to all
dnf remove mssql-tools unixODBC-utf16-devel
dnf install mssql-tools unixODBC-devel -ySTOP HERE FOR YOUR TEMPLATE BUILD
RESTART FROM HERE AFTER TEMPLATE BUILD
Linux RedHat Registration
Re-Register the server with RedHat if you entered initial credentials to add the server
You need to run the nmtui command to bring up the menu from above in this documentation and then simply change the IP and also the hostname
Run the following and this will change the subscription details
subscription-manager register --force
subscription-manager attach --autoActivate Directory Setup
Using SSSD
Install the following packages
yum install sssd sssd-tools realmd samba-common-tools oddjob oddjob-mkhomedir adcli samba -yRun this just in-case your domain is still using RC4
update-crypto-policies --set DEFAULT:AD-SUPPORTConfigure KRB5
Edit the following file and make sure the following is added/changed
vi /etc/krb5.confAdd or changed the following below
|
# To opt out of the system crypto-policies configuration of krb5, remove the [logging] [libdefaults] dns_canonicalize_hostname = fallback qualify_shortname = "" default_realm = ONLING.COM
[realms] [domain_realm] |
Join the server to the domain
Configurating the SSSD (in yellow update to site specific) (in green needs to be capitalized)
You must have the access to add to the AD server or the server has to be add first before you run the following command.
For the join you may need to specify the -OU's for the specific location
|
# realm discover onling.com # realm join -U administrator@ONLING.COM --verbose domain_controller.onling.com # authselect select sssd with-mkhomedir # authselect apply-changes |
Copy from below and make changes
realm discover onling.com
realm join -U administrator@ONLING.COM --verbose domain_controller.onling.com
authselect select sssd with-mkhomedir
authselect apply-changesUpdate SSSD config
Once joined then you can change or add the following parameters
vi /etc/sssd/sssd.conf|
[sssd] domains = onling.com config_file_version = 2 services = nss, pam
[domain/onling.com] default_shell = /bin/bash ad_server = sfl-dom-001.onling.com krb5_store_password_if_offline = True cache_credentials = True krb5_realm = ONLING.COM realmd_tags = manages-system joined-with-adcli id_provider = ad fallback_homedir = /home/%d/%u ad_domain = onling.com use_fully_qualified_names = false ldap_id_mapping = True access_provider = ad override_gid = 1000 |
Restarting SSSD
systemctl stop sssd; sss_cache -E; systemctl start sssdOptional SSSD configurations
Defaults to no Shell Access, allows short usernames
Optional (Group allow) additional parameters and changes
|
simple_allow_groups = sssd-users OR simple_allow_groups = gg-C3193???-KiwiTS_access |
Add users to SSSD
Optional grant shell access and force primary group to kiwiplan, change john.doe to the username
sss_override user-add john.doe -g $(getent group kiwiplan | cut -d: -f3) -s /bin/bash -h /KIWI/home/john.doeLinux Server - Install Rocky 9.4
Summary
Instructions on the install and configuration of a Linux server for Kiwiplan.
Details
Prerequisites
VMware, KVM, Hyper-V machine to host the installation
You will need to use the following command when you vi your files as you cut and paste:
Once in vi you have to hit the colon and then type “set paste”
:set pasteThis will not mess with the paste you put in.
Instructions
Preparing the OS
This is to install the OS on a VmWare
VMWare Setup using GUI
Boot ISO

Select “Install RedHat Linux”

Select Language
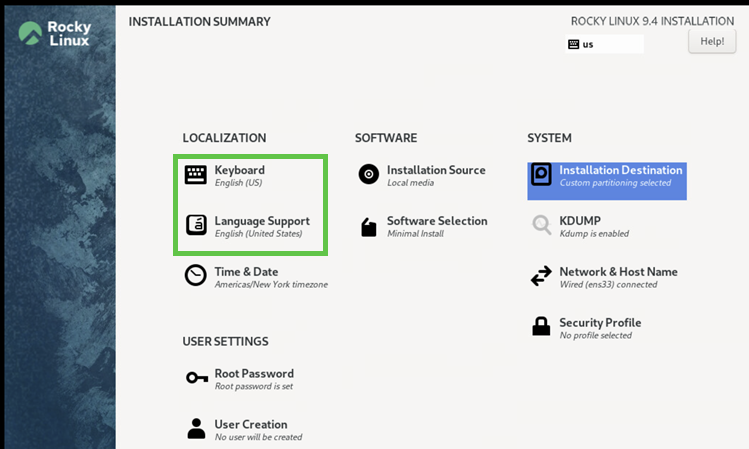
Then Select “Network & Hostname” from install menu.

Set hostname and hit apply
Click Configure and set the IP
Click on IPv6 Settings and disable it


Select “Installation Destination”

Make sure you select custom to configure the drives and click done

Click on the blue link to auto configure them

Make sure the /home drive is highlighted and click the “-“ minus sign to remove that drive

Add the pink value of the space available after the delete of the home folder.
Enter “350 GiB” (total of drive space you created for the VM), this will recalculate the size of the drive and then hit “Done”.
Hit “Accept Changes”
Click on the “Root Password” and click “Allow root SSH login with password” and then click “Done”

Click “Software Selection” and select “Minimal Install”
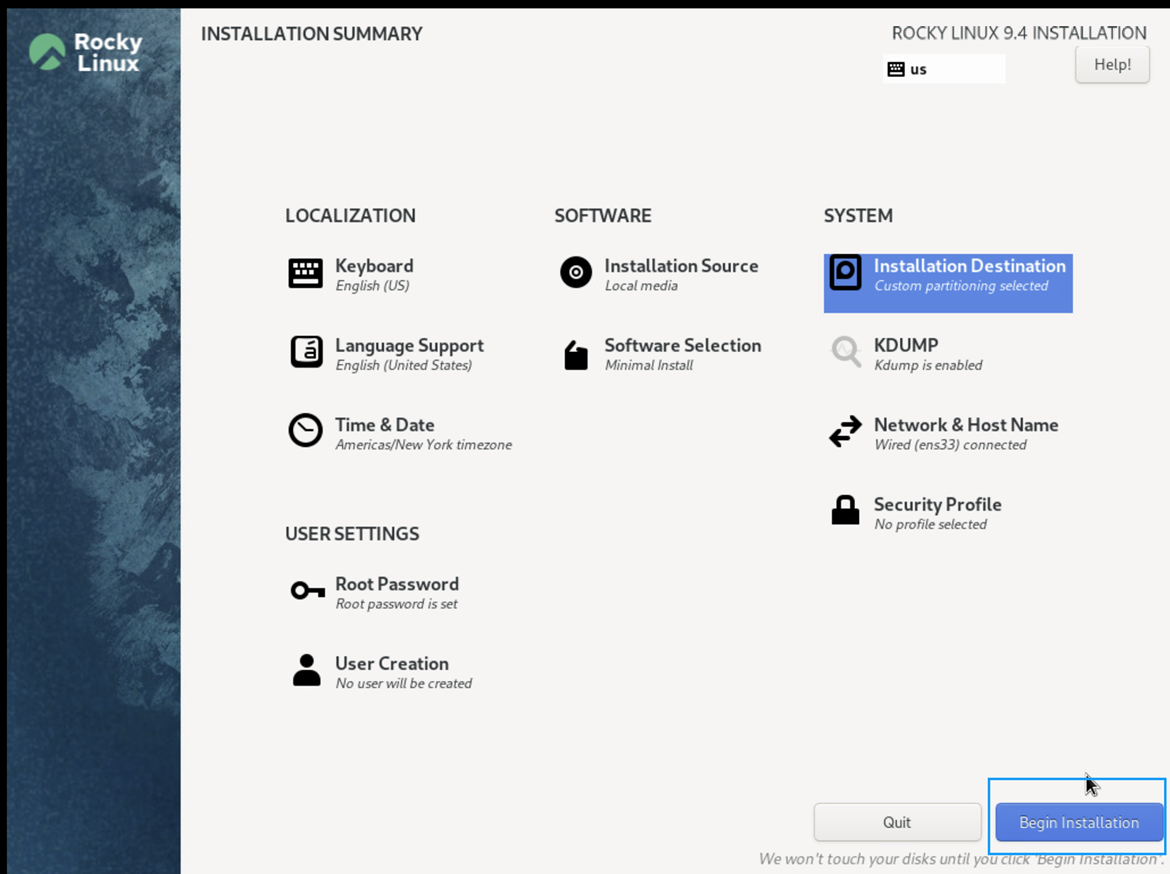

Click “Begin Installation”

When finished click on “Reboot System”
Network Text GUI
Login with root
NOTE: Run # nmtui Only if you did not do the GUI version
Select Edit connection
Select interface and hit enter
IPV4 change to manual and select show, fill in the information
IPV6 Change to disabled, press OK
Start setup Instructions for RedHat Linux
Connect to the Server
Use a SSH connection to the server the remaining of the commands in order to cut and pates them in instead of using the VM interface.
Commands to run
This will show all command that need to be ran to update within the OS to start the configuration.
All the command are within each box
Update the System
After install update system packages for the needed configuration.
dnf upgrade -yDisable SeLinux
setenforce 0
sed -i 's/^SELINUX=.*/SELINUX=disabled/g' /etc/selinux/configFile is located here if you wish to edit manually
vi /etc/sysconfig/selinuxDisable firewall
systemctl disable firewalld.serviceEpel Release
dnf install epel-release -yAfter Epel installation rerun the upgrade to update if any are needed
dnf upgrade -yInstall core software
Install Packages
Add the needed packages
Install required system packages
dnf install bind-utils bzip2 cups cifs-utils enscript ftp gdb ghostscript java-1.8.0-openjdk-headless java-11-openjdk-headless krb5-workstation ksh lftp lrzsz lsof libnsl lzop mariadb-server mlocate mutt ncompress net-tools net-snmp net-snmp-utils net-tools nfs-utils nmap nvme-cli openldap-clients openssh-clients psmisc realmd rsync samba-client strace sysstat tcpdump telnet telnet-server tmux unix2dos vim vim-enhanced vsftpd wget xfsdump vsftpd htop mc rsyslog rsyslog-doc postfix dbus-daemon s-nail dovecot cyrus-sasl cyrus-sasl-lib cyrus-sasl-plain tree figlet toilet coreutils rclone nano -yIf you are running on a virtual machine run the following
Install VM Tools
dnf install open-vm-tools -ySwap Settings
sysctl: The administrative utility used to modify Linux kernel parameters at runtime.vm.swappiness: The specific virtual memory parameter that controls the balance between swapping application memory (anonymous pages) and clearing disk caches (file-backed pages).=10: The assigned value on a scale from 0 to 100sysctl vm.swappiness=10Install vim color for scripting
dnf install git -y
git clone https://github.com/flazz/vim-colorschemes ~/.vim/
cp ~/.vim/colors/desert.vim /etc/vimrc.localConfigure Installed Packages
Configure the packages
Enable Telnet run the following to enable and start the packages
systemctl enable restart telnet.socket
systemctl enable telnet.socketONLY CHANGE FOR OLDER SSH ALGORYTHM IF NEEDED FOR LEGACY DEVICES
CONTINUE HERE IF SSH LEGACY IS NOT NEEDED
Enable Time Synchronization run the the following and add your domain time server
vi /etc/chrony.confAdd your server below the following and make sure you change the domain name from sflservicesllc.com
# These servers were defined in the installation:
#server _gateway iburst
server domain.sflserviesllc.com iburst preferEnable Time Synchronization
systemctl enable --now chronydNote: Time-zone changes are made with the command
timedatectlEnable FTP run the following
vi /etc/vsftpd/vsftpd.confMake the following changes within the file
sudo sed -i 's/^anonymous_enable=.*/anonymous_enable=NO/' /etc/vsftpd/vsftpd.conf
sudo sed -i 's/^local_umask=.*/local_umask=002/' /etc/vsftpd/vsftpd.conf
sudo sed -i 's/^#ascii_upload_enable=.*/ascii_upload_enable=YES/' /etc/vsftpd/vsftpd.conf
sudo sed -i 's/^#ascii_download_enable=.*/ascii_download_enable=YES/' /etc/vsftpd/vsftpd.confStart and Enable FTP for transfer in and out for us or other vendors
systemctl enable --now vsftpd.serviceIf you have a remote logging server setup then edit the following command
vi /etc/rsyslog.confONLY CHANGE THE FOLLOWING IF YOU HAVE REMOTE LOGGING
Then add the following at the end of the file but make sure you update the IP address and replace the XXX's
sudo tee -a /etc/rsyslog.conf > /dev/null << 'EOF'
# Forwarding Rules
*.* @192.168.XXX.XXX:514 # use @ for UDP Protocol
*.* @@192.168.XXX.XXX:514 # use @@ for TCP Protocol
auth.* @192.168.XXX.XXX:514 # only for authentication based records
EOFCONTINUE HERE IF NOT REMOTE LOGGING
Enable Rsyslog to enable logging locally and remotely
systemctl enable --now rsyslogEmailing backup the original file
cp /etc/postfix/main.cf /etc/postfix/main.cf.bakUpdate the following with a remote or local email server and make sure you change the domain name from sflservicesllc.com
# Set host, domain, and relayhost
sudo postconf -e "myhostname = sflservicesllc.com"
sudo postconf -e "mydomain = sflservicesllc.com"
sudo postconf -e "relayhost = mail.sflservicesllc.com"
# Check for syntax/configuration errors
sudo postfix check
# Reload Postfix to apply the configuration changes live
sudo postfix reload
# Check the specific parameters
postconf myhostname mydomain relayhostOptional: Update the following for no email server and make sure you change the domain name from sflservicesllc.com and only allow certain networks
# Set mynetworks
sudo postconf -e "mynetworks = 127.0.0.0/8, 168.100.189.0/28"
# Verify the updated parameter
postconf mynetworks
# Check syntax and reload Postfix
sudo postfix check
sudo postfix reloadEnable Postfix
systemctl enable --now postfixTest your config this way
echo "Install of Linux Rocks $HOSTNAME" | sendmail steve.ling@sflservicesllc.comLocale add-ons to make sure that ANSI applications display correctly so edit the following and replace all of the values with the following
Edit the following:
sudo cat > /etc/locale.conf << EOF
LANG="en_US"
SUPPORTED="en_GB:en_GB-.UTF-8:en_US:en_US.UTF-8:de_DE:de_DE.UTF-8"
SYSFONT="latarcyrheb-sun16"
EOFOnce added the locals exit and telnet back into the server to take the update
Bash colors and Prompt
Bash for root for color edit the following
Dependent on
dnf install figlet toilet -yCreating Aliases
sudo cat > /etc/profile.d/custom-aliases.sh << EOF
# Common interactive aliases for all users
alias rm='rm -i'
alias cp='cp -i'
alias mv='mv -i'
alias vi='vim'
alias tailf='tail -f'
EOFServer Warning
sudo tee /etc/profile.d/custom-prod-warning.sh > /dev/null << 'EOF'
# /etc/profile.d/custom-prod-warning.sh
# Production warning banner – only for real interactive logins
# 1. Exit immediately if this is not an interactive shell
[[ $- != *i* ]] && return
# 2. Exit if we don't have a real terminal
[[ -t 0 && -t 1 ]] || return
# 3. Exit if SSH is running a forced command (rsync, scp, ansible, etc.)
# OpenSSH sets SSH_ORIGINAL_COMMAND in these cases
[[ -n "${SSH_ORIGINAL_COMMAND:-}" ]] && return
# --- Safe to show the banner from here ---
RED='\033[1;31m'
YELLOW='\033[1;33m'
NC='\033[0m'
echo
if command -v figlet >/dev/null 2>&1; then
figlet -f big "PRODUCTION" | while IFS= read -r line; do
printf '%b%s%b\n' "$RED" "$line" "$NC"
done
figlet -f big "SERVER" | while IFS= read -r line; do
printf '%b%s%b\n' "$RED" "$line" "$NC"
done
else
echo -e "${RED}***** PRODUCTION SERVER!! *****${NC}"
fi
echo
echo -e "${YELLOW} *** EXTREME CAUTION REQUIRED ***${NC}"
echo -e "${RED}This is a LIVE PRODUCTION system.${NC}"
echo -e "${RED}Unauthorized access is strictly prohibited.${NC}"
echo -e "${RED}All activity is logged and monitored.${NC}"
echo -e "${YELLOW}Think twice before running commands!${NC}"
echo
EOFCreating Colorful Prompts
sudo tee /etc/profile.d/custom-prompt-and-colors.sh > /dev/null << 'EOF'
# Custom LS_COLORS and improved multi-line colored prompt
# Vibrant LS_COLORS (directories bold blue on gray, etc.)
LS_COLORS='rs=0:di=01;44:ln=01;36:mh=00:pi=40;33:so=01;35:do=01;35:bd=40;33;01:cd=40;33;01:or=40;31;01:su=37;41:sg=30;43:ca=30;41:tw=30;42:ow=34;42:st=37;44:ex=01;32:*.tar=01;31:*.tgz=01;31:*.arj=01;31:*.taz=01;31:*.lzh=01;31:*.lzma=01;31:*.tlz=01;31:*.txz=01;31:*.zip=01;31:*.z=01;31:*.Z=01;31:*.dz=01;31:*.gz=01;31:*.lz=01;31:*.xz=01;31:*.bz2=01;31:*.bz=01;31:*.tbz=01;31:*.tbz2=01;31:*.tz=01;31:*.deb=01;31:*.rpm=01;31:*.jar=01;31:*.rar=01;31:*.ace=01;31:*.zoo=01;31:*.cpio=01;31:*.7z=01;31:*.rz=01;31:*.jpg=01;35:*.jpeg=01;35:*.gif=01;35:*.bmp=01;35:*.pbm=01;35:*.pgm=01;35:*.ppm=01;35:*.tga=01;35:*.xbm=01;35:*.xpm=01;35:*.tif=01;35:*.tiff=01;35:*.png=01;35:*.svg=01;35:*.svgz=01;35:*.mng=01;35:*.pcx=01;35:*.mov=01;35:*.mpg=01;35:*.mpeg=01;35:*.m2v=01;35:*.mkv=01;35:*.ogm=01;35:*.mp4=01;35:*.m4v=01;35:*.mp4v=01;35:*.vob=01;35:*.qt=01;35:*.nuv=01;35:*.wmv=01;35:*.asf=01;35:*.rm=01;35:*.rmvb=01;35:*.flc=01;35:*.avi=01;35:*.fli=01;35:*.flv=01;35:*.gl=01;35:*.dl=01;35:*.xcf=01;35:*.xwd=01;35:*.yuv=01;35:*.cgm=01;35:*.emf=01;35:*.axv=01;35:*.anx=01;35:*.ogv=01;35:*.ogx=01;35:*.aac=00;36:*.au=00;36:*.flac=00;36:*.mid=00;36:*.midi=00;36:*.mka=00;36:*.mp3=00;36:*.mpc=00;36:*.ogg=00;36:*.ra=00;36:*.wav=00;36:*.axa=00;36:*.oga=00;36:*.spx=00;36:*.xspf=00;36:'
export LS_COLORS
# Only set up the fancy colored prompt in real interactive terminals
if [[ $- == *i* ]] && [[ -t 0 && -t 1 ]] && [[ -z "${SSH_ORIGINAL_COMMAND:-}" ]]; then
# Color and style variables
RESET=$(tput sgr0)
BOLD=$(tput bold)
BG_GRAY=$(tput setab 8)
FG_RED=$(tput setaf 1)
FG_MAGENTA=$(tput setaf 5)
FG_GREEN=$(tput setaf 2)
FG_CYAN=$(tput setaf 6)
# Multi-line prompt – all non-printing sequences wrapped in \[ \]
PS1="\n"
PS1+="\[${BOLD}${BG_GRAY}${FG_RED}\]\u"
PS1+="\[${FG_MAGENTA}\]@"
PS1+="\[${FG_RED}\]\`hostname\`"
PS1+="\[${FG_GREEN}\] : \`uname\` : "
PS1+="\[${FG_CYAN}\]\d \t : \${PLANTID:+\$PLANTID }"
PS1+="\[${RESET}\]\n"
PS1+="\[${FG_CYAN}\][\w]"
PS1+="\[${RESET}${BOLD}\] \\$ \[${RESET}\]"
export PS1
fi
EOFDatabase Install and Configuration
Configure MariaDB
Optional: To add the MariadB repo to get the latest revision other then the one that is included in the RedHat
MARIADB REPORTED A PROBLEM WITH 10.5, YOU SHOULD CONSIDER UPGRADING TO 10.11
Install the new Repo for MariaDB
curl -sS https://downloads.mariadb.com/MariaDB/mariadb_repo_setup | sudo bashThis is the location of
vi /etc/yum.repos.d/MariaDB.repoYou have to change the yellow below to get the desired version
10.11 Revision
|
[mariadb-main]
|
You will have to remove the current one installed if it exists and then install the new one
dnf remove mariadb-server -y
dnf install mariadb-server -yRun the following to edit the MariaDB service file
# Edit the file
sudo tee /etc/systemd/system/mariadb.service.d/override.conf > /dev/null << 'EOF'
[Service]
LimitNOFILE=32768
EOF
# 1. Tell systemd to scan for unit updates
sudo systemctl daemon-reload
# 2. Restart MariaDB to apply the new open file limits
sudo systemctl restart mariadb
# 3. Verify the applied LimitNOFILE setting for the running process
sudo systemctl show mariadb -p LimitNOFILERun the following to add the client socket to the [client] section
sudo awk '
/^\[client\]/ { print; print "socket=/var/lib/mysql/mysql.sock"; added=1; next }
{ print }
END { if (!added) print "\n[client]\nsocket=/var/lib/mysql/mysql.sock" }
' /etc/my.cnf.d/client.cnf | sudo tee /etc/my.cnf.d/client.cnf.tmp > /dev/null \
&& sudo mv /etc/my.cnf.d/client.cnf.tmp /etc/my.cnf.d/client.cnfVerify the following
cat /etc/my.cnf.d/client.cnfRun the following
vi /etc/my.cnf.d/server.cnfAdd the following below the [mysqld] section and you will have to use the :set paste command or it will not paste correctly
BELOW IS FOR SERVER 8CPU AND 64GIG MEMORY
#Custom
performance_schema = ON
tmpdir = /run/mariadb
thread_cache_size = 4
table_open_cache = 16384
table_definition_cache = 8384
sql_mode = ERROR_FOR_DIVISION_BY_ZERO,NO_AUTO_CREATE_USER,NO_ENGINE_SUBSTITUTION
query_cache_type = 0
query_cache_size = 0
query_cache_limit = 128M
query_cache_strip_comments = 1
tmp_table_size = 512M
max_heap_table_size = 512M
max_connections = 750
max_allowed_packet = 24M
sort_buffer_size = 24M
join_buffer_size = 48M
innodb_buffer_pool_size = 48G # 65-75% of RAM for InnoDB cache --> Keeping some for VUE
innodb_buffer_pool_instances = 6 # One instance per CPU core --> Keeping some for VUE 2 out of 8
innodb_flush_method = O_DIRECT # Reduce I/O overhead
innodb_flush_log_at_trx_commit = 2 # Balance performance and durability
innodb_log_buffer_size = 16M # Buffer for transaction logs
innodb_thread_concurrency = 0 # Let MySQL manage threads (0 = unlimited)
innodb_io_capacity = 2000 # Adjust based on storage IOPS
innodb_io_capacity_max = 4000 # Max IOPS for bursts
innodb_use_native_aio = 1
innodb_flush_log_at_trx_commit = 2 # Balance performance and durability --> Changed from 0
innodb_file_per_table
innodb_log_file_size = 2G # Larger logs for better write performance --> Changed from 512
#Optional configuration for transaction logging Change for mysql or mariadb
#log_bin = /var/log/mariadb/mariadb.log
#expire_logs_days = 2Reload the changes
systemctl daemon-reloadEnable and start MySQL/MariaDB on boot
systemctl enable --now mariadb.serviceRun the following
mysqlThen execute the following statements also make sure to (change passwords as needed XXXXXXXXXX but NOT the users names)
DROP USER 'kiwisql'@'%';
FLUSH PRIVILEGES;
CREATE USER 'kiwisql'@'%' IDENTIFIED BY 'XXXXXX';
GRANT all ON *.* TO 'kiwisql'@'%' WITH GRANT OPTION;
DROP USER 'kiwisql'@'localhost';
FLUSH PRIVILEGES;
CREATE USER 'kiwisql'@'localhost' IDENTIFIED BY 'XXXXXX';
GRANT all ON *.* TO 'kiwisql'@'localhost' WITH GRANT OPTION;
DROP USER 'kiwilive'@'localhost';
FLUSH PRIVILEGES;
CREATE USER 'kiwilive'@'localhost' IDENTIFIED BY 'XXXXXX';
GRANT all ON *.* TO 'kiwilive'@'localhost';
DROP USER 'remuser'@'%';
FLUSH PRIVILEGES;
CREATE USER 'remuser'@'%' IDENTIFIED BY 'XXXXXX';
GRANT all ON *.* TO 'remuser'@'%' WITH GRANT OPTION;
DROP USER 'remuser'@'localhost';
FLUSH PRIVILEGES;
CREATE USER 'remuser'@'localhost' IDENTIFIED BY 'XXXXXX';
GRANT all ON *.* TO 'remuser'@'localhost' WITH GRANT OPTION;
DROP USER 'reports'@'%';
FLUSH PRIVILEGES;
CREATE USER 'reports'@'%' IDENTIFIED BY 'readonly';
GRANT SHOW DATABASES, SELECT, EXECUTE, PROCESS, SHOW VIEW ON *.* TO 'reports'@'%';
FLUSH PRIVILEGES;
quitBuild skeleton for the Kiwiplan Environment
Command to Run
Setup the user environment
Remember to change the remuser & esp password
ESP username password is the global password store in ESP to let it connect and is unfortunately visible to an admin user but please make sure to (change passwords as needed XXXXXXXXXX but NOT the users names)
groupadd kiwiplan
mkdir /opt/kiwi
ln -s /opt/kiwi/ /KIWI
mkdir /opt/kiwi/{home,rev}
mkdir /opt/kiwi/rev/{map,mes}
useradd -g kiwiplan -G wheel -d /KIWI/home/remuser/ remuser
echo NewDssP@$$RemRhel193 | passwd --stdin remuser
useradd -g kiwiplan -d /KIWI/home/esp/ esp
echo esp2map | passwd --stdin esp
chown -R remuser:kiwiplan /opt/kiwi
mkdir /etc/kiwiplan
chown remuser:kiwiplan /etc/kiwiplanSystemd Socket Implementation For KIDD
Configure kidd.stocket
Remember your :set paste command
Create a socket file and the following
vi /lib/systemd/system/kidd.socketThen add the following
[Unit]
Description=KIDD
[Socket]
ListenStream=2326
Accept=yes
[Install]
WantedBy=sockets.targetCreate a service file by editing the following
vi /lib/systemd/system/kidd@.serviceThen add the following
[Unit]
Description=Kidd Server
[Service]
ExecStart=/KIWI/rev/current/progs/kidd -a -p -F 1
User=root
Group=root
StandardInput=socket
StandardOutput=socket
# Resource configuration
LimitNOFILE=8192
LimitNPROC=4096
# MaxConnections=nnn - The maximum number of connections to simultaneously run services instances for
# when Accept=true is set. nnn should be sized accordingly for the implementation.
MaxConnections=200
# The maximum number of connections for a service per source IP address.
# This is very similar to the MaxConnections= directive above. Disabled by default.
MaxConnectionsPerSource=80Start the service and enable on reboot
systemctl start kidd.socket
systemctl enable kidd.socketThis will only work once you have the Kiwiplan environment configured/installed
VUE Installation Configurations
Adjust system limits for VUE products
Edit the following
sudo tee -a /etc/security/limits.d/20-nproc.conf > /dev/null << 'EOF'
# Soft process limit for kiwiplan group
@kiwiplan soft nproc 32768
EOFVerify the edit
cat /etc/security/limits.d/20-nproc.conf
Edit the following
sudo tee -a /etc/security/limits.conf > /dev/null << 'EOF'
# Open file limits for kiwiplan group
@kiwiplan - nofile 32768
EOFVerify the edit
cat /etc/security/limits.confInstalling MsSQL Tool
Configure MsSQL tools
Install the repo for the MsSQL service/connection
curl https://packages.microsoft.com/config/rhel/9/prod.repo > /etc/yum.repos.d/msprod.repoThis will only work once you have the Kiwiplan environment configured/installed
Install the packages make sure you answer/type YES to all
dnf remove mssql-tools unixODBC-utf16-devel
dnf install mssql-tools unixODBC-devel -yActivate Directory Setup
Using SSSD
Install the following packages
yum install sssd sssd-tools realmd samba-common-tools oddjob oddjob-mkhomedir adcli samba -yRun this just in-case your domain is still using RC4
update-crypto-policies --set DEFAULT:AD-SUPPORTConfigure KRB5
Edit the following file and make sure the following is added/changed
vi /etc/krb5.confAdd or changed the following below
|
# To opt out of the system crypto-policies configuration of krb5, remove the [logging] [libdefaults] dns_canonicalize_hostname = fallback qualify_shortname = "" default_realm = ONLING.COM
[realms] [domain_realm] |
Join the server to the domain
Configurating the SSSD (in yellow update to site specific) (in green needs to be capitalized)
You must have the access to add to the AD server or the server has to be add first before you run the following command.
For the join you may need to specify the -OU's for the specific location
|
# realm discover onling.com # realm join -U administrator@ONLING.COM --verbose domain_controller.onling.com # authselect select sssd with-mkhomedir # authselect apply-changes |
Copy from below and make changes
realm discover onling.com
realm join -U administrator@ONLING.COM --verbose domain_controller.onling.com
authselect select sssd with-mkhomedir
authselect apply-changesUpdate SSSD config
Once joined then you can change or add the following parameters
vi /etc/sssd/sssd.conf|
[sssd] domains = onling.com config_file_version = 2 services = nss, pam
[domain/onling.com] default_shell = /bin/bash ad_server = sfl-dom-001.onling.com krb5_store_password_if_offline = True cache_credentials = True krb5_realm = ONLING.COM realmd_tags = manages-system joined-with-adcli id_provider = ad fallback_homedir = /home/%d/%u ad_domain = onling.com use_fully_qualified_names = false ldap_id_mapping = True access_provider = ad override_gid = 1000 |
Restarting SSSD
systemctl stop sssd; sss_cache -E; systemctl start sssdOptional SSSD configurations
Defaults to no Shell Access, allows short usernames
Optional (Group allow) additional parameters and changes
|
simple_allow_groups = sssd-users OR simple_allow_groups = gg-C3193???-KiwiTS_access |
Add users to SSSD
Optional grant shell access and force primary group to kiwiplan, change john.doe to the username
sss_override user-add john.doe -g $(getent group kiwiplan | cut -d: -f3) -s /bin/bash -h /KIWI/home/john.doeKiwiplan - Classic Purge Parameter Defaults
This is to give your plant(s) default set values for these parameters.
Legend:
- PARAMS - Default for all
- CSC - Corrugator Scheduling Center
- RSS - Roll Stock System
- ULT - Unit Load Tracking
- WIP - ULT Work In Progress
PARAMS is the default setting for all modals if it is the only one that exists
|
System Description View_or_Maintain Prefix Description View_or_Maintain Default_key Many_records_allowed Description Contents Purge orders daily (Y/N) Y Purge details daily (Y/N) Y Purge history daily (Y/N) Y Purge specifications daily Y/N Y |
CSC Parameters
|
System Description View_or_Maintain Prefix Description View_or_Maintain Default_key Many_records_allowed Description Contents Purge orders daily (Y/N) Y Purge details daily (Y/N) Y Purge history daily (Y/N) Y Purge specifications daily Y/N Y |
RSS Parameters
|
System Description View_or_Maintain Prefix Description View_or_Maintain Default_key Many_records_allowed Description Contents Purge orders daily (Y/N) Y Purge details daily (Y/N) Y Purge history daily (Y/N) Y Purge specifications daily Y/N Y |
ULT Parameters
|
System Description View_or_Maintain Prefix Description View_or_Maintain Default_key Many_records_allowed Description Contents Purge orders daily (Y/N) Y Purge details daily (Y/N) Y Purge history daily (Y/N) Y Purge specifications daily Y/N Y |
WIP ULT Parameters
|
System Description View_or_Maintain Prefix Description View_or_Maintain Default_key Many_records_allowed Description Contents Purge orders daily (Y/N) N Purge details daily (Y/N) N Purge history daily (Y/N) Y Purge specifications daily Y/N |
Kiwiplan - Costing
SFL Services LLC can help you revamp or configure your cot model
Contact us to get timing and cost
Contents
0020 Board Waste on the Corrugator
0022 Board Waste on Converting
0050 Starch Costs on the Corrugator
0081 Purchased Goods for Converting
0111 Set up Costs on Converting - (Fixed Cost)
0111 Set up Costs on Converting - (Variable Cost)
0140 Running Costs on Corrugator - (Fixed Cost)
0140 Running Costs on Corrugator – (Variable Cost)
0160 Running Costs on Converting - (Fixed Cost)
0160 Running Costs on Converting – (Variable Cost)
0167 Internal WIP Transport – (Fixed Cost)
0167 Internal WIP Transport – (Variable Cost)
0201 Palletizer – (Fixed Cost)
0201 Palletizer – (Variable Cost)
0250 Financial Cost of Debtors
0231 Dedicated Transport Costs
0232 – Over The Road Transport Quoted Cost
0233 – Over The Road Transport Estimated Cost
SFLS-OTR Transport (Estimated)
0234 Additional Transport Costs (need to chage to new ESP functionality)
0825 Financial Cost of Inventory
Kiwiplan - Farmout Routes in ESP
Farm-Out Routes in ESP
Warehoused Product Designs
These 5 Farm Out route scenarios have at least these operations
| Below - PCS Classic | Below - PCS VUE |
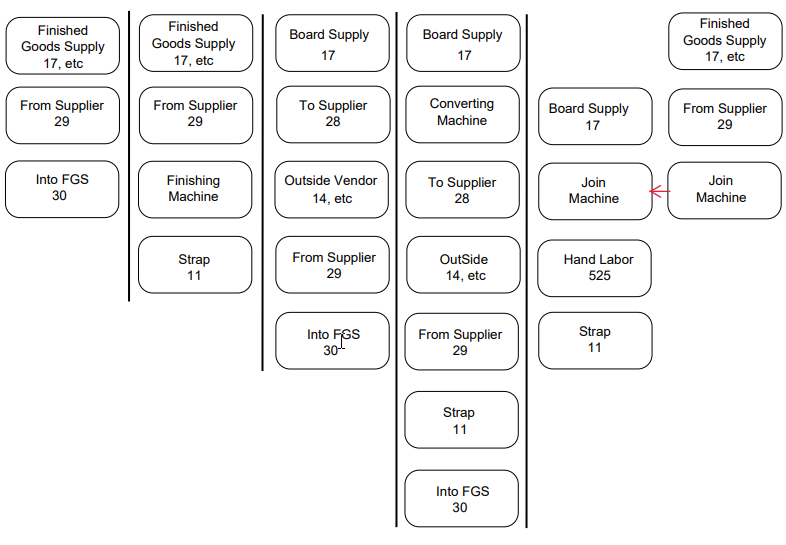
| Above - PCS Classic | Above - PCS VUE |
How To and Explanation:
If no route appears after saving PD
- Drag & drop machine into route.
- Drop once on Green
- Right click in Blue, Assign Operations
- In Misc Details (2) Tab, ensure all operations correlate with their respective bubble.
If a route appears after saving PD
- Make appropriate changes to machines to how your item is being produced.
- Delete & Add Machines
- Choose Machines from Machine list
- Right click in Blue, Assign Operations
- In Misc Details (2) Tab, ensure all operations correlate with their respective bubble.
Script - Import Data Script for Internal Customer Servers
This is a script to import databases, logs and preference bundles from a backup file generated from a datadump script.
Name:
importdataScript Located here:
https://github.com/SFLServicesLLC/Scripts/blob/main/Linux/importdata
Kiwiplan - Box Plant Classic/Refresh To VUE Master Parameters
Master Data Parameters for a Classic Refresh Plant
This is used to know where the parameter take affect in either VUE or Classic
| ReFresh | ||||
| Setup In | ||||
| Classic | VUE | Option | Vue Script | Comments |
| Yes | Material > Material Group > Board Group | |||
| Yes | Configuration > Organization > Score Types | Make sure default in VUE is set but also set CORR-CP & PCS-QB | ||
| Yes | Yes | Configuration > Organization > Score Types & PCS-QB & CORR-CP | Make sure that classic has the default converting score set | |
| Yes | Materials > Flute Types | |||
| Yes | Materials > Material Group > Board Group | |||
| Yes | Materials > Material Groups > Paper Classes | |||
| Yes | Yes | CSC00 > P > CSC > UD | ||
| Yes | Configuration > Downtime > Downtime Classes | |||
| Yes | Yes | Materials > Materials > Shippers & GEN-SN | VUE only needed for COMMS. Classic for everything else | |
| Yes | PCS00 > P > GEN > TB | |||
| Yes | PCS00 > P > GEN > TU | |||
| Yes | Yes | Configuration > Parameters > Manufacturing > COMMS & GEN-UM | ||
| Yes | GEN-UP | Not used in VUE but stored on the unitising table | ||
| Yes | PCS00 > P > GEN > WC | |||
| Yes | INV-SM | Not used in VUE but stored on the shipmethod and job table | ||
| Yes | PCS00 > P > PCS > CC | Yes | ||
| Yes | PCS00 > P > PCS > CE | Yes | ||
| Yes | PCS-CN, GEN-CM, GEN-CN | |||
| Yes | Configuration > Parameters > PCS > Feedback | |||
| Yes | PCS00 > P > PCS > IC | Yes | ||
| Yes | Configuration > Tool > Tool Types & PCS-PD | VUE needs these for tooling but ESP reads classic for type | ||
| Yes | PCS00 > P > PCS > QD | |||
| Yes | PCS00 > P > PCS > QS | |||
| Yes | Configuration > Organization > Machine Groups & PCS-QE | Classic & ESP reads the group description from classic | ||
| Yes | Configuration > Machine > Machine Operations & PCS-QK | |||
| Yes | Configuration > Order > Hold Statuses | |||
| Yes | Configuration > Order > Hold Statuses | |||
| Yes | PCS00 > P > PCS > QP | |||
| Yes | Configuration > Machine > Slot WidthCodes | |||
| Data Fields | ||||
| Yes | Materials > Materials > Papers | |||
| Yes | Materials > Materials > Starch | |||
| Yes | Materials > Materials > Corrugated Boards | |||
| Yes | Materials > Materials > Corrugator Coatings | |||
| Yes | PCS00 > L > D | |||
| Materials > Material Group > Ink Groups | ||||
| Yes | Configuration > Organization > Plant > Stores and invmenu | Only machine in and out feed locations need to be in VUE | ||
| Yes | Configuration > Organization > Plant > Stores and invmenu | Only machine in and out feed locations need to be in VUE | ||
| Yes | Yes | Configuration > KDG Templates & lbs00:A | Just code needs to exist in classic, label defined in VUE | |
| Yes | Configuration > Organization > Plant > Machines | |||
| Calendars > Shift Names | ||||
| Calendars > Calendars | ||||
| PICS and ESP | Must enter in ESP and PICS and must match | |||
Kiwiplan - Sheet Plant VUE Master Parameters
Master Data Parameters for a VUE Sheet Plant
This is used to know where the parameter take affect in either VUE or Classic
| Sheet Plants / Box Plant Full VUE | |||||
| Setup In | |||||
| Parameter | Description | Classic | VUE | Option | Comments |
| CORR-BB | Board Codes | Yes | Material > Material Group > Board Group | ||
| CORR-CT | Score Codes | Yes | Configuration > Organization > Score Types | Make sure default in VUE is set but also set CORR-CP & PCS-QB | |
| CORR-CP & PCS-QB | Default Score Code | Yes | Yes | Configuration > Organization > Score Types & PCS-QB & CORR-CP | Make sure that classic has the default converting score set |
| CORR-FL | Flutes | Yes | Materials > Flute Types | ||
| CSC-BS | Board Structure | Yes | Materials > Material Group > Board Group | ||
| CSC-PC | Paper Classes | Not required for sheetplants | |||
| CSC-UD | Unit Descriptions | Yes | Configuration > Order > Groups | ||
| GEN-QC | Downtime Classes | Yes | Configuration > Downtime > Downtime Classes | ||
| GEN-SN | Shipper types | Yes | Yes | Materials > Materials > Shippers & GEN-SN | VUE only needed for COMMS. Classic for everything else |
| GEN-TB | Top Boards | Yes | Materials > Materials > Top Board | ||
| GEN-TU | Pallets | Yes |
Materials > Materials > Pallets Materials > Unit Load Types < -- After version 10 Box Plant |
||
| GEN-UM | Units of Measure | Yes | Yes | Configuration > Parameters > Manufacturing > COMMS & GEN-UM | |
| GEN-UP | Label/Sample Placement | Yes | GEN-UP | Not used in VUE but stored on the unitising table | |
| GEN-WC | Waste Classes | Yes | Configuration > Waste - Categories | ||
| INV-SM | Shipment Method | Yes | INV-SM | Not used in VUE but stored on the shipmethod and job table | |
| PCS-CC | Closure Codes | Yes | Configuration > Machine > Closure Codes | ||
| PCS-CE | Flap Types | Yes | Configuration > Machine > Closure Type | ||
| PCS/GEN-CM/CN | Communications | Yes | PCS-CN, GEN-CM, GEN-CN | ||
| PCS-FB | Feedback | Yes | Configuration > Parameters > PCS > Feedback | ||
| PCS-IC | Inks & Coatings | Yes | Configuration > Material Group > Ink types | ||
| PCS-PD | Tooling Definitions | Yes | Yes | Configuration > Tool > Tool Types & PCS-PD | VUE needs these for tooling but ESP reads classic for type |
| PCS-QD | Tooling Die Status | Yes | Configuration > Tool > Tool Statuses | ||
| PCS-QS | Tooling Print Status | Yes | Configuration > Tool > Tool Statuses | ||
| PCS-QE | Machine Groups | Yes | Yes | Configuration > Organization > Machine Groups & PCS-QE | Classic & ESP reads the group description from classic |
| PCS-QK | Machine Operations | Yes | Yes | Configuration > Machine > Machine Operations & PCS-QK | |
| PCS-QO | Order Status | Yes | Configuration > Order > Hold Statuses | ||
| CSC-OS | Order Status | Yes | Configuration > Order > Hold Statuses | ||
| PCS-QP | PCS-QP | Not required for sheetplants | |||
| PCS-SW | Slot Widths | Yes | Configuration > Machine > Slot WidthCodes | ||
| Data Fields | |||||
| Papers | Not required for sheetplants | ||||
| Starch | Not required for sheetplants | ||||
| Board Grades | Yes | Materials > Materials > Corrugated Boards | |||
| Coatings | Yes | Materials > Materials > Coatings | |||
| Inks | Yes | Materials > Materials > Inks | |||
| Ink Groups | Yes | Materials > Material Group > Ink Groups | |||
| Locations | Yes | Yes | Configuration > Organization > Plant > Stores and invmenu | Only machine in and out feed locations need to be in VUE | |
| Stores | Yes | Yes | Configuration > Organization > Plant > Stores and invmenu | Only machine in and out feed locations need to be in VUE | |
| Label Formats | Yes | Yes | Configuration > KDG Templates & lbs00:A | Just code needs to exist in classic, label defined in VUE | |
| Machines | Yes | Configuration > Organization > Plant > Machines | |||
| Shift Names | Yes | Calendars > Shift Names | |||
| Calendars | Yes | Calendars > Calendars | |||
| Purchase Category | Yes | PICS and ESP | Must enter in ESP and PICS and must match | ||
SFL - Post-Site Audit Installation

Post-Site Audit Installation
This document is used to go through each department on a plant visit or for the plant to fill conduct themselves prior a visit.
Please take time to talk to each team and document their concerns as most of the time their concerns will have or are part of cascading effects from or to other departments.
Document Instruction
You will have to download this document and fill out ALL sections and we will re-upload it if we are taking on your project which we will add to our project planning area HERE.
Current SOPs (Standard Operating Procedures)
The big question in most cases, does the plant have either past system SOP or any current SOP's?
Depending on you answer are you look for us to help you create them for the newly installed system?
Introduction
This section is to learn more about what was installed at the plant when the systems were introduced:
| System aka's | Name | Yes/No |
| CSC | Corrugator Control Scheduling | |
| SCS | Supply Chain Simulator | |
| PCS | Production Control System | |
| ESP | Enterprise Sales Processing | |
| ULT | Unit Load Tracking | |
| VUE PCS | Visual GUI version of Production Control System | |
| VUE CSC | Visual GUI version of Corrugator Control Scheduling | |
| VUE ULT | Visual GUI version of Unit Load Tracking | |
| KDW | Kiwiplan Data Warehouse | |
| TSS | Truck Scheduling System | |
| QMS | Quality Management System | |
| MMS | Material Management System | |
Fact Finding Mission
Overview
The mission of the document is to make sure that the processes that are used at the plant are adaptable to the Kiwiplan system suit of the MAP/MES and ESP systems.
Overview Questions:
| What system did the plant use before the installation | |
| Was there use of spreadsheet before the installation | |
| What was the driver to change the system for the plant | |
Business Flow Charts
Do you have any workflow to provide us that are like this from your old or new processes:
Estimating
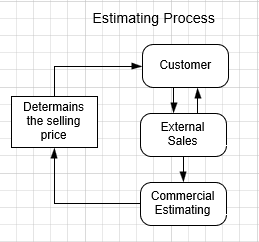
Ordering
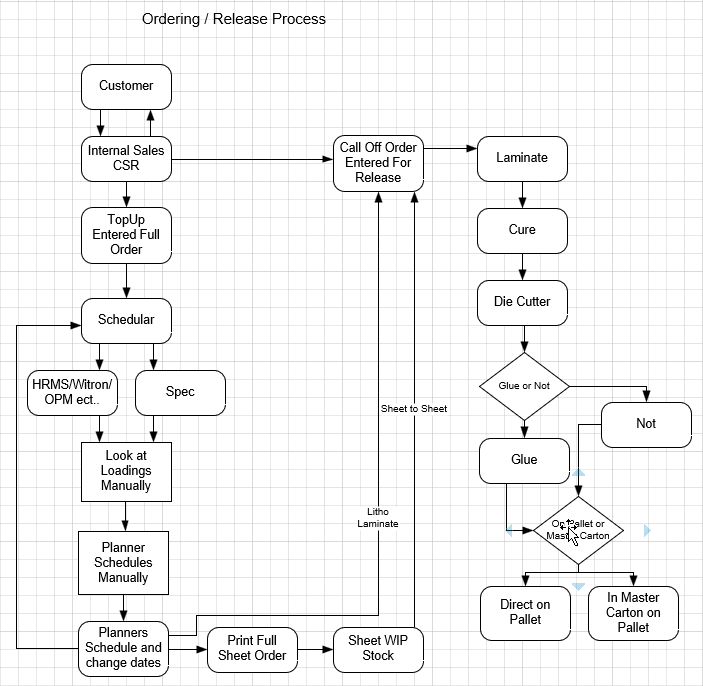
Other Core Systems
This section is for any other systems that complement the Kiwiplan systems.
| Do you have a unitizing system for optimizing stacking | |
| Do you have a CAD system for creating products | |
| What is your accounting software | |
Specific Workflows
The section is if you have any workflows that complement the corrugated processes within your plan.
Product Design / Estimating / Costing Processes
This section is to explain the process from the point of creating a product specification, its routing, its costing and finally its pricing.
We need a detailed process explanation or flow chart to tell us how this works at the plant.
You can have a look at our costing model that we usually configure at our customer plants/corporation:
Click HERE
Creating Product
What is the process used to create your product and which department is creating.
Setting Degrade Rules
This is crucial to have implemented degrade rules from a costing leveling perspective to the routing perspective. This allows you to consistently cost at the same level but be able to send more accurate run speeds to production to keep a good production level.
| Machine# | Detailed Degrade Rules Set Y/N (Y for detailed N for Standards Only) |
Creating Routing
What is the process used to create your routing for the product and which department is creating.
Creating Estimating
What is the process used to create your cost estimate based on the routing and the product and which department is creating.
Creating Pricing
What is the process used to create your pricing based on the costing and product information and which department is creating.
Roll Stock
This section is to explain the process from the ordering of the rolls to receiving them into your own warehouse.
Please fill out the table below to know how your plant currently functions with your warehouses.
| Owned/Leased | Name | Consignment Y/N | EDI Y/N |
Production
This section is to explain the process of placing the order in the ESP system and getting the BOB (Book on Blue) date with the use of loadings and degrade rules if any are set.
Please specify if you send some work out to get farm out and what that process looks like.
Please specify if you are in the horticulture segment of the industry and what that process looks like.
Printing Plates
This section is to explain if you create, purchase or destroy your tooling and what is its process on a daily bases.
How do you manage your Printing Plates:
| Purchasing | |
| Rotations | |
| Discarding |
Die Cut Dies
This section is to explain if you create, purchase or destroy your tooling and what is its process on a daily bases.
How do you manage your Cutting Dies:
| Purchasing | |
| Rotations | |
| Discarding |
Purchasing Materials
What are your current process on purchasing finished products or sheets from a external source?
Customer Service Department
This section is to explain the processes withing the customer service area of the plant. Please elaborate on the departments process on booking orders to delivery. These processes should also include what and how the team handles order requests or inquiries during the day. Please include all interactions that the team can think of between them and the plant depatments.
Finance Department
This section is to explain the processes within the finance area of the plant.
Does the invoicing happen the day of or the next day of the delivery?
Do you ship across boarders?
Do you have an interface build to send the transactional data to from ESP to the accounting software?
Logistic Department
This section is to explain the processes used in the shipping departments at the plant. Does the plant use the production schedule to plant for trucks and where they are going by a certain criteria? For example regions, zones or etc.
If you purchased the TSS system how are you using it to determine when to deliver the goods and when?
Quality Department
This section is to explain the process within the quality department. Please explain you past or current process on how your plant processes are dealing with current runs or past runs of products.
Did you purchase the QMS?
Integrations (Interfaces)
This section is to explain if you have any integrations with any core systems used at your location or locations to feed data to other host systems?
| System | Integration |
Custom Scripts or Applications
This section is to explain if you have any kind of special system scripts or application in between the systems to the Kiwiplan system and that includes any SQL agent scripts or SSIS processes?
| System | Integration |
Summary Notes
This section is to explain if you can think of any other system touch points that were not covered above?
Document Revision History
|
Date |
Version |
Document |
Created / Modified |
Comments |
|
08.11.2018 |
1.0 |
Kiwiplan Site Audit |
Steve Ling |
Creation |
|
02.07.2025 |
1.1 |
Added to the docs site for ease of sharing |
Steve Ling |
|
Kiwiplan - Conversion Tables for VUE (Microns)
Conversion Table
This is a table to help you if building reports from the Kiwiplan VUE systems
| Value | Into | Factor | Feet | Inches | 16ths | Formula |
| 17729644500 | Lineal Feet | 3048000 | 5817 | ROUND([value]/3048000) | ||
| 27178000 | Roll Width | 25400 | 66.8750 | 1070 | ROUND([value]/25400)/16 |
Kiwiplan - JAVA openJDK Install for Oracle Licensing Issues
Microsoft OpenJDK
These two version are required for some of the Kiwiplan suit installations
Java Main
Here is the link to the main page
https://learn.microsoft.com/en-us/java/openjdk/download
Java 8
Here is the link for the 8 version
https://learn.microsoft.com/en-us/java/openjdk/download#openjdk-8
Java 11
Here is the link for the 11 version
https://learn.microsoft.com/en-us/java/openjdk/download#openjdk-11
Script - Data Dump Script for Internal Customer Servers
This script is to get a backup of all databases to either send them to a test server, just a backup or send them for support.
Name:
datadumpScript Located here:
https://github.com/SFLServicesLLC/Scripts/blob/main/Linux/datadump
Script - Test Server .bash_profile
This script needs to be modified for the test server login
vi /etc/skel/.bash_profileAdd or change the following to this
PATH=$PATH:$HOME/.local/bin:$HOME/bin
export PATH
/KIWI/corp/bin/bash_profile
#Uncomment if you want the shell to exit when user exists
exitScript to be added/created to the $CORPBIN of the server
Edit the following script
vi /KIWI/corp/bin/bash_profileAdd the following
#!/bin/bash
#Type:Utility
#########################################################
# Script:
#
# This is used for logging into a test server
#
# Created
# Steve Ling
#########################################################
# Revision
#
# 2025-01-26 SFL Initial revision
#
#########################################################
#
# Environment:
#
umask 002
#trap 'echo "Caught Ctrl+C"; exit 0' SIGINT
export KIWIBASE=/KIWI
DBHOST=localhost
MYSQLUSER=kiwisql
MYSQLPASS=800486kiwi
#
# Variables
REVS=/KIWI/rev/map
MREVS=/KIWI/rev/mes
DATASETS=/KIWI/backups
#
# Define colors
RED='\033[1;31m'
GREEN='\033[1;32m'
YELLOW='\033[1;33m'
BLUE='\033[1;36m'
NC='\033[0m' # No Color
BOLD='\033[1m'
FLASH='\033[5m'
#
# Define log file
LOG_FILE="Log$(date +"%Y%m%d_%H%M%S").log"
#
# Logging function
log() {
local message="$1"
local level="$2" # Optional: INFO, WARNING, ERROR
local color="$3"
# Timestamp
timestamp=$(date +"%Y-%m-%d %H:%M:%S")
# Log message with level and timestamp
echo -e "${color}${message}${NC}" | tee -a "$LOG_FILE"
#echo -e "${color}${message}${NC}" >> "$LOG_FILE"
echo "[${timestamp}] [${level}] ${message}" | logger
}
#
# Display banner
banner(){
clear
log "=========================================" "INFO" "${GREEN}${BOLD}"
log "| Welcome to the Test/Dev Environment |" "INFO" "${GREEN}${BOLD}"
log "| |" "INFO" "${GREEN}${BOLD}"
log "| You are in the server: |" "INFO" "${GREEN}${BOLD}"
log " `hostname` " "INFO" "${YELLOW}${BOLD}"
log "=========================================" "INFO" "${GREEN}${BOLD}"
echo ""
}
#
checkVariables() {
if [ ! -d $REVS ];then
log "$REVS does not exist" "ERROR" "${RED}${BOLD}${FLASH}"
return 1
fi
#
if [ ! -d $MREVS ];then
log "$MREVS does not exist" "ERROR" "${RED}${BOLD}${FLASH}"
return 1
fi
#
if [ ! -d $DATASETS ];then
log "$DATASETS does not exist" "ERROR" "${RED}${BOLD}${FLASH}"
return 1
fi
}
#
main_menu(){
# Main Menu
banner
echo ""
log "A) Add Site" "INFO" ${GREEN}${BOLD}
log "D) Delete Site." "INFO" ${GREEN}${BOLD}
log "R) Restore Data" "INFO" ${GREEN}${BOLD}
log "S) Select Site" "INFO" ${GREEN}${BOLD}
echo ""
log "X) Exit" "INFO" ${BLUE}${BOLD}
echo ""
echo -en ${YELLOW}${BOLD} "Default [S] : "
read -t 10 choice
log choice
case "$choice" in
"A"|"a")
log "Chose option A" "INFO" ${YELLOW}${BOLD}
site_add
;;
"D"|"d")
log "Chose option D" "INFO" ${YELLOW}${BOLD}
site_delete
;;
"R"|"r")
log "Chose option R" "INFO" ${YELLOW}${BOLD}
data_restore
;;
"S"|"s")
log "Chose option S" "INFO" ${YELLOW}${BOLD}
site_select
;;
"X"|"x")
log "Exiting..." "INFO" ${YELLOW}${BOLD}
return 0
;;
*)
site_select
return 0
;;
esac
}
site_add(){
echo -en ${GREEN}${BOLD} "Enter 4 character site name : "
read NEW_SITE
if [ -z "$NEW_SITE" ]
then
exit 1
main_menu
else
REVS=$(find /KIWI/rev/map/* -maxdepth 0 -type d| sort)
PS3="Select MAP revision for $NEW_SITE : "
select REV in $REVS
do
if [ ! -d "/KIWI/rev/site_$NEW_SITE" ]; then
ln -s $REV $KIWIBASE/rev/site_$NEW_SITE
fi
mkdir -p $KIWIBASE/site_$NEW_SITE
ln -s $KIWIBASE/rev/site_$NEW_SITE/bin $KIWIBASE/site_$NEW_SITE/bin
ln -s $KIWIBASE/rev/site_$NEW_SITE/progs $KIWIBASE/site_$NEW_SITE/progs
ln -s $KIWIBASE/rev/site_$NEW_SITE/scp $KIWIBASE/site_$NEW_SITE/scp
ln -s $KIWIBASE/rev/site_$NEW_SITE/sql $KIWIBASE/site_$NEW_SITE/sql
break
done
install_mysql new
gen_kidds
mkdir -p $KIWIBASE/site_$NEW_SITE/site/bin
mkdir -p $KIWIBASE/site_$NEW_SITE/site/dat
if [ ! -d $KIWIBASE/services ];then
mkdir -p $KIWIBASE/services/
fi
cd $KIWIBASE
if [ ! -d $KIWIBASE/java ];then
ln -s $KIWIBASE/services java
fi
mkdir -p $KIWIBASE/services/sites/$NEW_SITE/
MREVS=$(find $KIWIBASE/rev/mes/* -maxdepth 0 -type d| sort)
PS3="Select MES revision for $NEW_SITE : "
select MREV in $MREVS
do
cd /$KIWIBASE/services/sites/$NEW_SITE/
mkdir -p `basename $MREV`
ln -s `pwd`/`basename $MREV` current
mkdir -p $KIWIBASE/services/sites/$NEW_SITE/current/conf
mkdir -p $KIWIBASE/services/sites/$NEW_SITE/current/conf/roadgrids
mkdir -p $KIWIBASE/services/sites/$NEW_SITE/current/conf/kiwiplan/roadgrids
ln -s $KIWIBASE/services/maps/roadgrids/osm-gh $KIWIBASE/services/sites/$NEW_SITE/current/conf/roadgrids/osm-gh
ln -s $KIWIBASE/services/maps/roadgrids/osm-gh $KIWIBASE/services/sites/$NEW_SITE/current/conf/kiwiplan/roadgrids/osm-gh
mkdir -p $KIWIBASE/services/sites/$NEW_SITE/current/logs
break
done
fi
log "Added $NEW_SITE to the environment" "INFO" ${BLUE}${BOLD}
log "Setting the $NEW_SITE environment" "INFO" ${YELLOW}${BOLD}
export KIWI=${KIWI:-$KIWIBASE/site_$NEW_SITE}
export CORPBIN=${CORPBIN:-${KIWIBASE}/corp/bin}
export CORPDAT=${CORPDAT:-${KIWIBASE}/corp/dat}
export SITEBIN=${SITEBIN:-${KIWI}/site/bin}
export SITEDAT=${SITEDAT:-${KIWI}/site/dat}
export BIN=${BIN:-${KIWI}/bin}
export WORK=${WORK:-${KIWI}/work/${LOGNAME}}
export DATA=${DATA:-${KIWI}/data_$NEW_SITE}
export PROGS=${PROGS:-${KIWI}/progs}
export SCP=${SCP:-${KIWI}/scp}
export SQL=${SQL:-${KIWI}/sql}
export UFD=${UFD:-${KIWI}/ufd}
export KIWISEA=".:$WORK:$HOME:$DATA:$SITEDAT:$SITEBIN:$CORPDAT:$CORPBIN:$BIN:$PROGS:$SCP:$SQL"
export PATH=".:$WORK:$HOME:$SITEBIN:$CORPBIN:$BIN:$PROGS:/bin:/usr/bin:/usr/sbin"
export JAVA_HOME=/usr/lib/jvm/jre-11
log "Now will add the MES environment for $NEW_SITE" "INFO" ${BLUE}${BOLD}
cd $MREV
REVBASE=`basename $MREV`
log "This will take some time to decompress and will start the install" "INFO" ${BLUE}${BOLD}${FLASH}
tar zxvf mes_$REVBASE.tar.gz
./mes-$REVBASE.sh
log "Running the importdata script for the $NEW_SITE environment" "INFO" ${GREEN}${BOLD}
$KIWIBASE/corp/bin/importdata
main_menu
}
site_delete(){
if [ ! -d $KIWIBASE/site_* ];then
log "Sites do not exists"
sleep 2
main_menu
fi
PS3="Choose site : "
SITES=`ls -d $KIWIBASE/site_* | cut -b 12-`
select SITE in $SITES
do
echo -n "Are you sure you want to delete /KIWI/site_$SITE (Y/[N])?"
read choice
case "$choice" in
"Y"|"y")
echo "Deleting the Classic Site Folder"
find $KIWIBASE/site_$SITE/ -name kwsql -exec mysql -e "drop database $SITE_classic" \;;
echo "Deleting the Kiwi Site Folder"
rm -rf $KIWIBASE/site_$SITE
echo "Deleting the Rev Site Folder"
rm -f $KIWIBASE/rev/site_$SITE
echo "Deleting the Jave Site Folder"
rm -rf $KIWIBASE/services/sites/$SITE
echo "Deleting the Web Folder"
rm -rf $KIWIBASE/services/web/$SITE
;;
*)
main_menu
;;
esac
break
done
main_menu
}
data_restore() {
if [ ! -d $KIWIBASE/site_* ];then
log "Sites do not exists"
sleep 2
main_menu
fi
PS3="Choose site : "
SITES=`ls -d $KIWIBASE/site_* | cut -b 12-`
select NEW_SITE in $SITES
do
echo -n "Are you sure you want to overwrite data for /KIWI/site_$NEW_SITE (Y/[N])?"
read choice
case "$choice" in
"Y"|"y")
rm -rf $KIWIBASE/site_$SITE/data_$NEW_SITE/*
echo "Select data source : "
echo ""
echo "I) ISAM"
echo "M) MySQL"
echo ""
echo -n "Default [I] : "
read choice
case "$choice" in
"M"|"m")
install_mysql restore
;;
*)
install_isam restore
;;
esac
;;
*)
main_menu
;;
esac
break
done
main_menu
}
install_isam() {
if [ ! -f $KIWIBASE/backups/*.tar.gz ];then
log "ISAM Backup files do not exist"
sleep 2
return
fi
DATASETS=`find $KIWIBASE/backups/*.tar.gz`
PS3="Select data for $NEW_SITE : "
select DATASET in $DATASETS
do
if [ $1 == "new" ]
then
tar -zxvf $DATASET -C $KIWIBASE/site_$NEW_SITE/
mv -vf `find $KIWIBASE/site_$NEW_SITE/* -type d -maxdepth 0` $KIWIBASE/site_$NEW_SITE/data_$NEW_SITE
fi
if [ $1 == "restore" ]
then
find $KIWIBASE/site_$NEW_SITE/ -name kwsql -exec rm {} \;;
tar -zxvf $DATASET -C $KIWIBASE/site_$NEW_SITE/
SCR_DIR=`basename \`tar -ztf $DATASET | head -n 1\``
mv -vf $KIWIBASE/site_$NEW_SITE/$SCR_DIR $KIWIBASE/site_$NEW_SITE/data_$NEW_SITE
fi
break
done
}
install_mysql() {
if [ -f $KIWIBASE/backups/*.sql.gz ];then
DATASETS=`find $KIWIBASE/backups/*.sql.gz`
PS3="Select data for $NEW_SITE : "
select DATASET in $DATASETS
do
if [ $1 == "restore" ];then
log "Checking to ensure the database is not in use" "INFO" ${YELLOW}${BOLD}
sleep 2
mysqladmin processlist | grep -v _master | egrep -q $DATASET
if [ $? -eq 1 ] ; then
mysql -e "drop database `$NEW_SITE_classic`"
logo "Dropping old databases""INFO" ${YELLOW}${BOLD}
sleep 2
else
echo "Destination database is in use. Please try again later."
read error
fi
else
mkdir -p $KIWIBASE/site_$NEW_SITE/data_$NEW_SITE
fi
logo "Creating new database." "INFO" ${YELLOW}${BOLD}
sleep 2
mysql -e "create database $NEW_SITE_classic"
log "Restoring database now." "INFO" ${YELLOW}${BOLD}
sleep 2
zcat $DATASET | grep -v "CREATE DATABASE" | mysql $NEW_SITE_classic
mysql -e "grant all on $NEW_SITE.* to 'kiwisql'@'localhost' identified by '800486kiwi'"
break
done
else
log "SQL Backup files do not exist" "INFO" ${YELLOW}${BOLD}
fi
if [ ! -d $KIWIBASE/site_$NEW_SITE/data_$NEW_SITE ]; then
echo "Creating the site Data Folder"
mkdir -p $KIWIBASE/site_$NEW_SITE/data_$NEW_SITE
fi
touch $KIWIBASE/site_$NEW_SITE/data_$NEW_SITE/kwsql
echo "DATA="${NEW_SITE}"_classic" > $KIWIBASE/site_$NEW_SITE/data_$NEW_SITE/kwsql
echo "HOST=localhost" >> $KIWIBASE/site_$NEW_SITE/data_$NEW_SITE/kwsql
echo "INTERFACE=sql" >> $KIWIBASE/site_$NEW_SITE/data_$NEW_SITE/kwsql
echo "USER=kiwisql" >> $KIWIBASE/site_$NEW_SITE/data_$NEW_SITE/kwsql
echo "PASSWORD=800486kiwi" >> $KIWIBASE/site_$NEW_SITE/data_$NEW_SITE/kwsql
# echo "PASSWORDX=2o5tP2P8uX4WMp4xsjVnK8DGX5uYrwBz" >> /KIWI/site_$NEW_SITE/data_$NEW_SITE/kwsql
echo "LOG=error" >> $KIWIBASE/site_$NEW_SITE/data_$NEW_SITE/kwsql
echo "LOGPID=1" >> $KIWIBASE/site_$NEW_SITE/data_$NEW_SITE/kwsql
}
gen_kidds() {
rm -f $KIWIBASE/site_$NEW_SITE/KIDSENV
touch $KIWIBASE/site_$NEW_SITE/KIDSENV
echo "SHELL=/bin/sh" >> $KIWIBASE/site_$NEW_SITE/KIDSENV
echo "TERM=vt100" >> $KIWIBASE/site_$NEW_SITE/KIDSENV
echo "KIDSDEBUG=4" >> $KIWIBASE/site_$NEW_SITE/KIDSENV
echo "KIDSLOGLEVEL=4" >> $KIWIBASE/site_$NEW_SITE/KIDSENV
echo "KIWISITE=$NEW_SITE" >> $KIWIBASE/site_$NEW_SITE/KIDSENV
echo "" >> $KIWIBASE/site_$NEW_SITE/KIDSENV
echo "KIWI=/KIWI/site_$NEW_SITE" >> $KIWIBASE/site_$NEW_SITE/KIDSENV
echo "DATA=\$KIWI/data_$NEW_SITE" >> $KIWIBASE/site_$NEW_SITE/KIDSENV
echo "WORK=\$KIWI/work/$LOGNAME" >> $KIWIBASE/site_$NEW_SITE/KIDSENV
echo "BIN=\$KIWI/bin/" >> $KIWIBASE/site_$NEW_SITE/KIDSENV
echo "PROGS=\$KIWI/progs/" >> $KIWIBASE/site_$NEW_SITE/KIDSENV
echo "SCP=\$KIWI/scp/" >> $KIWIBASE/site_$NEW_SITE/KIDSENV
echo "SITEBIN=\$KIWI/site/bin" >> $KIWIBASE/site_$NEW_SITE/KIDSENV
echo "SITEDAT=\$KIWI/site/dat" >> $KIWIBASE/site_$NEW_SITE/KIDSENV
echo "SQL=\$KIWI/sql" >> $KIWIBASE/site_$NEW_SITE/KIDSENV
echo "KIDSLOGDIR=\$KIWI/work/$LOGNAME" >> $KIWIBASE/site_$NEW_SITE/KIDSENV
echo "KWSQL_COMMONDIR=\$KIWI/data_$NEW_SITE" >> $KIWIBASE/site_$NEW_SITE/KIDSENV
echo "" >> $KIWIBASE/site_$NEW_SITE/KIDSENV
echo "LD_LIBRARY_PATH=\$PROGS" >> $KIWIBASE/site_$NEW_SITE/KIDSENV
echo "" >> $KIWIBASE/site_$NEW_SITE/KIDSENV
echo "KWSQL_USER=kiwisql" >> $KIWIBASE/site_$NEW_SITE/KIDSENV
echo "KWSQL_PASS=800486kiwi" >> $KIWIBASE/site_$NEW_SITE/KIDSENV
echo "" >> $KIWIBASE/site_$NEW_SITE/KIDSENV
echo "KIWISEA=.:\$DATA:\$SITEDAT:\$SITEBIN:\$PROGS:\$BIN:\$SCP:\$SQL" >> $KIWIBASE/site_$NEW_SITE/KIDSENV
echo "PATH=\$PATH:.:\$SITEDAT:\$SITEBIN:\$CORPBIN:\$PROGS:\$BIN:\$DAT" >> $KIWIBASE/site_$NEW_SITE/KIDSENV
}
setup_counter () {
cd $KIWIBASE
rm $KIWIBASE/counter
ln -s $KIWIBASE/site_$NEW_SITE/work/mdcxmt counter
}
site_select(){
if [ ! -d $KIWIBASE/site_* ];then
log "Sites do not exists" "ERROR" ${RED}${BOLD}${FLASH}
sleep 2
main_menu
fi
banner
PS3="Choose site : "
SITES=`ls -d $KIWIBASE/site_* | cut -b 12-`
log "Sites that are currently running:" "INFO" ${YELLOW}${BOLD}
for j in $SITES
do
RUNNING=`ps -ef | grep tomcat | grep -i $j | cut -b 133-136`
if [ ! "$RUNNING" = "" ];then
log "${GREEN}${BOLD}Site ${BLUE}${BOLD}$j ${GREEN}${BOLD}is already running" "INFO" ${BLUE}${BOLD}
fi
done
echo ""
log "Site Ports" "INFO" ${YELLOW}${BOLD}
for s in $SITES
do
if [ -e $KIWIBASE/services/sites/$s/current/conf/recentparametervalues.properties ];then
PORTS=`cat $KIWIBASE/services/sites/$s/current/conf/recentparametervalues.properties|grep OFFSET|cut -d"=" -f2`
PORTEXT=`expr 8080 + $PORTS`
if [ -n $PORTS ];then
log "${GREEN}${BOLD}Site ${BLUE}${BOLD}$s ${GREEN}${BOLD}has a port of ${BLUE}${BOLD}$PORTEXT" "INFO" ${BLUE}${BOLD}
fi
fi
done
echo ""
log "Sites that are available:" "INFO" ${YELLOW}${BOLD}
select SITE in $SITES
do
if [ -z "$SITE" ];then
SITE=$SITES
fi
export PLANTID=$SITE
export KIWI=$KIWIBASE/site_$PLANTID
export EXEC="kiwimenu menu=support"
# MySQL query
QUERY="SELECT SUBSTRING(xl_body,30,39) FROM XLATEP WHERE xl_system='GEN' AND xl_prefix='EE' OR xl_prefix='EI'"
# Execute query and store results
results=$(mysql -h "$DBHOST" -u "$MYSQLUSER" -p"$MYSQLPASS" -D "${SITE}_classic" -e "$QUERY" --batch --silent)
# Check if query was successful
if [ $? -ne 0 ]; then
log "Error executing MySQL query" "ERROR" ${RED}${BOLD}${FLASH}
sleep 2
main_menu
fi
# Read results line by line
while IFS=$'\t' read -r -a columns; do
mkdir -p ${columns[0]}
log "Created the following folder : ${columns[0]}" "INFO" ${BLUE}${BOLD}
done <<< "$results"
# setup_counter
. $KIWIBASE/corp/bin/stdprofile
break
done
}
#
# Execute
checkVariables
main_menu
#
#if [ -f ~/.bashrc ]; then
# . ~/.bashrc
#fi
#
#THIS MUST BE AT THE END OF THE FILE FOR SDKMAN TO WORK!!!
#export SDKMAN_DIR="/KIWI/home/remuser//.sdkman"
#[[ -s "/KIWI/home/remuser//.sdkman/bin/sdkman-init.sh" ]] && source "/KIWI/home/remuser//.sdkman/bin/sdkman-init.sh"
#
#exit 0Script to be added/created to the $CORPBIN of the server
Edit the following script
vi /KIWI/corp/bin/stdprofileAdd the following
#!/bin/bash
umask 002
if [ -r $KIWI/site/KIWIENV ]; then
COMM_DIR=`cat /KIWI/site_$PLANTID/site/KIWIENV | grep "^COMMSDIR:" | cut -d":" -f2`
AB_DIR=`cat /KIWI/site_$PLANTID/site/KIWIENV | grep "^HOMEAB:" | cut -d":" -f2`
fi
export KIWIBASE=/KIWI
export KIWI=${KIWI:-/KIWI/site_$PLANTID}
export BACKUPS=${BACKUPS:-${KIWIBASE}/backups}
export BIN=${BIN:-${KIWI}/bin}
# COMMS
export COMMSDIR=${COMMSDIR:-${KIWI}/work/cscomm}
export COMM_DIR=${COMM_DIR:-COMMSDIR}
export COMMS_PRINTER=98
export CORPBIN=${CORPBIN:-${KIWIBASE}/corp/bin}
export CORPDAT=${CORPDAT:-${KIWIBASE}/corp/dat}
export DATA=${DATA:-${KIWI}/data_$PLANTID}
export HOMEAB=${HOMEAB:-${KIWI}/work/mdcxmt}
export HOMECO=${HOMECO:-${KIWI}/work/corrop}
export HOMECONV=${HOMECONV:-${KIWI}/work/ducker}
export PROGS=${PROGS:-${KIWI}/progs}
export SCP=${SCP:-${KIWI}/scp}
export SQL=${SQL:-${KIWI}/sql}
export UFD=${UFD:-${KIWI}/ufd}
export SITEBIN=${SITEBIN:-${KIWI}/site/bin}
export SITEDAT=${SITEDAT:-${KIWI}/site/dat}
export WORK=${WORK:-${KIWI}/work/${LOGNAME}}
export ftpdir_ord=/mnt/ducker/ordinfo
export ftpdir_seq=/mnt/ducker/corrseq
export ftpdir_ols=/mnt/ducker/ol
export ftpdir_stk=/mnt/ducker/pidnumber
export ftpdir_load=/mnt/ducker/cvm_enter
export DCV_VERSION=3.01
export USESAMBA=1
# VUE Directories
export VUE=${VUE:-${KIWIBASE}/services/sites/$PLANTID/current}
export JCSC=${VUE:-${KIWIBASE}/services/sites/$PLANTID/current}
export VBIN=${VBIN:-${KIWIBASE}/services/sites/$PLANTID/current/bin}
export VLOG=${VLOG:-${KIWIBASE}/services/sites/$PLANTID/current/logs}
export VCONF=${VCONF:-${KIWIBASE}/services/sites/$PLANTID/current/conf}
export KBIN=${KBIN:-${KIWIBASE}/services/etl/kdw/current/kiwiplan/bin}
export KLOG=${KLOG:-${KIWIBASE}/services/etl/kdw/current/kiwiplan/logs}
export KCONF=${KCONF:-${KIWIBASE}/services/etl/kdw/current/kiwiplan/conf}
export PS1="\\[$(tput bold)\\]\\[$(tput setaf 1)\\]\\[$(tput setab 8)\\]
"\\u\\[$(tput setaf 5)\\]@\\[$(tput setaf 1)\\]`hostname`"\\[$(tput setaf 2)\\] : ""`uname`"" : \\[$(tput setaf 6)\\]""\d \t : ""`echo $PLANTID`""
"[\\w]'\$\[$(tput sgr0)\] '
export KWSQL_COMMONDIR=${KWSQL_COMMONDIR:-${DATA}}
#export LANGUAGE=${LANGUAGE:-{KIWI_LANG}}
export KWSQL_USER=${KWSQL_USER:-kiwisql}
export MYSQL_PWD=${MYSQL_PWD:-800486kiwi}
export EXEC=${EXEC:-""}
# Has to come after the $PROGS definition
export LD_LIBRARY_PATH=${PROGS}
#export HOMELD=${HOMELD:-${KIWI}/work/autotags}
#export HOMECONVM=${HOMECONVM:-${KIWI}/work/minda}
#export HOMECONVS=${HOMECONVS:-${KIWI}/work/mindas}
export KIWISEA=".:$WORK:$HOME:$DATA:$SITEDAT:$SITEBIN:$CORPDAT:$CORPBIN:$BIN:$PROGS:$SCP:$SQL"
export PATH=".:$WORK:$HOME:$SITEBIN:$CORPBIN:$BIN:$PROGS:/bin:/usr/bin:/usr/sbin"
export JAVA_HOME=/usr/lib/jvm/jre-11
#if [ -z "${WORK}" ]; then
# echo "Variable WORK does not exist. WORK: ${WORK}"
# sleep 2
# exit
#fi
if [ ! -d ${WORK} ]; then
mkdir -p ${WORK}
if [ ! -d ${WORK} ]; then
clear
echo -e "ERROR: Cannot create work directory : ${WORK}"
echo -e "Press <Enter> to continue ... \c"
read key
exit 1
fi
fi
cd $WORK
if [ -z "${EXEC}" ]; then
exit
else
${EXEC}
fiKiwiplan - ULT/VUE Setup a New Machine for Outside Farmout
Kiwiplan - ESP Consignment Store
How to set up Consignment Store
MAP & PCS/Planner
- Create Stores in MAP & PCS/Planner
- Name
- Full Address
- Create Locations
- Default (DEF)
- Fact Call Off Doors (FC1, FC2, etc.)
- Quarantine (QUAR)
- Receive (RECEIV)
ESP
- Create Address in ESP
- Setup Store Parameters
- Configuration > Application > FGSClient > Sections > Stores

- Setup Store to Allow Fast Call-Off
- When creating a Stock Line for a Product Design. “Allows Fast Call-Offs” must be checked.

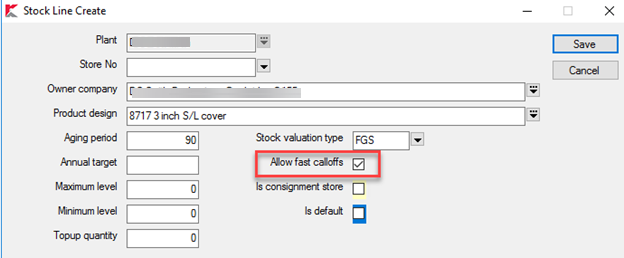
Kiwiplan - ESP Crystal Reports Standards and Help Hints
Customised Reports:
In order to make sure that customised reports, and the SQL views or stored procedures behind them, do not get overwritten during ESP upgrades the following points should be observed:
- A site specific reports directory should be set up and this must be the first directory on the path listed under the section Directories/Reports in ESP.
- All customised reports (“.rpt” files) and “.ini” files should be saved in the site specific reports directory. To avoid confusion ONLY customised reports and ini files should be saved to this directory.
- Any customised report should use a customised source for its data. If the report has been customised but uses a generic SQL view or stored procedure then the view or stored procedure should be copied and renamed. For example the stored procedure for the generic Cost Estimates Report is called “irsCostEstimateDetails”, at one site the stored procedure is called “irsACostEstimateDetails”, at another the procedure is called “irsWCostEstimateDetails”.
- As a naming convention it is strongly suggested that, in cases where a customised view or stored procedure is derived from a generic one the customised view/stored procedure is given the same base name with a site specific suffix eg for a site called “AnyCartons” a customised version of the view “irsListofInvoices” could be named “irsListofInvoices_AnyCartons”.
- Once the copy of the view or stored procedure has been made Crystal reports will allow you to “alias” the report fields to the new View/Stored Procedure with no changes required to the fields on the report. This is done through the “Database/Set Location” menu option in the Crystal reports designer.(NOT THE Database/Set Alias” menu option)..
- Once the alias is set using the “Set Location” option it will be necessary in some case to perform a final step. This is done through the “Show SQL Query” option, also on the Database Menu. If the report is being driven from a View there will be a “FROM viewname” clause. If this has not been changed by step 4) above the following will need to be done:
- If the existing view is called “irsOldView” the new customised view is called “irsNewViw”
- If the from clause was “from irsOldView” this will need to be changed to “from irsNewView irsOldView”
- If the from clause reads “from irsOldView irsOldView” or “from irsOldView as irsOldView” then this needs to be changed to “from irsNewView irsOldView”. The “as” in the second example is optional
These points should minimise the chances of an ESP upgrade causing problems with customised views and reports.
As another safeguard any changes made to existing Crystal reports or ini files should have copies sent to Kiwiplan NZ. Any SQL views or stored procedures should be saved as sql scripts using the naming convention:
Yyymmdd_Updirsxxxxx.sql – where sxxxxxis is an existing view/stored procedure name
or
Yyymmdd_Addirsxxxxx.sql – where sxxxxxis is a new view/stored procedure name
And then a copy of the script sent to Kiwiplan NZ.
If small changes are required to a standard report it is worthwhile discussing the changes with Kiwiplan NZ before deciding to create a custom report. Sometimes small changes can be added to the existing standard report and made available to all customers.
SQL Naming and Coding Conventions
Traditionally all views and stored procedures that are created to be used with reports are named with the prefix “irs”
All scripts that create or modify views, stored procedures or SQL functions should follow the format:
If SQL object exists
Drop SQL object
GO
Create [dbo].[SQL Object]
<SQL to create the object>
GO
Grant permissions on SQL Object
GO
For a view the Grant statement should be:
GRANT SELECT on [dbo].[<view name>] to [PUBLIC]
For a stored procedure (or SQL function) the statement should read:
GRANT EXECUTE ON [dbo].[<stored procedure name>|<SQL function name>] TO [public]
Make sure that all objects are created with the “dbo” owner qualification to the name.
All character variables within stored procedures and functions should be defined as “nvarchar” to cater for Unicode based sites.
If creating temporary tables all character columns should be defined using the “COLLATE DATABASE_DEFAULT” option to cater for sites where multiple collations could be in use. This is shown below:
declare @table table
(
atextfield nvarchar(50) COLLATE DATABASE_DEFAULT null,
....more fields
)
This allows sorts and equality testing to happen without an error being raised.
A couple of points about performance:
- Use table variables for temporary tables rather than the traditional “#” temp tables
- Avoid cursors if possible
- Think in terms of set operations rather than individual row operations. That is if a query can be written to perform bulk operations then use this in preference to traversing a result set and working on individual rows
- Use Case statements in queries to cater for multiple options rather than repeating the query.
- Try to think of the way the indexes on the tables involved in a query are structured when building a “WHERE” clause, the closer the “WHERE” clause matches underlying indexes the more chance there is that the query optimizer will utilise the index.
Standard ESP SQL Functions
The following functions are part of the ESP database.
Note: For the date and financial period functions “zero hour” is “00:00:00” hours on the day, “midnight hour” is 23:59:59.99” on the day
|
Function name |
Parameter(s) |
Returns |
Description |
|---|---|---|---|
|
Date Functions -Calendar dates |
|||
|
dbo.fn_getstartday |
datetime |
datetime |
Given a datetime value, returns the “zero hour” value for that date |
|
dbo.fn_getendday |
datetime |
datetime |
Given a datetime returns the “midnight hour” value for that day |
|
dbo.fn_getstartmonth |
datetime |
datetime |
Given a datetime returns the “zero hour” value for the first of the month |
|
dbo.fn_getendmonth |
datetime |
datetime |
Given a datetime returns the “midnight hour” value for the last day of the month |
|
dbo.fn_getstartyear |
datetime |
datetime |
Given a datetime returns the “zero hour” value for the first of January for that year |
|
dbo.fn_getendyear |
datetime |
datetime |
Given a datetime returns the “midnight hour” value for the 31st of December for that year |
|
Date Functions - Financial dates |
These need the financial year and financial periods to be set up in ESP to work, otherwise they fall back to calendar months and years |
||
|
dbo.fn_getstartfinperiod |
datetime |
datetime |
Returns the “zero hour” on the first date of the financial period that the given a date is contained in |
|
dbo.fn_getendfinperiod |
datetime |
datetime |
Returns the “midnight hour” on the last date of the financial period that the given a date is contained in |
|
dbo.fn_getstartfinyear |
datetime |
datetime |
Returns the “zero hour” on the first date of the financial year that the given a date is contained in |
|
dbo.fn_getendfinyear |
datetime |
datetime |
Returns the “midnight hour” on the last date of the financial year that the given a date is contained in |
|
General Utility Functions |
|||
|
dbo.fn_IsInList |
@strlist nvarchar(1024) @strsearch nvarchar(100) @joinchar nvarchar(1) |
smallint |
Given a string containing a list of values (@strlist) separated by a single character(@joinchar) and a value to search for(@strsearch) returns 0 if the exact value is not found or 1 if it is. |
|
dbo.fn_parsecriteria |
@sValue nvarchar(200) @fieldname nvarchar(100) @datatype nvarchar(50) |
nvarchar(500) |
Given a string containing a value to include in a WHERE clause, the name of the field to search on and the data type of the field will return a string that can be concatenated to a SQL statement |
|
dbo.fn_as16s |
Int |
nvarchar(30) |
Given an integer value returns the value formatted as 16ths ie Given 21 will return “1.05”, Given 30 returns “1.14” (Used on sites that use imperial units of measure) |
|
dbo.fn_fixx |
Float |
Int |
Given a number returns the largest integer less than or equal to the given number Given 1.5 returns 1 Given -2.4 returns -3 |
|
dbo.fn_MaskValue |
@mask nvarchar(500) @pval int |
nvarchar(500) |
Returns the given number masked with the given mask |
|
dbo.fn_StripMask |
@mask nvarchar(500) @pval vnarchar(500) |
Int |
Returns the numeric value of a masked string |
|
dbo.fnGetFKColumns |
@constraintID int, @keyID int, @rf nchar(1) |
varchar(2126) |
This , and the next function are used to retrieve details on foreign key constraints and indexes. There were written to be used in the stored procedure “dbo.inf_ResetCollation” (see Utility Stored Procedures section below)which resets and rebuilds all constraints and indexes in a given database to a given collation. |
|
dbo.fnGetIndexColumns |
@objname sysname @objid int @indid int |
varchar(2126) |
|
|
ESP Specific Function |
|||
|
dbo.fn_numworkdays |
@firstdate datetime @lastdate datetime @id int @idtype nvarchar(1) |
int |
Return the number of working days between a given start and end date for either a specific address or a plant if the @idtytpe is “P”(uses the plant base address). This uses the “opendays” field from the address. |
|
dbo.fn_getcoatings |
@pdid int @coattype varchar(2) |
varchar(500) |
Returns a comma separated list that contains, for each colour/coating, the sequence, code and coverage. The parameter @coattype can be one of the following: IC – Inside colour OC – Outside colour II - Inside coating OI – Outside coating |
|
dbo.fn_getPDCoating |
(@pdid int @isColourorCoating int @inside smallint @coatorcover int |
varchar(500) |
Returns a comma separated list of either the coating/colour codes or the coverage percent. Data is selected from the table ebxproductdesigncoating based on the parameters: @inside equals the column inside ( can be -1 or 0 ) @isColourOrCoating equals the column @isColourorCoating |
|
dbo.fn_ShipPiecesPerUnit |
@pd int @route int |
int |
For a given route for a product design returns the quantityperunit field from th euntizing data for the last step on the route. |
|
dbo.fn_unitcost |
@ceid int @ppid int |
float |
Returns the “per unit” full cost value from either a cost estimate or product price record. |
|
dbo.fn_UnitSummaryQty |
@unitsummary varchar(1000) |
int |
Returns the total quantity of items as held in the unit summary field |
|
dbo.fnGetSetTotalPrice |
@CostEstimateID int @CalculationQuantity int, @currdate datetime |
money |
Returns the total “freight inclusive” price from the product price table for all components (if any) that are part of the set defined by having the supplied cost estimate as their “master” cost estimate. They must also have the same calculation quantity and be active at the given time. |
|
Functions to access MAP/ULT data |
These functions have been re-written as stored procedures so that they would not be restricted to a “hard coded” linked server. The sored procedures are named under the function names and both take the linked server name as a parameter. Output remains a table/dataset with the same column names. |
||
|
dbo.fn_GENPL() (Stored procedure dbo.irsGENPL) |
plantno varchar(8) plantname varchar(30) defaultCorrugatorMachineNo int defaultDespatchMachineNo int boardTransferMachineNo int pickupGoodsMachineNumber int quarantineMachineNumber int fgsReworkStoreMachineNo int sbsFromStockMachineNumber int sheetBoardStrapperNumber int sheetBoardSlitterMachineNo int supplyFromStockMachineNo int defaultRssReceiptingStore int stockDespatchMachineNo int despatchNotificationMachineNo int defaultBoardReceivingmchNo int defaultOrderingMachineNo int |
Returns a table giving, for each plant in the MAP dataset, the default machines as set up in the GEN/PL XLATEP parameter in MAP |
|
|
dbo.fn_GENTU() (Stored procedure dbo.irsGENTU) |
pallettype varchar(8) pallet varchar(30) width int null length int null height int null weight int null |
Returns a table giving, for each pallet type, the width, length, height and weight. These are taken from the GEN/TU XLATEP parameter in MAP |
|
Utility SQL Stored Procedures
The following table lists stored procedures that provide functionality that is outside specific report requirements.
|
Stored Procedure |
Input Parameters |
Output |
Description |
|---|---|---|---|
|
Procedures to access MAP/ULT data |
These procedures assume a valid “linked server” to a MySQL database is set up. The syntax of the SQL is MySQL specific. |
||
|
dbo.irsGENPL |
nvarchar(500) |
See entry above for dbo.fn_GENPL() |
Given a linked server name returns the table described above in the Functions section |
|
dbo.fn_GENTU |
nvarchar(500) |
See entry above for dbo.fn_GENTU() |
Given a linked server name returns the table described above in the Functions section |
|
dbo.irsCORRCP |
nvarchar(500) |
plant_number int, corrugatornumber int, corrugatorname nvarchar(30) machinenumber int |
Given a linked server name, returns a list of all corrugators with information taken from the CORR/CP parameter in the XLATEP table and the CSCNTR table. |
|
dbo.irsmachines |
nvarchar(500) |
Machineno interactionmachinename nvarchar(40) machinegroup int |
Given a linked server name, returns a list of all machines held in the CSCNTR table. |
Crystal 10 Database Connections

Select “Create New Connection”

Select “ODBC (RDO)”

Select “Enter Connection String”

Enter the string “DRIVER=SQL Server”

Fill in the details:
1)Server is the database server
2)User ID and Password are the values held in the ESP Parameters under
Configuration/Application/InfClient(or Infrastructure)/Section/Security/Report Login Name
Configuration/Application/InfClient(or Infrastructure)/Section/Security/Report Login Password
3)Database is the ESP database name
DO NOT check the “Trusted Connection” check box
Click on “Finish” and if all details have been entered correctly you should be able to select tables, views or stored procedures from the database.
Crystal Reports and ESP
This document provides an outline of the interaction between ESP and Crystal Reports and covers the points to be aware of if you are planning on creating Crystal reports to be used from within ESP.
Overview
There are two major components involved in the integration of Crystal Reports with ESP.
- Ini files – these provide a specification for the construction of the report options form that allows the user to make criteria selections
- Rpt files – these are the actual Crystal reports files
These files MUST have the same base name for example if you have saved your report as
“My Report.rpt”
the ini file must be called
“My Report.ini”
Both files must exist and must reside in a directory that is specified in ESP in the “INFClient/Sections/Directories/Reports” parameter.
Sections below cover the following points in more detail:
- An overview of the processes involved when running a report
- Ini Files
- Points to take into consideration when writing Crystal reports
- Adding reports to ESP
- Report Data Sources
Running a Report
Once a report is selected from the reports menu, or one of the sub menus, the following process takes place:
- ESP looks for the ini file with the same name as the report. It searches for this file in the directories specified by the “INFClient /Sections/Directories/Reports” parameter, in the order that the directories are listed.
- Once found the ini file is read and the report options form is created with the controls specified by the various sections in the file (see Ini Files below). Default values are placed in fields where specified.
- If translation is turned on then all labels and constant text values are translated, this includes all hard coded lists (combo boxes of “listAbsValue” type or default text)
- The options form is displayed and the user makes their selection of criteria/parameters/sorting fields.
- The user also has the option of either exporting or viewing the generated report.
Once the user has made their selections and clicked the “OK” button (or pressed enter) ESP performs the following actions:
- ESP looks for the rpt file in the directories named in the “INFClient /Sections/Directories/Reports” parameter. NOTE: The rpt file does NOT have to be in the same directory as the ini file, as long as it can be found in one of the directories specified in the parameter.
- If translation is turned on for the site then the report is translated (see Crystal Reports – Translation below)
- Values selected or entered in the various parameter and criteria fields on the report options form are processed and the Crystal reports’ SQL is updated (if required) and report parameters are set.
- The reports data source is set to be the current database that ESP is running against unless the section “[DBConnection]” has been set in the Ini file. If it has the connection will either be set to the defined connection or left as is.
- If the “Export Report” option has been selected the Crystal Reports “Export” dialogue box where the type and location of the export can be chosen. The report is then generated and output to the specified location.
- If the “View Report” option has been selected the report is generated and displayed in the Crystal reports viewer window.
Ini Files
Ini files provide information to ESP to allow it to construct a report options form that acts as the interface between the end user and the Crystal report being run. They follow the standard Windows ini file format with section headers, indicated by a keyword enclosed in square brackets alone on a line:
[Criteria]
and section bodies, generally a keyword followed by an equal sign followed by various values separated by semi-colons:
Report Date=date;{irsRepView.datefield}
Sections recognised by ESP are:
- [General] – This must always be the first section and always consists of the one line body:
Form=frmReportOptions
- [Criteria] – This section specifies values which will be used to build a, or add to an existing, “where clause”. This section is NOT used if the data for the report is supplied by a stored procedure.
- [Default Criteria] – This section provides default values for items in the “Criteria” section. Labels must match exactly with a Criteria Label in the Criteria section.
- [Parameters] – This section is used to supply values to Crystal report “Parameter” fields. There are two types of parameter, displayed or hidden. Either type of parameter can be either used internally in the report of passed through as input parameters to stored procedures.
- [Default Parameters] – Values in this section provide default values to items in the “Parameters” section. Labels must match exactly with a Parameter Label in the Parameters section.
- [DBConnection] – Specifies an alternate data source to be used for the current report.
- [Sortable Fields] – Any items in this section are used to structure the sort order of the report. If a report has pre-defined grouping the sorting will be defined at the detail level, within the lowest level of grouping.
- [Default Sorting] – Values in this section allow the default sort options to be offered, including setting the sort direction.
- [Formulas] – Formulas and Formula Fields allow for a degree of end user selection of fields to appear on the report. These fields can be calculated, concatenations of multiple fields or can be individual fields. This section defines the labels and available formulae.
- [Formula Fields] – This section lists the formula field names that are available on the report and defines the link between the formula field used to display a selected formula value and the formula field which will display the formula label.
- [Default Formulas] – This section provides default formula selections.
- [Show Form] – This section is used to tell ESP that the report options form should not be displayed
- [Default Mode] – This section is used to set the default mode for processing the report (View or Export)
The following is the contents of an example ini file. Most ini files will not be anywhere near as complicated as this. For the purposes of documentation every possible section and option has been used. Sections may be left blank, for example a report that relies on a stored procedure for its data will have no values in either the Criteria or Default Criteria sections and many reports have no Sort or Formula sections defined. Following the sample is an explanation of the various sections and detail lines of the file.
[General]
FormName=frmReportOptions
[Criteria]
Plant=Long;{espInvoice.plantID};listQryID=plant,,name,ID;
Customer=String;{orgcompany.name};listqryvalue=company,id in(select id from orgcompany where iscustomer = -1),name
Invoice Number=String;{espInvoice.InvoiceNumber};
Transaction Date=Date;{espInvoice.TransactionDate};
OrderType=String;{espOrder.ordertype};listAbsID=0,Make and Deliver,1,Call Off,2,Top Up
(NP)Status=String;{irsInvoice.InvoiceStatus}
Product Design Number=String;{ebxproductdesign.designnumber}
[Parameters]
Application Name=Application Name
Application Version=Application Version
Username=User
Copyright=Copyright
Criteria=Criteria
(NP)ReportType=String;
ReportCustomer=Customer
Invoice Type=String;;listAbsValue=Product,Non-Product
Report Date Range=Date;
[DBConnection]
Server=Access1
DB=db11
Login=mylogin
Password=no password
[Sortable Fields]
Invoice Number={espInvoice.InvoiceNumber}
Transaction Date={espInvoice.TransactionDate}
Customer Name={orgCompany.Name}
[Formulas]
Description LxW=ToText({espOrder.width}) + " X " + ToText({espOrder.Length})
Status={espOrder.OrderStatus}
Contact Name={orgContact.FirstName} + " " + {orgContact.LastName}
Special Instructions={espOrder.SpecialInstructions}
[Formula Fields]
extraField1=extraField1Label
extraField2=extraField2Label
extraField3=extraField3Label
[Show Form]
[Default Mode]
Export
[Default Criteria]
(NP)Status=<>Cancelled
Transaction Date=[mtd]
Product Design Number=[class#productdesign.designnumber]
[Default Parameters]
(NP)ReportType=Detail
Invoice Type=Product
[Default Sorting]
Invoice Number=ascending
[Default Formulas]
extraField1=Description LxW
All the first two lines in ini files used for reports must start with:
[General]
FormName=frmReportOptions
The other sections can appear in any order, the only requirement is that the section header appear as the only value on a line, it is not necessary to have blank line between the last item in a section and the next section header, however it does make the ini file easier to read.
The usage of each section is detailed below. The section name is given, followed by a line showing the syntax of the detail items, under this is an example line from the sample ini file, then a description of the parts of the line.
[Criteria]
Field Label=Data Type;{Data Field};Combo Type(optional);Required?(optional)
Plant=Long;{espInvoice.plantID};listQryID=plant,,name,ID;Yes
- Field Label / Plant -The value to the left of the equal sign is the name that will appear on the options form as the label for the field. If a value is selected in the field the label is also formatted into the “Criteria” field value displayed in report headers. If the Field Label is prefaced with the string “(NP)” then the criteria will not be displayed on the options form although if a default value for it is specified in the “[Default Criteria]” section the value will be used in building the SQL where clause.
- Data Type / Long – The value immediately to the right of the equal sign indicates the data type of the field. This can be one of the following:
- Long – The data entry will be a text box unless a Combo Type is specified
- String – The data entry will be a text box unless a Combo Type is specified
- Date – The data entry will be a text box unless a Combo Type is specified
- Boolean – Data entry will be via a check box
- {Data Field} / {espInvoice.PlantID} – This is the field against which the entered criteria is applied in the where clause. It must be enclosed in curly braces “{}” and must match exactly the name of a field that is available to the query in the report. This can be either a table column or a field from a SQL view (if that is the data source for the report. In this example if the user had entered the value 5 in this field on the options form, then ESP would format this as:
(espinvoice.plantid = 5)
If the query already had a where clause would append this as
and (espinvoice.plantid = 5)
If the query did not have a where clause this would be added
where (espinvoice.plantid = 5)
- Combo Type / listQryID=plant,,name,ID – The “Combo Type” part of the section detail item is optional and is used when a drop-down combo box is to be displayed. There are several different combo box types available depending on the source of the data.
- ListQryId – Data is supplied by a query and the “ID” field from the selected row is used.
- ListQryValue – Data is supplied by a query and the value of the selected row is used
- ListAbsId – Data is supplied by a hard coded list and the “ID” value is used
- ListAbsValue – Data is supplied by a hard coded list and the value is used.
The syntax of the two “ListQry…” combos is
Table Name,Filter Clause(optional),Display Value,ID(not used if the combo type is ListQryValue)
Where
-
- Table Name is the business class name (the database table name without its 3 letter prefix)
- Filter Clause is a filtering condition and should take the form of
Field=condition
For example, in the example being used, the customer combo will only display names from the orgcompany table where the “IsCustomer” flag is true (-1),
id in(select id from orgcompany where iscustomer = -1)
If no filter condition is used then the space must be delimited with a trailing comma (as in the sample ini file)
-
- Display Value is the name of the field to display in the list, in the case of a “ListQryValue” this is the field used to build the where clause.
- ID is specified when the combo type is “ListQryID”
The syntax of the combo type “ListQryID” is as follows
listAbsID=ID1,Value1,ID2, Value2,….
listAbsID=0,Make and Deliver,1,Call Off,2,Top Up
In other words, it consists of a list of pairs of values, a numeric “ID” value followed by a string to be displayed, all values separated by commas.
The syntax of the “ListQryValue” combo consists of a simple list of values separated by commas.
- Required?(optional) - This is an optional value, that, if set to one of the following values will cause the field background to be displayed with the colour defined in the ESP parameter “InfClient/FORMS/Required controls colour”. It will also cause ESP to check that a value has been entered in the field when the user clicks the “OK” button. If there is no value in the field then the user is warned and asked to enter a value.
- 1
- -1
- true
- required
- mandatory
- yes
[Default Criteria]
Criteria Label=Default Value
(NP)Status=<>Cancelled
There are three types of default values. In the example above the value is literal, in that it will be displayed exactly as it is (<>Cancelled) against the specified Criteria. The second type is a keyword enclosed in square brackets as in the line below.
Criteria Label=[Keyword]
Transaction Date=[mtd]
The possible keywords are explained in the following list
- [now] – The current date and time formatted as a "General Date"
- [datenow] – The current date formatted as a “Short Date”
- [date] – The current date formatted as a “Long Date”
- [time] – The current date formatted as a “Long Time”
- [mtd] – A date range with the first of the current month as the first value and “today” as the second value, both formatted as “Short Date”
- [ytd] – A date range with the first of the current year as the first value and “today” as the second value, both formatted as “Short Date”
- [yesterday] – The day before the current date formatted as a “Short Date”
- [lastmonth] – A date range with the first of the previous month as the first value and the last of the previous month as the second value. Both formatted as “Short Date”
- [lastyear]– A date range with the first of January of the previous year as the first value and the thirty first of December of the previous year as the second value. Both formatted as “Short Date”
The third type of default value is also enclosed in square brackets and has the form:
Criteria Label=[Default Value]
Product Design Number=[class#productdesign.designnumber]
In this type of default value the keyword class# indicated that we want ESP to use the current context of the user and to
use as a default the specified property of the class. In this example, if the user had the Product design form open then the current Product designs design number would be placed as a default value against the Criteria “Product design Number”
[Parameters]
There are two major types of Parameters, displayed and hidden. In both types the Parameter Label that appears to the left of the equal sign must exactly match a Parameter field defined in the Crystal report. If the parameter does not exist (or is misspelled) then any value derived from the Parameter from the ini file is ignored.
Displayed Parameters
Displayed parameters have a similar syntax and usage to Criteria.
Parameter Label=Data Type;;Combo Type(optional);Required?
Invoice Type=String;;listAbsValue=Product,Non-Product;Mandatory
The major differences between Displayed Parameters and Criteria are:
- The “Data Field” that appears on the Criteria is missing from the Parameter line.
- If no “Combo Type” is specified then the Data Type must be terminated with a semi-colon.
- No “where clause” is built using any entered value. Apart from date parameters all values are passed through to the equivalent report parameter
- Date values can be either a single date or a date range (two dates separated by two dots). When ESP comes to process the value in a Date parameter it performs the following actions:
- If the value is a single date, say 21/06/04, then two values are created, one that is for the start of the day, formatted as “yyyymmdd hh:mm:ss”, (“20040621 00:00:00”) and one for the end of the day (“20040621 23:59:59”).
- If a range has been entered, say 20/06/04..30/06/04, then the first value is formatted as the start of that day (“20040620 00:00:00”) and the second as the end of that day (“20040630 23:59:59”)
- It looks for a parameter in the Crystal report with a name that matches the parameter label but with the word “start” added to the end. In the sample ini file the parameter from the ini file is “Report Date Range” and the expected parameter from the report would be “Report Date Rangestart”. The first date value is assigned to this parameter.
- Next ESP looks for a report parameter with the same base name but ending with the word “end” (“Report Date Rangeend”) and assigns the second value to this parameter if it is found.
- If no report parameter ending with the word “start” is found ESP will look for a report parameter that exactly matches the Parameter Label and if found will assign the literal value of the field to it.
- Ranges (two values separated by .. (two dots) are only supported for date parameters. With Criteria ranges are supported for String and Numeric data types as well.
- The label shown as black text on a white background (when using the standard Windows colour scheme). Criteria labels are black text on a background the same colour as the form background.
Hidden Parameters
Keyword Parameters
Keyword=Keyword
Application Name=Application Name
There are eight possible keyword parameters. They follow the syntax of two instances of the keyword, separated by an equals sign. The possible keywords are:
- Application Name – This is the application that the report is listed as a parameter under. In the standard reports this will be “InfClient”
- Application Version – This is the current major version of ESP e.g. 4.028 or 4.036
- Username – The logged on user running the report
- Copyright – Kiwiplan Copyright
- Criteria – This is a “readable” version of the where clause built from selected Criteria values. It follows the format of :
(Criteria Label = Selected Value) And (Criteria Label 2 = Selected Value 2)
- Now – This is the current date and time that the user presses “OK” on the options form
- Date – The current date at the time that the user presses “OK” on the options form
- Time – The current time that the user presses “OK” on the options form
Criteria Value parameters
Parameter Name=Criteria Label
ReportCustomer=Customer
These are Parameters that are not displayed but which are loaded with the value selected by the user for the Criteria. This is useful as the individual Criteria values are not available within the body of the report.
Hidden Value Parameters
(NP)Parameter Label=DataType;
(NP)ReportType=String;
[Default Parameters]
Default Parameters follow the same rules and have the same processing as Default Criteria. However they are only applied to Displayed Parameters and Hidden Value Parameters. Keyword Parameters are already their own default and to apply a default to a Criteria Value Parameter you would apply it to the Criteria that the parameter was pointing to.
[DBConnection]
Connection Parameter Name=Value
Server=Access1
DB=db11
Login=mylogin
Password=no password
This section is used by ESP to set the connection details for a report if it has been defined to use a different data source than the ESP database. There are two ways of using this section,
- The first as shown in the sample ini file, specifies the values required to set the database connection. The example is for a system ODBC DSN.
- Server=Access1 – In the case of an ODBC connection this is the DSN name, if the report was being pointed at a SQL Server database (using the Crystal native SQL driver) then the server value would be the name of the SQL Server.
- DB=db11 – This is the database that holds the tables that the report is looking for..
- Login=mylogin – this is the username to use to login on to the database. If this option is not specified or is blank the default “report user” as defined for ESP will be used.
- Password=no password – This indicates that no password is to be used on this connection. If this option is not specified or left blank the default “report user password” as defined for ESP will be used.
- The second way is to specify a single line:
- UpdateTables=no – This tells ESP that you want it to use the connection details from the report itself. However there is a limitation here in that the user and password on the report connection MUST be the same as the default defined as the ESP “report user”.
[Sortable Fields]
Sort Field Label={Sort Data Field}
Invoice Number={espInvoice.InvoiceNumber}
The Sort Field Label is displayed in the list box of available sort fields. Selecting any of the sort fields will cause the report to be sorted on the Sort Data Field assigned the Sort Field Label Name.
[Default Sorting]
Sort Field Label=Sort Direction
Invoice Number=ascending
Any entries must exist as Sort Field Labels in the Sortable Fields section, and will be automatically selected when the form is displayed. The value to the left of the equals sign is optional and can be either “ascending” or “descending”. If omitted the equals sign must be used and the default sort direction will be descending. Multiple default sort fields can be specified below each other in this section. The order that they are placed in determines the precedence of sorting on the report.
[Formulas]
Formula Label=Formula
Description LxW=ToText({espOrder.width}) + " X " + ToText({espOrder.Length})
The Formula Label is what is displayed in the drop down list of available formulae.. It is also the value that is assigned to the Label Formula Field. The Formula is assigned to an empty formula field on the Crystal report.
The syntax of the Formula must be acceptable to Crystal Reports. (Default syntax used in the KiwiPlan generic reports is “Crystal” not “Basic”)
[Formula Fields]
Formula Field Name=Label Formula Field Name
extraField1=extraField1Label
This section holds a list of pairs of empty formula fields from the Crystal report. The Formula Field Name is the formula to which a selected formula is assigned. The Label Formula Field Name has the Formula Label assigned to it.
[Default Formulas]
Formula Label=Formula Field Name
Description LxW=extraField1
The Default Formulas section allows the assignment of formula to specific formula fields.
[Show Form]
This section is optional if used and the [Show Form] section header is followed on the next line by the word “No” the report options form will not be displayed. This option can be used where a report can have the various criteria and /or parameters set with default values that should not be altered. For example a sales report that is always run using the last calendar month as the date range.
[Default Mode]
Export
This section is optional. It is used to specify that the “Export Report” option is selected by default on the report options form. If omitted or any other value than “Export” is placed under the heading the default mode will be set to “View Report”
Crystal Reports
This section outlines the points that need to be taken into consideration when either writing new reports or modifying existing reports for use from ESP. Most of these have to do with making sure that reports are handled correctly when language translation is turned on for Crystal reports from within ESP. There are three conditions that must be met to enable language translation of Crystal reports when they are run from ESP.
- The Crystal runtime dlls, CRAXDRT.dll (version 8.5.0.674) and CRPE32.dll (version 8.5.3.979), must exist and be registered. Both of these ship with ESP. DLL
- The parameter INFClient/Section/Language Translation/Enable Translation must be set to “True”
- The parameter INFClient/Section/Language Translation/Translate Crystal Reports must be set to “True”
If these three conditions are met then ESP will translate the report using the process outlined below.
In order for any values to be translated there must be an entry in the “InfClient” language table for the value and there must be a “Site Text” value for that entry. If there is no entry in the language table, or if the “Site Text” field is empty for the value then it will be displayed on the report “as is”.
Overview of the Translation process
Translation of a report is done in several steps.
- A copy of the report is made
- All formula field in the report are processed
- All formulae associated with groups and sections (conditional formula) are processed
- All text objects on the report are translated
- All conditional formula attached to formulae, fields and text objects are translated.
Formula Field Translation
- Each formula field on the report is examined and any values enclosed in double quotes are translated.
- If the string “//func” is encountered then all text from that point to the end of the formula is not processed
- If a sting beginning with a double at sign “@@” is encountered it is assumed to be a placeholder for one of the ESP Crystal functions as in the following list:
|
Placeholder |
|
|
@@smallareafull() |
Returns the full text of the small area unit from the Unit table |
|
@@smallarea() |
Returns the abbreviation of the small area unit from the Unit table |
|
@@largeareafull() |
Returns the full text of the large area unit from the Unit table |
|
@@largearea() |
Returns the abbreviation of the large area unit from the Unit table |
|
@@smallweightfull() |
Returns the full text of the small weight unit from the Unit table |
|
@@smallweight() |
Returns the abbreviation of the small weight unit from the Unit table |
|
@@largeweightfull() |
Returns the full text of the large weight unit from the Unit table |
|
@@largeweight() |
Returns the abbreviation of the large weight unit from the Unit table |
|
@@smallvolumefull() |
Returns the full text of the small volume unit from the Unit table |
|
@@smallvolume() |
Returns the abbreviation of the small volume unit from the Unit table |
|
@@largevolumefull() |
Returns the full text of the large volume unit from the Unit table |
|
@@largevolume() |
Returns the abbreviation of the large volume unit from the Unit table |
|
@@smalllinearfull() |
Returns the full text of the small linear unit from the Unit table |
|
@@smalllinear() |
Returns the abbreviation of the small linear unit from the Unit table |
|
@@largelinearfull() |
Returns the full text of the large linear unit from the Unit table |
|
@@largelinear() |
Returns the abbreviation of the large linear unit from the Unit table |
|
@@currencysymbol() |
Returns a dollar sign. To enable translation of this into the local symbol the “$” symbol will need to be defined and have a “Site Text” value in the translation table |
In this case the returned value from the function will replace the placeholder in the string.
if {?UseTranslation} then
"Avg area per order (@@smallarea())"
//func
else
"Avg area per order " + EspUOMgetUnitInfo("abbreviation","area","small")
If the site in question had “sq m” as their small area abbreviation and translation was turned on the above would result in the following string being passed through to be translated:
"Avg area per order (sq m)"
And the translated value of the string would be displayed on the report. The line “//func” would cause the translation process to ignore the remainder of the formula.
Note that if translation is turned off then the first part of the formula would be ignored and the “else” portion would be executed while the report was being generated.
Group Name Translation
The process used here is identical to that followed by ESP when translating Formula Fields.
Text Object Translation
- All text objects in the report are translated
- It is not possible, with a text object, to conditionally translate part of the text. If there is text that is required to be displayed un-translated then one of the following methods can be used:
- Do not have a “Site Text” value for the text in the language table”
- Place the text in a formula field and place the string “//func” on the first line of the field
- DO NOT use Text objects with fields embedded in them. Due to limitations in the 8.5 version of Crystal, ESP will strip the embedded fields out and replace them with square brackets.
Conditional Formula Translation
The process used here is identical to that followed by ESP when translating Formula Fields.
Adding Reports to ESP
Reports are made available to users in two steps
- Placing the report and ini file in the appropriate directory. These directories are specified in the parameters section of ESP under “InfClient/Section/Directories/Reports”. The directories are searched in the order that they are listed in this parameter, this allows for site specific reports (or ini files) to be placed in a folder that will not be overwritten during an upgrade process. The report and ini files do not have to both be in the same directory if, for example, a site had customised defaults on a standard report they could place the customised ini file in the site specific directory (normally first in the parameter) and leave the report in the standard ESP reports directory.
- Making a parameter entry in the InfClient/Section/Reports area of Configuration. This can be done either manually or through running the SQL outlined below.
if (select count(id) from infparameter where value like 'report=Chep Pallets%') <= 0
BEGIN
EXECUTE infHelperInsParameter 'InfClient',
'Reports',
'all=Chep Pallets',
'report=Chep Pallets|app=INF|group=Pallet Reports|caption=Chep Pallets', 0,
NULL
END
go
This SQL checks to see if the report already exists, if not it calls the stored procedure “infHelperInsParameter”, passing the following parameters:
- ‘InfClient’ – This is the Application under which the report is to be listed, all ESP reports should use ‘InfClient’
- ‘Reports’ – This is the parameter branch that reports are stored on
- ‘all=Chep Pallets’ – this is the “name” field value and indicates that the report is available whatever the current users context in ESP.
- ‘Report=Chep Pallets|App=INF|group=Pallet Reports|caption=Chep Pallets’ – this parameter consists of label=value pairs separated by “|” symbols
- Report=Chep Pallets – the value to the right of the equal sign is the name of the rpt and ini files without their extensions
- App=INF – the application group, should always be ‘INF’
- Group=Pallet Reports – this is an optional value, if included it indicates that the report should be placed on a sub-menu called (in this example) “Pallet reports”
- Caption=Chep Pallets – this is the value which will be displayed on the menu, it may differ from the true report name.
- ‘0’ - this is scope of the report parameter, 0 indicating a report that is globally visible.
- ‘NULL’ – This parameter is not used and should be left set as ‘NULL’
 Support Scenarios:
Check that report and ini are in one of these folders
 Problem:Can't find rpt or ini:
Solution
Check that the report and ini files are in one of the folders listed under
Configuration/Application/InfClient/Section/Directories/Report Directory
The rpt and ini do NOT have to be in the same folder, but files are used based on the ordering of the
folders.
Problem Login failed:

Solution: This is caused by the report user and/or password set in ESP not having correct permissions in SQL Server to access the ESP database. Ensure that the values set in the parameters
Configuration/Application/InfClient/Section/Security/Report Login Name
Configuration/Application/InfClient/Section/Security/Report Login Password
match a valid user in the ESP database.

Ensure that this is a valid user in the ESP database and the correct password for that user
Problem: Unable to see labels on report options form Labels and background both set to the same colour

Solution:
This is caused by the colour settings in the Display Properties reached by right clicking on the desktop and selecting the “Appearance” tab. The sfest option is the “Windows Classic” or “Windows Standard” style, however other styles can be fine, it just may take some experimentation to find the correct one.

Problem: Unable to connect to database

s
Solution: This is caused by an incorrect datasource used when creating the report. The following procedure should be followed to ensure that ESP can correctly set the datasource on the report at runtime.
In Crystal Reports open the Database/Set Database Location menu option
Select “Create New Connection”
Select “ODBC (RDO)”
Select “Enter Connection String”
Enter the string “DRIVER=SQL Server”
Fill in the details:
1)Server is the database server
2)User ID and Password are the values held in the ESP Parameters under
Configuration/Application/InfClient(or Infrastructure)/Section/Security/Report Login Name
Configuration/Application/InfClient(or Infrastructure)/Section/Security/Report Login Password
3)Database is the ESP database name
DO NOT check the “Trusted Connection” check box
Click on “Finish” and if all details have been entered correctly you should be able to select tables, views or stored procedures from the database.
Linked Server
The target audience for this document is technical and support personnel.
Manual Setup
ODBC DSN
On the SQL Server machine
1) Install the MySQL ODBC Driver
2) Set up a System DSN

Name of MySQL server
Name of database to link to
Name of user, must have privileges on the database being linked to
Leave this
3)Set options:
These are defaults-leave them

Set this
Once these details click on “Test data Source” if the test is successful click on OK if not there is a chance that the user has not had access granted on the MySQL database.
Linked Server Setup in SQL Server
After this is done the Linked Server needs to be setup. There are two ways of doing this, both must be carried out on the SQL server machine.
Manual Setup
Expand the Security branch of the Explorer tree in Enterprise Manager, then right click on the “Linked Servers” node. Select “New Linked Server” and the following dialog will be displayed:
This can be anything

Select from drop down list
This can be anything
Name of System DSN set up above
Then open the “Security” tab and select the “Be made using this security context” option.

Enter the name of the user defined in the DSN as the “Remote login" as well as any password defined in the DSN.
Click on OK and that should be it.
Setup Using Scripts
ODBC DSN
It is possible to create a registry script that will create a system DSN, however it is not recommended as
the possibility of corrupting the registry exists.
Linked Server Setup
The linked server in SQL Server can be created using the system stored procedure “sp_addlinkedserver”. The following SQL commands will accomplish this. See notes after the SQL for more explanation.
/*
Script to add linked server, requires that a ODBC System DSN be set up first on the actual SQL Server
machine with the name "MAPMYSQL"
*/
EXEC sp_addlinkedserver 'MAPMYSQL', 'MySQL', 'MSDASQL', Null, Null,
'Driver={MySQL ODBC 3.51 Driver};DB=mysqldb;
SERVER=mysqlserver;option=512;uid=mysqluser;pwd=mysqlpassword;'
EXEC sp_addlinkedsrvlogin 'MAPMYSQL', 'false', NULL, 'mysqluser', 'mysqlpassword'
EXEC sp_serveroption 'MAPMYSQL', 'data access', 'true'
EXEC sp_serveroption 'MAPMYSQL', 'use remote collation', 'true'
EXEC sp_serveroption 'MAPMYSQL', 'connect timeout', 0
EXEC sp_serveroption 'MAPMYSQL', 'query timeout', 0
/*
End script
*/
NOTES:
- The value (MySQL ODBC 3.51 Driver) will need to be changed if a later version of the MySQL ODBC driver is used.
- The values for DB, SERVER, uid, pwd in the sp_addlinkedserver line will need to be modified for each site. These should match the values used to set up the ODBC System DSN.
- The values 'mysqluser' and 'mysqlpassword' in the sp_addlinkedsrvlogin will need to be edited to
match the values used for the 'uid' and 'pwd' parameters in the previous line
Once this is done data is accessed through the SQL Server “OpenQuery()” function. In theory linked servers support the 4 part naming convention for sql , however it appears that the 3.511 version of the MySQL ODBC driver does not. So the “OpenQuery” function is the only way of accessing the MySQL data from within SQL server.
The “OpenQuery” function can be used to create views so that the fact that the data is from a linked server is transparent to the users.
Create view MAP_ULOADC as
select u.* from openquery(MAPMYSQL, 'select * from ULOADC') as u
go
Be aware that in the MAP dataset the following tables have blob or tinyblob fields and views for them should be created by explicitly selecting each column and casting the blob column as char
Table blob column
COMTRN body
LABELS body
LBMISC misc_data
SCHCOM body
XLATEP xl_body
XLDEFN body
The example below shows how this is done with the XLATEP table.
create view dbo.MAP_XLATEP as
select x.* from openquery(MAPMYSQL,
'SELECT xl_prefix, xl_key,
cast(xl_body as char) as xl_body,
xl_system, xl_group
FROM XLATEP') as x
Linked Server Name Parameter
A parameter called “Linked Server Name” has been added to the section “Report Parameters” under the Inf Client application in ESP. This is to allow individual sites the freedom to name their linked servers however they wish.
The code below shows how the linked server name can be retreived from the parameter table then used to build an openquery sql statement.
declare @linkedservername nvarchar(50)
--get the linked server name
select @linkedservername = isnull(value, 'MAPMYSQL') from infparameter where name = 'Linked Server Name' and sectionid in (select id from infsection where name = 'Report Parameters')
--build the sql statement using the retrieved linked server name
set @sql = 'declare qcurs cursor for select isnull(qty,0) from openquery(' + @linkedservername +
',''select sum(quantity_good_out) as qty from FACTRY where job_number = ''''' + @job +
''''' and machine_number in (1180,2180,3180)
and finish_datetime < ''''' + convert(nvarchar(30),@dte,120) +
''''' group by job_number'')'
-- now exec the statement
exec(@sql)
This functionality can be used in stored procedures but not in SQL functions or Views.
Kiwiplan - MAP Variables
Kiwiplan software uses several environmental variables within the Unix structure.
Knowing these variables will provide a better understanding of the directory structure during setup of Kiwiplan software.
These variable settings are located in the files:
$HOME/.profile à /KIWI/site/bin/profile.?????
/KIWI/site/bin/stdprofile
$DATA/PROFILE or $WORK/PROFILE
Environment variables point to individual directories and give a shortcut to the Kiwiplan software.
Below is a listing of all directory variables.
{DRIVE} = any location :folder or drive location
$KIWI = /{drive}/kiwi :contains the kiwi environment
$REV = /KIWI/revisions
$COMMSDIR = /KIWI/work/cscomm :contains comms logs & audit trails
$PLANTBIN = /KIWI/site/00xx/bin :contains plant specific menu scripts
$SITEBIN = /KIWI/site/bin :contains site specific menu scripts
$PLANTDAT = /KIWI/site/dat :contains plant .MNU, .TOG files
$SITEDAT = /KIWI/site/dat :contains .MNU, .TOG files
$DATA ISAM= /KIWI/data_a :contains revision data files & indexes
$DATA SQL = /KIWI/site_sql :contains revision data files
$WORK = /KIWI/usr/work :contains all user .TM and .LS files
$SCP = /KIWI/kiwi/scp :contains revision specific scripts
$PROGS = /KIWI/kiwi/progs :contains all program files for revision
$BIN = /KIWI/kiwi/bin :contains unix specific scripts
$UFD = /KIWI/kiwi/ufd :contains data file definitions
$TOOLS = /KIWI/site/tools :contains admin tools & menus
$SCRIPTS = /KIWI/site/SCRIPTS :contains homemade scripts
NOTE: Some sites use a different base directory for the Kiwiplan software.
Examples: $KIWI may be /usr/kiwi or /kiwi/kiwi.
Environmental variables are used to set up the user’s environment, meaning which data, menu, etc… they access when logging in. Below is a list of basic environment variables.
EXEC = executes a program or script, which in turn will call a specific .MNU file.
Example: ”kiwimenu menu=csc00”
DATA = which data the user will access when logging in.
Example: data_a or site_sql
TERM = what terminal type the user will default to when logging in.
Example: vt220, vt100, & ansi
KIWISEA = the search path for Kiwiplan environment.
UNIX PATH = the UNIX executing search path.
To view what each variable is set to, use the echo command. Example= echo $TERM will tell what terminal emulation is being used. Below is a directory tree layout to better show the variable locations and directory contents.
Kiwiplan - Add Printer for Classic and Refresh Sites
This is how to add a printer in Kiwiplan for KDG to host the printer and for classic label.
Step1:
Add the printer to the server were KDG is running under Control Panel\Hardware\Devices and Printers
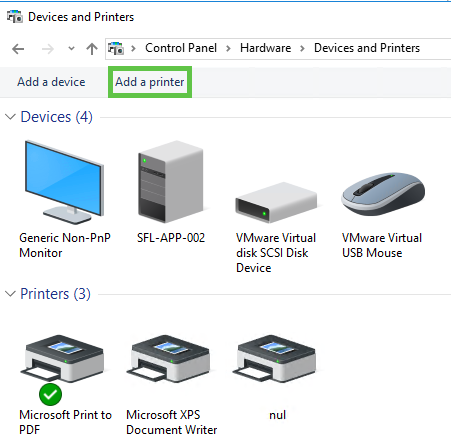
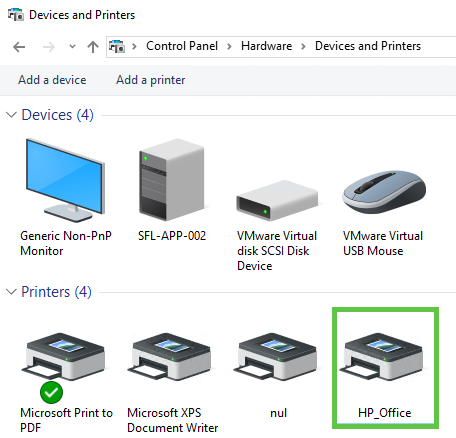
Step2:
Verify in KDG top make sure it shows up
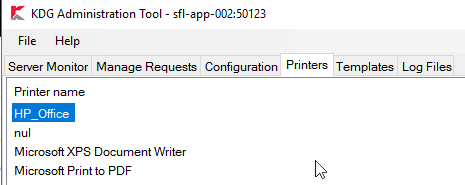
Step3:
Once the printer is available you have to add a printer to the PRINTERS file on the Linux server
You can use the locate command to find out where the file is located
locate PRINTERSThis is what the file would/should look like
|
#Other
##Non-Physical Printers LPT97:SCRIPT:pgprint
LPT100:SCRIPT:print_email |
To add in the new HP_Office printer we just added, in the example we will add the printer 1 ( 1 will be used in the classic environment ) but in PCS Vue the name of the printer will show.
The options are LETTER and LEGAL for the template
The option for SCRIPT the following options are available
print_kdg means it will send the request via KDG
print_email means it will email you the classic report and as text and a PDF
pgprint means it will display the result on screen and you will be able to page through them
saveprint means it will save the file to drive and keep it as a SAVE_?????.LS file
noprint means it will just not print all all
#Office Printers
LPT1:TEMPLATE:LETTER
LPT1:SCRIPT:print_kdg
#Other
##Nul Printer
LPT90:TEMPLATE:LEGAL
LPT90:SCRIPT:print_kdg
##Non-Physical Printers
LPT93:SCRIPT:print_email
LPT97:SCRIPT:pgprint
LPT98:SCRIPT:saveprint
LPT99:SCRIPT:noprint
LPT100:SCRIPT:print_email
LPT100:PRINTER:sales@sflservicesllc.comStep4:
Still on the Linux side you will need to associate the printer to number you just created to the KDG side you will need to run the following command
kdgprintOr you can also do this via the parameters section call SYS:KP, but I recommend using the above command.
Once you run the command you can use a filter if you have man printers or just leave it blank
|
kdgprint Assign KDG Printers utility 26/Thu 11:17
Apply filter to server list: .............................. |
|
kdgprint Assign KDG Printers utility 26/Thu 11:18 Indx KDG_Printer_name Print_Tray LegacyPrinters 2 Microsoft Print to PDF (C)hange, (F)ind, (E)xit, or select Index ? E.... |
As you enter through the Print_Tray and enter 1 for the Legacy printer you may get an error if an old printer was delete and the parameters section still exists
| ? Printer number already assigned :Office_CustomerService |
You will need to go to the paramters sectip of SYS:KP and delete the old printer
If not you can add the 1 to the LegacyPrinters, also this will allow you to add more then one printer number to the same printer which is useful if a printer goes down.
|
kdgprint Assign KDG Printers utility 26/Thu 11:22 Indx KDG_Printer_name Print_Tray LegacyPrinters (C)hange, (F)ind, (E)xit, or select Index ? E.... |
Kiwiplan - MySQL log is fill or filled the drive
This document is to explain the procedure on how to get the plant operational again.
Couple of things to think about:
- Is the drive full
- Do you see many log files for mariadB or MySQL
- If so then proceed on delete the oldest to the newest date and the onse with a .gz extention
- Then investigate the growing log to figure out what is adding to the logs
- If not then go to step one below
- If so then proceed on delete the oldest to the newest date and the onse with a .gz extention
Steps:
Kiwiplan - Install Web Launcher
This requires Java to be installed first
-
First program that must be installed in Kiwiplan_Web_Launcher_Setup.
- This file is usually in the Linux server in the MES folder for the current revision or on the RDS server if it was copied
-
Verify Kiwiplan Launcher version works with current revision, if not need to uninstall and reinstall different Kiwiplan Launcher. (Should verify with Kiwiplan)
-
Open local drive > Kiwiplan > Kiwiplan Revisions.
-
Choose the appropriate revision folder (May need to confer with Kiwiplan to know which one to choose)

-
Run “Kiwiplan_Web_Launcher_Setup” as Admin
-
Click “Yes” for Do you want to allow this app from an unknown publisher to make changes to your device.
-
This is a silent launcher and takes a few second to install.
-
Verify by going into Kiwiplan folder and seeing c:\kiwiplan
Script - Deleting a KDE server from the Database
DECLARE @ServerID INT, @UPD INT
SET @ServerID = 1 --Server ID To Delete
SET @UPD = 0 --0 to Select 1 to Delete
-- DOT NOT MODIFY BELOW --
IF @UPD != 1
BEGIN
SELECT * FROM [KDG].[dbo].[kdgDelivery] where serverID = @ServerID
SELECT * FROM [KDG].[dbo].[kdgDeliveryResource] where serverID = @ServerID
SELECT * FROM [KDG].[dbo].kdgDocument where serverID = @ServerID
SELECT * FROM [KDG].[dbo].kdgEmailDelivery where serverID = @ServerID
SELECT * FROM [KDG].[dbo].kdgEmailRecipient where serverID = @ServerID
SELECT * FROM [KDG].[dbo].kdgPrintDelivery where serverID = @ServerID
SELECT * FROM [KDG].[dbo].kdgRequest where serverID = @ServerID
SELECT * FROM [KDG].[dbo].kdgSaveToDiskDelivery where serverID = @ServerID
SELECT * FROM [KDG].[dbo].kdgServer where ID = @ServerID
SELECT * FROM [KDG].[dbo].kdgServerConfig where serverID = @ServerID
END
IF @UPD = 1
BEGIN
DELETE FROM [KDG].[dbo].[kdgDelivery] where serverID = @ServerID
DELETE FROM [KDG].[dbo].[kdgDeliveryResource] where serverID = @ServerID
DELETE FROM [KDG].[dbo].kdgDocument where serverID = @ServerID
DELETE FROM [KDG].[dbo].kdgEmailDelivery where serverID = @ServerID
DELETE FROM [KDG].[dbo].kdgEmailRecipient where serverID = @ServerID
DELETE FROM [KDG].[dbo].kdgPrintDelivery where serverID = @ServerID
DELETE FROM [KDG].[dbo].kdgRequest where serverID = @ServerID
DELETE FROM [KDG].[dbo].kdgSaveToDiskDelivery where serverID = @ServerID
DELETE FROM [KDG].[dbo].kdgServer where ID = @ServerID
DELETE FROM [KDG].[dbo].kdgServerConfig where serverID = @ServerID
ENDKiwiplan - KIDSENV Settings
MAXPROC=999
TERM=vt100
KIDSLOGDIR=$PLANT/tmp
KIDSLOGMAX=1000000
KIDSLOGLEVEL=-4
The KWSQL_LOG variable is a system-level setting in Kiwiplan that controls logging options for the SQL interface, although ISAM can also utilize these logs. It allows you to specify the log level, which can be one of the following:
- all: Logs everything.
- error: Logs only errors.
- warn: Logs warnings and errors.
- query: Logs queries, warnings, and errors.
- info: Logs informational messages.
- none: Disables logging entirely.
For example, setting the log level to error will only display errors, while setting it to query will display queries, warnings, and errors
KWSQL_LOG=query
The KWLOCK_TIME_LOG variable is a system-level diagnostic setting in Kiwiplan. It causes the application to abort if a lock remains active for a specified number of seconds
KWLOCK_TIME_LOG=15
The KWLOCK_TIME_COUNT variable is a system-level diagnostic setting in Kiwiplan. It causes the application to abort if a lock remains active for a specified number of iteration counts
KWLOCK_TIME_COUNT=15
The KIWI_NO_CATCH_HUP variable is a system-level setting in Kiwiplan that turns off the catching of HUP (hangup) signals. This means the application will not handle or respond to HUP signals when this variable is specified. This one if for MDC that keeps shutting down
export KIWI_NO_CATCH_HUP=1
The KIWI_LOCK_NOPID variable is a system-level setting in Kiwiplan that forces the process ID to be written to the lock file when a process locks a file. However, it comes with a warning that setting this variable can affect performance. This one is for the lock files
export KIWI_LOCK_NOPID=1
GEN/IN use lock monitor N
Kiwiplan - Server Load Monitor
This script is based on this initial loadmon script
This is to monitor specific objects at a Advantive/Kiwiplan sites
It will send something like this for PCS
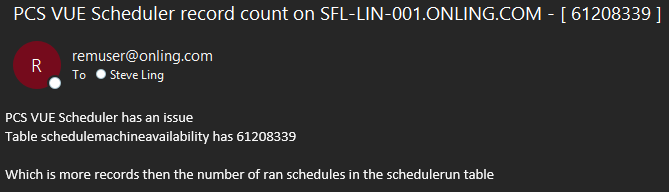

#!/bin/bash
############################################
#
# Author: Steve Ling 5/2/25
# Modified:
# Added PCS Scheduler looping monitoring 8/14/25
# Added PCS table record counts 8/14/25
#
# Purpose: Monitor system metrics including:
# - Average Load
# - CPU Usage
# - Disk Space
# - Memory Usage
# - MySQL Table Record Counts (multiple tables with individual thresholds)
#
# Installation:
# 1. Copy to /opt/scripts/
# 2. Set permissions: chmod 755 /opt/scripts/loadmon.sh
# 3. Set ownership: chown remuser:kiwiplan /opt/scripts/loadmon.sh
# 4. Add cron job as root to run every 5 minutes:
# To supply parameters or not:
# */5 * * * * /opt/scripts/loadmon.sh >/dev/null 2>&1 | logger
# */5 * * * * root MYSQL_USER="your_user" MYSQL_PASSWORD="your_password" MYSQL_DATABASE="your_db" MYSQL_TABLES_AND_THRESHOLDS="users:50000,orders:100000" /opt/scripts/loadmon.sh >/dev/null 2>&1 | logger
# */5 * * * * root MYSQL_USER="your_user" MYSQL_PASSWORD="your_password" /opt/scripts/loadmon.sh >/dev/null 2>&1 | logger
#
# MySQL Configuration:
# Set the following environment variables:
# - MYSQL_HOST: MySQL host (default: localhost)
# - MYSQL_USER: MySQL username
# - MYSQL_PASSWORD: MySQL password
# - MYSQL_PCS_DATABASE: PCS Database name
# - MYSQL_TABLES_AND_THRESHOLDS: Comma-separated list of table:threshold pairs
# (e.g., "table1:50000,table2:100000,table3"). If threshold is omitted, uses MYSQL_RECORD_THRESHOLD.
# - MYSQL_PCS_RECORD_THRESHOLD: Default record count threshold
#
# Improvements:
# - Added support for multiple MySQL tables with individual thresholds
# - Sends individual alerts for each table exceeding its threshold
# - Added error handling for MySQL commands
# - Improved logging with timestamps
# - Made thresholds configurable via environment variables
# - Added hostname to alerts for clarity
# - Replaced mutt with mail (more common)
# - Optimized command execution
# - Added input validation
#
############################################
# Uncomment to "Exit" the script on any error
#set -e
# Configuration (can be overridden via environment variables)
: "${LOAD_THRESHOLD:=10.00}" # Load average threshold
: "${DISK_THRESHOLD:=85}" # Disk usage threshold (%)
: "${CPU_THRESHOLD:=65}" # CPU usage threshold (%)
: "${MEM_THRESHOLD:=85}" # Memory usage threshold (%)
: "${MYSQL_RECORD_THRESHOLD:=100000}" # Default MySQL table record count threshold
: "${MYSQL_PCS_RECORD_THRESHOLD:=100000}" # Default PCS Scheduler table record count threshold
: "${RECIPIENTS:=steve.ling@sflservicesllc.com}" # Space-separated email addresses
: "${HOSTNAME:=$(hostname -s)}" # Short hostname for alerts
: "${LOG_FILE:=/var/log/loadmon.log}" # Log file location
: "${MYSQL_HOST:=localhost}" # MySQL host
: "${MYSQL_USER:=}" # MySQL username
: "${MYSQL_PASSWORD:=}" # MySQL password
: "${MYSQL_PCS_DATABASE:=ccc_pcs}" # MySQL database prefix
: "${MYSQL_TABLES_AND_THRESHOLDS:=schedulemachineavailability:1000000}" # Comma-separated table:threshold pairs
# Ensure required commands are available
for cmd in awk df top free mail logger mysql sed tr bc; do
if ! command -v "$cmd" &>/dev/null; then
echo "Error: Required command '$cmd' not found" | logger -t loadmon
exit 1
fi
done
# Function to log messages with timestamp
log_message() {
local message="$1"
echo "$(date '+%Y-%m-%d %H:%M:%S') - $message" | logger -t loadmon
echo "$(date '+%Y-%m-%d %H:%M:%S') - $message" >> "$LOG_FILE"
}
# Function to send email alerts
send_alert() {
local subject="$1"
local body="$2"
if echo -e "$body" | mail -s "$subject" $RECIPIENTS 2>/dev/null; then
log_message "Alert sent: $subject"
else
log_message "Error: Failed to send alert: $subject"
fi
}
# Collect system metrics
load=$(awk '{print $1}' /proc/loadavg 2>/dev/null || log_message "Error: Failed to read load average")
disk_usage=$(df / | awk 'NR==2 {print $5}' | sed 's/%//' 2>/dev/null || log_message "Error: Failed to read disk usage")
cpu_usage=$(top -bn1 | grep "Cpu(s)" | awk '{print 100 - $8}' | cut -d. -f1 2>/dev/null || log_message "Error: Failed to read CPU usage")
mem_usage=$(free | awk '/Mem:/ {printf "%.0f", $3/$2 * 100}' 2>/dev/null || log_message "Error: Failed to read memory usage")
# Validate collected system metrics
if ! [[ "$load" =~ ^[0-9]+([.][0-9]+)?$ ]]; then
log_message "Error: Invalid load value: $load"
exit 1
fi
if ! [[ "$disk_usage" =~ ^[0-9]+$ ]]; then
log_message "Error: Invalid disk usage value: $disk_usage"
exit 1
fi
if ! [[ "$cpu_usage" =~ ^[0-9]+$ ]]; then
log_message "Error: Invalid CPU usage value: $cpu_usage"
exit 1
fi
if ! [[ "$mem_usage" =~ ^[0-9]+$ ]]; then
log_message "Error: Invalid memory usage value: $mem_usage"
exit 1
fi
# Collect MySQL table record counts (if configured)
mysql_records_summary=""
if [ -n "$MYSQL_USER" ] && [ -n "$MYSQL_PCS_DATABASE" ] && [ -n "$MYSQL_TABLES_AND_THRESHOLDS" ]; then
IFS=',' read -r -a table_pairs <<< "$MYSQL_TABLES_AND_THRESHOLDS"
for pair in "${table_pairs[@]}"; do
pair=$(echo "$pair" | sed 's/^[[:space:]]*//;s/[[:space:]]*$//') # Trim whitespace
table="${pair%%:*}" # Extract table name
threshold="${pair#*:}" # Extract threshold (if provided)
# Use default threshold if not specified or invalid
if [ -z "$threshold" ] || ! [[ "$threshold" =~ ^[0-9]+$ ]]; then
threshold="$MYSQL_PCS_RECORD_THRESHOLD"
log_message "Warning: Using default threshold ($threshold) for table $table"
fi
# Validate table name (basic check for non-empty and no special characters)
if [ -z "$table" ] || [[ "$table" =~ [^a-zA-Z0-9_] ]]; then
log_message "Error: Invalid table name: $table"
continue
fi
# Query record count
record_count=$(mysql -h "$MYSQL_HOST" -u "$MYSQL_USER" -p"$MYSQL_PASSWORD" -D "$MYSQL_PCS_DATABASE" -N -e "SELECT COUNT(*) FROM \`$table\`" 2>/dev/null) || {
log_message "Error: Failed to query MySQL table $MYSQL_PCS_DATABASE.$table"
record_count=0
}
# Validate record count
if ! [[ "$record_count" =~ ^[0-9]+$ ]]; then
log_message "Error: Invalid record count for table $table: $record_count"
record_count=0
fi
# Append to summary
mysql_records_summary="$mysql_records_summary $table:$record_count"
# Check threshold and send alert if exceeded
if [ "$record_count" -gt "$threshold" ]; then
body="Record count in $MYSQL_PCS_DATABASE.$table: $record_count\nThreshold: $threshold"
send_alert "High MySQL record count on $HOSTNAME - $table [ $record_count ]" "$body"
fi
done
mysql_records_summary=$(echo "$mysql_records_summary" | sed 's/^ //') # Trim leading space
else
log_message "Warning: MySQL configuration incomplete (USER, DATABASE, or TABLES_AND_THRESHOLDS missing)"
mysql_records_summary="N/A"
fi
# Collect PCS Scheduler record count
mysql_pcs_record_count=0
if [ -n "$MYSQL_USER" ] && [ -n "$MYSQL_PCS_DATABASE" ]; then
mysql_pcs_record_count=$(mysql -h "$MYSQL_HOST" -u "$MYSQL_USER" -p"$MYSQL_PASSWORD" -D "$MYSQL_PCS_DATABASE" -N -e "SELECT COUNT(*) FROM schedulemachineavailability WHERE pcsSchedule NOT IN (SELECT pcsSchedule FROM schedulerun)" 2>/dev/null) || {
log_message "Error: Failed to query PCS Scheduler table $MYSQL_PCS_DATABASE"
mysql_pcs_record_count=0
}
else
log_message "Warning: PCS Scheduler configuration incomplete (USER or DATABASE missing)"
fi
# Validate collected system metric
if ! [[ "$mysql_pcs_record_count" =~ ^[0-9]+$ ]]; then
log_message "Error: Invalid PCS Scheduler record count: $mysql_pcs_record_count"
mysql_pcs_record_count=0
fi
# Check thresholds and send alerts for system metrics
if (( $(echo "$load > $LOAD_THRESHOLD" | bc -l) )); then
body=$(sar -q 2>/dev/null || echo "Error collecting sar data")
send_alert "High load on $HOSTNAME - [ $load ]" "$body"
fi
if (( disk_usage > DISK_THRESHOLD )); then
body=$(df -h / 2>/dev/null || echo "Error collecting df data")
send_alert "High disk usage on $HOSTNAME - [ ${disk_usage}% ]" "$body"
fi
if (( cpu_usage > CPU_THRESHOLD )); then
body=$(top -bn1 | head -n 12 2>/dev/null || echo "Error collecting top data")
send_alert "High CPU usage on $HOSTNAME - [ ${cpu_usage}% ]" "$body"
fi
if (( mem_usage > MEM_THRESHOLD )); then
body=$(free -h 2>/dev/null || echo "Error collecting free data")
send_alert "High memory usage on $HOSTNAME - [ ${mem_usage}% ]" "$body"
fi
if [ "$mysql_pcs_record_count" -gt "$MYSQL_PCS_RECORD_THRESHOLD" ]; then
body="PCS VUE Scheduler has an issue\nTable schedulemachineavailability has $mysql_pcs_record_count\n\nWhich is more records then the number of ran schedules in the schedulerun table"
send_alert "PCS VUE Scheduler record count on $HOSTNAME - [ $mysql_pcs_record_count ]" "$body"
fi
log_message "Monitoring completed: Load=$load, Disk=${disk_usage}%, CPU=${cpu_usage}%, Mem=${mem_usage}%, PCS Scheduler Count=${mysql_pcs_record_count}, MySQL Records=[$mysql_records_summary]"
MySQL - Parameters Explained
performance_schema = ON
tmpdir = /run/mariadb
thread_cache_size = 4
table_open_cache = 16384
table_definition_cache = 8384
sql_mode = ERROR_FOR_DIVISION_BY_ZERO,NO_AUTO_CREATE_USER,NO_ENGINE_SUBSTITUTION
query_cache_type = 0
query_cache_size = 0
query_cache_limit = 128M
query_cache_strip_comments = 1
tmp_table_size = 512M
max_heap_table_size = 512M
max_connections = 750
max_allowed_packet = 24M
sort_buffer_size = 24M
join_buffer_size = 48M
innodb_buffer_pool_size = 65G # 65-75% of RAM for InnoDB cache --> Keeping some for VUE
innodb_buffer_pool_instances = 10 # One instance per CPU core --> Keeping some for VUE
innodb_flush_method = O_DIRECT # Reduce I/O overhead
innodb_flush_log_at_trx_commit = 2 # Balance performance and durability
innodb_log_buffer_size = 16M # Buffer for transaction logs
innodb_thread_concurrency = 0 # Let MySQL manage threads (0 = unlimited)
innodb_io_capacity = 2000 # Adjust based on storage IOPS
innodb_io_capacity_max = 4000 # Max IOPS for bursts
innodb_use_native_aio = 1
innodb_flush_log_at_trx_commit = 2 # Balance performance and durability --> Changed from 0
innodb_file_per_table
innodb_log_file_size = 2G # Larger logs for better write performance --> Changed from 512
Dataset - Restrict Date in MAP MES VUE ESP
This is to freeze a datasets for different Kiwiplan modules.
MAP / CLASSIC / FFF
Create a file named [PROFILE] in the KIWISEA path. The best place to put it is in the $DATA folder. The DATA and TIME are the settings you wish to freeze the data at.
RESTRICT:
DATE:160725
TIME:0700VUE
There are a couple of places you will need to have a file named [time.properties] and you will need to create and save a file in each folder with the following entry:
time=16/07/2025 07:00:00Linux Server
/KIWI/services/sites/<sitename>/current/conf/kiwiplan
/KIWI/services/web/<sitename>/current/conf/kiwiplanWindows Server (Client Install)
C:\Kiwiplan\<install folder>\conf\kiwiplanESP
Create a file named [PROFILE.INI] to hold the database you wish to freeze in time with the following entry:
[SFL]
StartDateTime=07/16/2025 07:00:00
TimeZone=US Eastern Standard Time
LocaleID=1033
[DBLABELMAPPING]
ESP_LIVE=SFLThe sections are set like the folowing:
[DBLABELMAPPING] example
DBNAME=SECTION_NAME
[TimeZone] examples
US Eastern Standard Time
Central Standard Time
GMT Standard Time
New Zealand Standard Time
[LocaleID] code page example
1033
1062
5129Windows Server (ESP Installation)
C:\Kiwiplan\EspServ\
Kiwiplan - Setup ULT for ESP
Parameter settings
SYS MO
Load Docket Program Allowed=Y
Allow FG tracking=1
Allow WP tracking=1
GEN ED
#2=*
#3=16 (site dependent)
#4= #
GEN EE
ULTDLD
1 Data Type ULTDLD
2 Description Docket Export
3 Directory Name ./ or path to /ultdld
4 Last File Number Used 1
5 Script name for File Export EspRenameDkt
6 Fixed record length 0=variable 0
7 File Name (optional)
8 Layout Version <
ULTUNIT
1 Data Type ULTUNIT
2 Description ULT Unit movement for ESP
3 Directory Name ./ or path to ultunit
4 Last File Number Used 1
5 Script name for File Export
6 Fixed record length 0=variable 0
7 File Name (optional) unitmvmt.edi
8 Layout Version S3
GEN PP
ULT
1 Key ULT
2 Produce filefull before purge N
3 Purge orders daily (Y/N) Y
4 Purge orders weekly (0-7) 0=No 0
5 Number of days orders to keep 120
11 Purge history daily (Y/N) Y
12 Purge history weekly (0-7)0=No 0
13 Number of days history to keep 120
WIP
1 Key WIP
2 Produce filefull before purge N
3 Purge orders daily (Y/N) Y
4 Purge orders weekly (0-7) 0=No 0
5 Number of days orders to keep 120
11 Purge history daily (Y/N) Y
12 Purge history weekly (0-7)0=No 0
13 Number of days history to keep 120
GEN PQ
ULT
1 System Name (Key) ULT
2 Name of purge program to run ultprg
11-14 Ords-WARN no purge in N days 10 (all 3 params)
WIP
1 System Name (Key) WIP
2 Name of purge program to run ultprg
GEN PL
Example machines
4 Default Corrugator Machine No. 1,011
5 Default Despatch Machine No. 8,000
6 Board Transfer Machine Number 9,999
8 Pick-Up Goods Machine Number 9,997
9 Quarantine Machine Number 9,998
10 FGS Rework Store Machine No. 8,007
11 Strapper Triggering Notifictn 7,999
12 Printer No for Notifications 99
13 Notification Label Code
16 Sheetboard strapper number 7,998
18 Supply From Stock Machine No 1,000
21 Into WIP Default Label Format 0A
22 Into FGS Default Label Format 01
27 Stock Despatch Machine No 8,008
29 Default Board Receiving Mch No 1,001
37 Surplus Sheetboard Machine No. 8,006
GEN TU
Set up all pallet types (must match ESP)
1 Unit Load Type 01
2 Description 40X48,
3 Width 40.00
4 Length 48.00
5 Default load height 52.00
7 Absolute Length Overhang 8.00
8 Absolute Width Overhang 8.00
12 Thickness 5.00
28 Weight of Pallet 40
INV DL
Maximum value for load Id 64,000
Maximum Unit Loads per truck=500
Allow File Export=Y
One file per Despatch Load = N
BOL Sequence = 0
Qty subtotals in BOL report = N
BOL totals only = N
Job pages in BOL report=N
BOL last number = 1 ( as a starting point)
BOL maximum value 99,999,,999
Ignore Plant check as planning=Y
Ignore mach. check as planning=Y
Prompt for ship method = Y
Don’t prompt to enter Truck Id =N
When set Load to “Despatch”
Check Label-Only Units = N
Generate BOL printout=N
BOL printout only if Transf.=N (use ESP transfer type docket)
Number of copies of BOL printout = 0
Generate BOL export (Billing) = Y
Accept before Export/Ship Y
Enter Despatch Comment 1 (added for seal numbers/dock time appts)
When set Load to Shipped”
Generate DLBOL export = Y
Include in export transfer = Y (use ESP ‘transfer’ type docket)
Always transfer jobs of type 3 = Y
Update PCS when shipping loads = Y
Update PCS with Xfered Units = Y
Skip Board Transfers in ULT= N
Split BOL per Address No. = Y
Allow entry of BOLJob Weight = N
Show Label units in FastTrack = N
Exclude Special Inst. From BOL=Y
Status Partial if more series Y
No new series for Call-Off Rtn N
Fast-Track: Auto assign L-Bay N (Yes would use any free Dock Door)
Fast-Track: Select Unit by:
0=Min Splits, 1=FIFO 1
Allow loading from diff. store N (allows load, unload & relocate to a different store)
No upper casing customer names Y (fixes customer search in BDR report)
Select CallOff UL on Qty Split Y (helps use the FIFO selection process on fasttrack)
Auto select up to Overrun Qty N ( For type 0 orders only, Yes where it is not OK to over deliver, else all units including overrun are selected)
Allow Misc Items on ULT Loads = N
Prefix for Misc. Items = MISC
Assign Stop No in Reverse Seqn = N
Freight Code for RollStock =
Flag full load at X units = 0
Flag full load at X weight = 0
Single Ship Method for Load = N (consolidates to first orders ship method if different)
Allow to correct shipped loads N (new to prevent unshipping when ESP has status ??)
Correct Shipped loads if:
Job Status in Load is <= 1 (0 No invoice created, 1 Inv cancelled, 2 Inv created, 3 Inv printed, 4 Inv posted, 5 error, 6 unknown)
Invoice Check:Default ShipCode = ( used for generic ship methods, ie. CC, when user should have changed ship method before exporting load details to ESP)
INV UT
Unit Load Delimiter = -
Unit Load Step Delimiter = W
Unit Load Qty. Delimiter = (blank)
Unit Load String Delimiter = (blank)
Default Pallet Type (must match a valid GEN TU or blank is fine)
Xfer store name as customer = Y
New unit barcode field format
0=Plant Code/Unique#, 1=SSCC = 0
Allow 0 Pallets on a Unit Load = Y
Auto Move WIP Units to InFeed = Y
Auto Consume Entry WIP Units = Y
No check Unprocessed Exit Uls = Y
Allow Add for jobs not in PCS = N
Method to calc unit height = (blank)
Don't export WIP unit changes = Y
Search only for a selected job= N
Skip Purge of Into Store Mchs = N
Board Xfer integrate with ULT = Y if on Rev 8.10 April 2015 or newer
PCS FB
Default WIP Label Format (site specific) Ex: WW
Default FGS Label Format (site specific) Ex: WF
Print WIP labels from Feedback = Y
Print from (H) Mach Lineup = Y
Print from (F) Mach Lineup = Y
Estimated WIP Labels 1 less = Y
Prevent updating of non-contiguous feedback = Y
Only 1 In-Process job allowed = Y
Qty/Unit to keep default value = Y
PCS RP
Standard Truck Volume = 1,750 (metric 70)
Default Hours Until Ready = 24
Blank line on Sort Key change = 1
Full Order Status from DPR = Y
Chg. Load Status when Add Load = Y
PCS QO
Order Status
2 Keys = 1, 3, 14, + any soft Hold Keys
Despatch Plan Report Selected = Y
PCS XF
FG transfers
1 Shipping Machine for customer 7995 op 28 machine
2 Destination ULT Transfer Store 11
3 Customer Name WH11 Name
4 Address Number 0
5 Delivery Destination Code WH11
6 Ship Method (blank is fine on all)
7 Customer Key (blank is fine on all)
8 Carrier (blank is fine on all)
Next Example:
1 Shipping Machine for customer 7995 op 28 machine
2 Destination ULT Transfer Store 12
3 Customer Name WH12 Name
4 Address Number 0
5 Delivery Destination Code WH12
Etc.
WP transfers
1 Shipping Machine for customer 7995 op 28 machine
2 Destination ULT Transfer Store 101
3 Customer Name OP101 Name
4 Address Number 0
5 Delivery Destination Code W101
Next example:
1 Shipping Machine for customer 7995 op 28 machine
2 Destination ULT Transfer Store 102
3 Customer Name OP102 Name
4 Address Number 0
5 Delivery Destination Code W102
Etc.
Possible order routes
Sheets
Stp Machine
1. Corrugator
2. Strapper
3. Shipping
Farm-out
Stp Machine
1. Corrugator
2. Diecutter
3. Transfer out
4. Outside process
5. Transfer in (optional)
6. Strapper
7. Shipping
Purchase sheets (farm-in)
Stp Machine
1. Purchase Product (sheets) (op 17)
2. Diecutter
3. Strapper
4. Shipping
Purchase Finished product
Stp Machine
1. Purchase Product (Finished product) (op 17)
2. Transfer In (op 29)
3. Warehouse (op 20/30)
Returns
Stp Machine
1. Return-Pickup Goods (op 20)
2. Quarantine/Rework (op 20 & 30)
Into Warehouse on site
Stp Machine
1. Corrugator
2. Diecutter
3. Strapper
4. Warehouse Stock (op 20 & 30)
Into Warehouse off site
Stp Machine
1. Corrugator
2. Diecutter
3. Strapper
4. Transfer Out (op 28)
5. Warehouse Stock (op 20 & 30)
Warehouse Release (Calloffs)
Stp Machine
1. Warehouse Release From Stock (no ops)
2. Shipping (op 20)
Stock Transfers
Stp Machine
1. Warehouse Release from stock (no ops) (FG store= blank)
2. Transfer Out (op 28)
3. Warehouse Stock (op 20 & 30)
Stores and Locations
Main Store
Store 10
( 2) Description MAIN FINISHED GOODS STORE
If one ESP database and more than one MAP database where plants are using same warehouse or cross warehousing between plants, then put plant names in description. ESP drop down will see description like:
Cor Main FG Store (10) and Paso Main FG Store (20)
CorAlliWHSE (151) and PasoAlliWHSE (151)
CorPasoWHSE (20) and PasoCor WHSE (10)
( 3) Plant Code 1
( 4) Allowed Types FG WP
(15) One Location N
(16) Def Recv Locatn STRAP
(17) Off-line 0
(19) Show only at fixed store N
Location types
ENTRY
( 1) Description Default Receiving
( 2) Default Type FG WP
( 3) Quarantine location N
( 5) 0-Enter,1-Store,2-Exit Unit Loads,3-Pre-Load 1
( 6) Fast Track Loading Bay N
( 7) Units from WIP label to be Available/Stock N
ST001
( 1) Description Storage
( 2) Default Type FG WP
( 3) Quarantine location N
( 5) 0-Enter,1-Store,2-Exit Unit Loads,3-Pre-Load 1
( 6) Fast Track Loading Bay N
( 7) Units from WIP label to be Available/Stock N
QUAR
( 1) Description Quarantine
( 2) Default Type FG WP
( 3) Quarantine location Y
( 5) 0-Enter,1-Store,2-Exit Unit Loads,3-Pre-Load 1
( 6) Fast Track Loading Bay N
( 7) Units from WIP label to be Available/Stock N
REWORK
( 1) Description Rework
( 2) Default Type FG WP
( 3) Quarantine location N
( 5) 0-Enter,1-Store,2-Exit Unit Loads,3-Pre-Load 1
( 6) Fast Track Loading Bay N
( 7) Units from WIP label to be Available/Stock N
DD01
( 1) Description Loading Dock Door
( 2) Default Type FG WP
( 3) Quarantine location N
( 5) 0-Enter,1-Store,2-Exit Unit Loads,3-Pre-Load 2
( 6) Fast Track Loading Bay N
( 7) Units from WIP label to be Available/Stock N
M####
( 1) Description Individual Machines
( 2) Default Type FG WP
( 3) Quarantine location N
( 5) 0-Enter,1-Store,2-Exit Unit Loads,3-Pre-Load 0
( 6) Fast Track Loading Bay N
( 7) Units from WIP label to be Available/Stock N
STRAP
( 1) Description Default Warehouse Receiving
( 2) Default Type FG WP
( 3) Quarantine location N
( 5) 0-Enter,1-Store,2-Exit Unit Loads,3-Pre-Load 0
( 6) Fast Track Loading Bay N
( 7) Units from WIP label to be Available/Stock N
Finished Good Warehouses
Store 11
( 2) Description Warehouse 11
( 3) Plant Code 1
( 4) Allowed Types FG WP
(15) One Location N
(16) Def Recv Locatn INTRAN
(17) Off-line 0
(19) Show only at fixed store N
Location types
INTRAN
( 1) Description Default Receiving
( 2) Default Type FG WP
( 3) Quarantine location N
( 5) 0-Enter,1-Store,2-Exit Unit Loads,3-Pre-Load 0
( 6) Fast Track Loading Bay N
( 7) Units from WIP label to be Available/Stock N
ST001
( 1) Description Storage
( 2) Default Type FG WP
( 3) Quarantine location N
( 5) 0-Enter,1-Store,2-Exit Unit Loads,3-Pre-Load 1
( 6) Fast Track Loading Bay N
( 7) Units from WIP label to be Available/Stock N
QUAR
( 1) Description Quarantine
( 2) Default Type FG WP
( 3) Quarantine location Y
( 5) 0-Enter,1-Store,2-Exit Unit Loads,3-Pre-Load 1
( 6) Fast Track Loading Bay N
( 7) Units from WIP label to be Available/Stock N
DD01 - With Scanning
( 1) Description Loading Dock Door
( 2) Default Type FG WP
( 3) Quarantine location N
( 5) 0-Enter,1-Store,2-Exit Unit Loads,3-Pre-Load 2
( 6) Fast Track Loading Bay N
( 7) Units from WIP label to be Available/Stock N
DD01 - Without scanning
( 1) Description Loading Dock Door
( 2) Default Type FG WP
( 3) Quarantine location N
( 5) 0-Enter,1-Store,2-Exit Unit Loads,3-Pre-Load 2
( 6) Fast Track Loading Bay Y
( 7) Units from WIP label to be Available/Stock N
Outside Farmout Warehouses
Store 101
( 2) Description Warehouse 101
( 3) Plant Code 1
( 4) Allowed Types FG WP
(15) One Location N
(16) Def Recv Locatn INTRAN
(17) Off-line 0
(19) Show only at fixed store N
Location types
INTRAN
( 1) Description Default Receiving
( 2) Default Type FG WP
( 3) Quarantine location N
( 5) 0-Enter,1-Store,2-Exit Unit Loads,3-Pre-Load 0
( 6) Fast Track Loading Bay N
( 7) Units from WIP label to be Available/Stock N
ST001
( 1) Description Storage
( 2) Default Type FG WP
( 3) Quarantine location N
( 5) 0-Enter,1-Store,2-Exit Unit Loads,3-Pre-Load 1
( 6) Fast Track Loading Bay N
( 7) Units from WIP label to be Available/Stock N
Consignments
Location types
Not Required
KDG Label Formats
Create label formats for Kiwi programs CORR (C=Type), PCS (W=Type) & ULT (F=type)
Specific customer FG formats passed from Host Systems should also be created.
Finished Goods Unit
Type Fields
01 STD LOGO (CONV/PCS/FFF) W - Work in Progress 2502 & 1047 = Y
11 STD LOGO (CORR) C - Corrugator 2502 & 1047 = Y
21 STD LOGO (FGS/ULT) F - Finished Goods 2502 & 1047 =N
Work in Process Unit
Type Fields
0A WIP TO WIP (CONV/PCS/FFF) W - Work in Progress 2503 & 1047 = Y
1A WIP TO WIP (CORR) C – Corrugator 2503 & 1047 = Y
2A WIP TO WIP (FGS/ULT) F - Finished Goods 2503 & 1047 = N
KDG Parameters
SYS - KG Kiwiplan Document Generator
1 KEY PARAMS
2 KDGServer fill in the server name
3 Port 50,123
4 User Name Login
5 User Password
6 Legacy KDG Folder legacy
SYS - KP KDG PrinterQueue
1 Printer number 23
2 KDG PrinterQueue PR######
3 KDG PrinterTray
Dispatch Planning Report
PCS TD
Regular delivery loads
Several can be setup in the PCS/TD parameters.
Example of Dispatch Shipping Report:
pcsmenu:AME Despatch Planning Report Menu Despatch Mch No or ALL
(A) ALL DISPATCH PLANNING REPORT ALL
(B) MAIN FG STORE DPR 8580 7995 8000 8001
(C) WAREHOUSE A DPR 8581
(D) WAREHOUSE B DPR 8582
Fast-track loads
1. Fast Tracking can be setup on each parameter PCS/TD or ULT option BDA when warehouse is not using RF/Scanning.
2. Set to level 4 or more, will allow manipulation of unit qty, selection of units, pallet types on the units, and total weight.
3. Shipping user can see the type 0 Make/Deliver or type 1 Calloff orders for the next few days in the PCS system, they can plan trucks.
4. A pick list (printed DPR or load list) of orders, quantity and items can be printed for fork lift driver to load trucks.
5. Selection can be unit by unit traceable, FIFO, or minimum partial pallet selection.
6. A truck ID can be added for the docket
7. Qty can be changed on a unit to match what was loaded, or units split up.
8. Returns for Calloff jobs can open series on Calloff or not. Add option has the unit finding most recent top up to assign unit against.
9. When using Qty selection you would have no idea what inventory is truly left in house for a Quality concern. Tally sheet selection provides unit traceability.
Fasttrack can be used from ULT BDA option.
ult00 menusep=. opt=b.d.a fasttrack=6 chgpal=1 fixstore=##
Here are some of the command line arguments associated with fasttrack:
chgpal=
chgqty=
fasttrack=
Levels of fasttrack:
1= Planning status
2= Issue status
3= Loading status and Completed question
4= Completed status
5= Despatch status – appears you can use Accept command here before load is Billing.
6= Shipped status
Possible ‘fasttrack’ script placed on a ULT menu
clear
echo "Fasttrack ULT B.D.A for store number"
echo
echo "Enter store number \c"
read st
echo
ult00 menusep=. opt=b.d.a fasttrack=6 chgpal=1 fixstore=$st
if [ "$st" = "201" ];then
ult00 menusep=. opt=b.d.a fasttrack=6 chgpal=1 fixstore=201
fi
if [ "$st" = "251" ];then
ult00 menusep=. opt=b.d.a fasttrack=6 chgpal=1 fixstore=251
fi
Fast Calloff loads
ESP Fast Calloffs would only work for ‘Calloffs’, as it excludes the make/deliver shipments; no unit by unit inventory accuracy. The correct amount would be peeled off and shipped using the fasttrack routine. Customers call at one of your remote stores and order products for immediate collection. In this case, orders are supplied from miscellaneous stock on hand.
1. Units allocated in ULT may not match the actual units supplied to the customer.
2. Returns for Calloff jobs can open series on Calloff or not. Add option has the unit finding most recent top up to assign unit against.
3. Fast Calloff uses the fasttrack routine to select units for each job
The oldest units are automatically picked. Parameter FIFO or least amount of split units.
The last unit is split, if necessary, to make the exact quantity shipped for each job.
Where a unit is split the remaining split unit retains the oldest creation date and time
so that it will be the first unit picked next time
4. Sufficient Qty needs to be in Store prior to processing the Calloff
5. No truck ID on docket
6. Quality concerns regarding production job – no idea what inventory is truly left in house for that production job, or where the rest of production has been shipped.
Electronic data transfers
GEN EE
Locate data transfers in MAP kiwi directory
Sent to ESP
*ULT*DLBOL* * *150123*112906*EST*1*4375*KIWIPLAN - CINCINNATI, OH*450*MASON FOA*0000*j*150123*112842* * * * *DC*14440*2685*3* * *10*L56*405*3*remuser*test*remuser*150123*112847*1632600*
*ULT*DLJOB* * *150123*112906*EST*1*4375*KIWIPLAN - CINCINNATI, OH*MASON FOA*0000*1694*2*360*2*8320*5776*1090*1745*037605-00*80.06*28.12*120611*120521*1*CB 35-26-30-26-33*1.48x1.64x1.48*450*3*0*0*
*ULT*JUNIT* * *150123*112906*EST*1*4375*KIWIPLAN - CINCINNATI, OH*1694*27*180*02*1*6*2*15*2888*545*1694*150123*112839*19372*437519372*0* *0*0* * * *130115*140508*
*ULT*JUNIT* * *150123*112906*EST*1*4375*KIWIPLAN - CINCINNATI, OH*1694*29*180*02*1*6*2*15*2888*545*1694*150123*112839*19374*437519374*0* *0*0* * * *130115*140609*
*ULT*DLJOB* * *150123*112906*EST*1*4375*KIWIPLAN - CINCINNATI, OH*MASON FOA*0000*1692*2*360*2*8320*5776*1050*1745*037603-00*80.06*28.12*120607*120521*2*CB 35-26-30-26-33*1.48x1.64x1.48*450*3*0*0*
*ULT*JUNIT* * *150123*112906*EST*1*4375*KIWIPLAN - CINCINNATI, OH*1692*22*180*02*1*6*2*15*2888*505*1692*150123*112839*12226*437512226*0* *0*0* * * *120607*153334*
*ULT*JUNIT* * *150123*112906*EST*1*4375*KIWIPLAN - CINCINNATI, OH*1694*31*180*02*1*6*2*15*2888*545*1692*150123*112839*19376*437519376*0* *0*0* * * *130115*140719*
*ULT*DLJOB* * *150123*112906*EST*1*4375*KIWIPLAN - CINCINNATI, OH*MASON FOA*0000*1693*1*180*1*8320*2888*545*1745*037604-00*80.06*28.12*120608*120521*1*CB 35-26-30-26-33*1.48x1.64x1.48*450*3*0*0*
*ULT*JUNIT* * *150123*112906*EST*1*4375*KIWIPLAN - CINCINNATI, OH*1694*45*180*02*1*6*2*15*2888*545*1693*150123*112839*19390*437519390*0* *0*0* * * *150123*103706*
ESP Dockets
ESP Delivery Dockets
Design KDG template for all customer specific and out of country documentation.
Upon ULT Despatch, user must approve or change the Complete/Partial Flag.
ESP Transfer Dockets
Warehouse Transfers – Design KDG template for transfer type documentation.
Upon ULT Despatch, user cannot change Complete/ Partial Flag.
Manual Dockets
User should log who, what, when, where, and manual docket number. Then update KIWI system at a later time to get ESP docket number. Then update log with ESP docket number.
Failed Dockets
1. User should search ESP for docket using ULT load number. If found, right click and email current user. Then open PDF file and print thru Windows.
2. If no docket in ESP, user should check Agent.
Create Invoices
ESP tools drop down – create invoices. Select shipped bill of ladings on left, or move them to the right to be held.
Post Invoices
ESP tools drop down – post invoices. Select invoices on the left, or move them to the right to be held.
Returns
ESP adds Customer Issue.
If check box ‘awaiting goods return’ is checked, then ADRTN records are sent to MAP.
Shipping can plan for return monitoring the PCS Pick up goods machine
Stp Machine
1 9997 Pick up Goods
2 9998 Returned/Quarantine
ULT return of units
Select job to return
ult01:BR Returned Goods 18/Wed 14:46
================================================================================
Page 1/1 Toggle 1 / 2
Idx Job# S Qty_Ex Qty_Rtn Str Reason
1 1042 P 31782 28800 10 Faulty Goods for Return
(M)ore, (P)rev, (B)eg, (T)og, (Q)uery, (F)inish, (L)ist, (V)iewLoc, > 1....
Return St/Loc: 10 FGS...
Start typing (job-unit number(s))
ult01:BR Return Units 18/Wed 14:48
================================================================================
Page 1/1 RtnId 1000002 Cur_St/Loc 10/FGS
Job# 1042 Spec# 1655 QtyRqd 2982
Idx Job_Unit Unit Qty Sta Customer Pal/Load CumQty PO spec
(A)dd, (E)xit, UL# or Idx ? 1042-52................
Verify qty on each unit
Qty 600....
After all unloaded, use R for Return, enter location, this updates Pick Up goods machine feedback with quantity returned.
ult01:BR Return Units 18/Wed 14:50
================================================================================
Page 1/1 RtnId 1000002 Cur_St/Loc 10/FGS
Job# 1042 Spec# 1655 QtyRqd 2982
Idx Job_Unit Unit Qty Sta Customer Pal/Load CumQty PO spec
1 1042-52 52 600 A MJK Manage 1 600 1655
2 1042-53 53 582 A MJK Manage 1 1182 1655
(A)dd, (C)hg, (U)ndo, (R)eturn, (M)ore, (P)rev, > R..
After all completely Returned for this return ID, and no more coming back, use F to finish the return. This should update ESP awaiting goods return check box.
ult01:BR Returned Goods 18/Wed 14:53
================================================================================
Page 1/1 Toggle 1 / 2
Idx Job# S Qty_Ex Qty_Rtn Str Reason
1 1042 P 31782 29982 10 Faulty Goods for Return
(M)ore, (P)rev, (B)eg, (T)og, (Q)uery, (F)inish, (L)ist, (V)iewLoc, > F...
PCS feedback and re-processing units
Order Status shows customer pickup step is done and 9998 Returned/Quarantine machine outstanding.
Now you need to use PCS lineup option H to feedback the quarantine/return goods machine:
Enter Idx of Job for Processing 1..
1 1042 /6 MJK 7 1/4" Iceless 5> 03/18 -0 -2 1182 x x *Ready 0 C
Total Sheets to be processed 1182
Transfer to In-Stock 1182
To be Reworked 0
Scrap as Waste 0
========
Remaining in Quarantine 0
Proceed (Y/N) ? Y
Order Status shows 9997 customer pickup step is fedback and 9998 Returned/Quarantine machine has changed to 8007 FGS Overrun machine outstanding.
Stp Machine Date_Time Qty_In No_Up Qty_Good No_Up Wst_Qty Sta U/L
1 9997 Customer Pick 03/18 15:08 63762 1/1 63702 1/1 40 ** 53
2 8007 FGS Overrun 03/18 15:28 31782 1/1 31782 1/1 0 * 53
Dispatch plan for re-shipment
Units still show as Avail to ship against job 1042, but they are on Overrun machine.
If plant is going to re-ship, then move them to 8000 or 8001 CPU machines. Else treat them as excess overrun and change ULT unit status to S for stock.
Month End Reports
ULT BB
Create several reports in ULT BB option by sorting the selection many different ways.
ult21LL is St/Loc/Cust/job sort 3/7
ult21LJ is sort 3 jobs
ult21LS is st/loc/spec/job sort 7
ult21JJ sort 1 jobs
ult21WL units
ult21CC cust/loc sort 8/9
ult21CB Cust / loc Jobs listing sort 9
ult21CA loc/cust sort 8 jobs
ult21D cust/loc 8 and units
ult21 units
ult21L sort 3 units
ult21E sort 8,9 units
ult21CJ sort 2 Cust job
ult21CS sort 6 cust spec job
ult21JS sort 4 Job Store Loc
ult21SJ sort 5 spec Job
ult25 history of units
Kiwiplan - Template Variables
Product Price List
[General]
NumberOfFooterLines=2
NumberOfDetailLines=1
UseShipToAddressAutotext=No
UseProductDesignAutotext=No
sortdetailsby=productprice.activedateAdd the following lines to [RELATIONSHIPS] section:
company=productdesign.company
style=productdesign.style