All Others Stuff
Copyright Notice
SFL Services LLC has prepared this document for use only by their staff, agents, customers and prospective customers. Companies, names and data used as examples in this document are fictitious unless otherwise noted. No part of this document may be reproduced or transmitted in any form or by any means, electronic or mechanical, for any purpose, without the express written permission of SFL Services LLC, who reserve the right to change specifications and other information contained herein without prior notice. The reader should consult SFL Services LLC to determine whether any such changes have been made.
Licensing and Warranty
The terms and conditions governing the licensing of SFL Services LLC software consist solely of those set forth in the written contracts between SFL Services LLC and its customers. Except as expressly provided for in the warranty provisions of those written contracts, no representation or other affirmation of fact contained in this document, including but not limited to statements regarding capacity, suitability for use or performance of products described herein, shall be deemed to be a warranty by SFL Services LLC for any purpose, or give rise to any liability of SFL Services LLC whatsoever.
Liability
In no event shall SFL Services LLC be liable for any incidental, indirect, special or consequential damages whatsoever (including but not limited to lost profits) arising out of or related to this document or the information contained in it, even if SFL Services LLC had been advised, knew or should have known of the possibility of such damages, and even if they had acted negligently.
- Raspberry Pi - SD card to a USB SSD
- Synology - Bag of Tricks
- VMWare - Delete inaccessible datastore
- Proper Active Directory Time Sync Methods
- Synology - Backup from Linux
- Raspberry Pi - Kiosk
- Linux - FTP Using Bash
- XWiki - Install
- Synology - Moving Packages Between Volumes DSM 7.0
- Veeam Upgrade
- WordPress - Setup WordPress
- VMWare - Install Windows 11 on vCenter 8 without TMP 2.0
- File Transfer - Using FTP LFTP commands
- File Transfer - WPUT
- File Transfer - CURL
- Asus - OpenVPN Site to Site or Point to Point
- MarkDown - Guide .md
Raspberry Pi - SD card to a USB SSD
Install
rpi-clone is on github and is downloaded by cloning the repository. It is a standalone script and the install is a simple copy to a bin directory. When run it checks its program dependencies and offers to install needed packages. But currently rpi-clone knows how to install only Debian packages with apt-get.
On a Raspberry Pi:
ddd
	$ git clone https://github.com/billw2/rpi-clone.git
	$ cd rpi-clone
	$ sudo cp rpi-clone rpi-clone-setup /usr/local/sbin
Make sure /usr/local/sbin is in your $PATH and then run rpi-clone or rpi-clone-setup with no args to print usage.
https://github.com/billw2/rpi-clone?tab=readme-ov-file#install
https://www.youtube.com/watch?v=AenM-JrG098
Synology - Bag of Tricks
sudo -i
ip link set eth1 down
My DS118 idles at 24% after disabling all the junk.
//run once as root to disable services *you* don't need
synopkg stop pkgctl-SynoFinder
synopkg uninstall SynoFinder
synopkg stop pkgctl-ActiveInsight
synopkg uninstall ActiveInsight
synopkg stop pkgctl-ScsiTarget
synopkg uninstall ScsiTarget
synopkg stop pkgctl-SecureSignIn
synopkg uninstall SecureSignIn
synopkg stop pkgctl-Python2
synopkg uninstall Python2
//root task disable thumbnails every boot if you're not indexing
cd /var/packages/FileStation/target/etc/conf/
mv thumbd.conf thumbd.conf.bak
Downgrade Synology DSM 7 (to 6)
I thought I would take the time to share how I downgraded my Synonlogy 1019+ from DSM version 7 to version 6.2.x. The reason for this was that after upgrading, I was no longer able to use Syncthing, and I really needed this working ON the NAS itself. After the upgrade to DSM 7, Plex broke initially as well, but I have a tip at the end of how I fixed this (if you are keeping DSM 7).
-
BACKUP YOUR CURRENT CONFIGURATION!!!!!!
-
Get Putty. If you have a Mac, you can use Terminal for the first part, but if you've upgraded to the most recent version of OSX, you won't get Telnet in ZSH. So yeah, just use Putty.
-
In your Control Panel (on the NAS), enable Telnet and SSH.
-
Login to your NAS via SSH (using Putty or Terminal), using your admin account and password.
-
Do the following: sudo vi /etc.defaults/VERSION
[ENTER]
when prompted, enter your password
5.Once in the VI editor, press the "i" (eye) key to be able to insert data. Overwrite all content, and replace it with the following:
majorversion="6" minorversion="2" productversion="6.2.3" buildphase="GM" buildnumber="25426" smallfixnumber="0" builddate="2020/07/01" buildtime="06:24:39"
-
To save, do the following:
[ESC]
:wq!
[ENTER]
sudo reboot [ENTER] (or reboot from the web interface)
-
Once the NAS reboots, use the Synology Assistant to find it. Follow the prompts to reinstall DSM.
-
At the screen that prompts you to choose the version of DSM to install, choose the Manual option, and click the link beside it and download version 6. Download the DSM version you want.
-
Continue the installation process by browsing to, and selecting the DSM version 6 file you just downloaded. As the process continues, you will be met with an error. At this point STOP, the Telnet port will be opened. Do the following:
10. Using Putty, choose the Telnet option, enter the IP address of your NAS, ensure that port 23 is chosen, and connect.
11. Enter "root" as the user, and the password of "101-0101" (without the quotes).
12. Repeat Step 4, except you should not enter "sudo" since you are already root. Repeat Step 5.
13. It took me quite some time to figure out this one issue. When I would go to save the edited file, I kept getting an error, and it did not make sense. Eventually, I figured it out. Repeat step 6, except don't do the combination write and quit (:wq!) command as before. I had to do a write first, then a quit. As below:
Assuming you entered the information from Step 12...
[ESC]
:q [ENTER][ENTER]
:w [ENTER][ENTER]
14. Go back to your browser, and continue the installation of DSM 6.
Good luck.
Bonus Tip if you keep DSM 7:
I removed the original steps to fix Plex if you KEEP DSM 7. According to the user below, simply follow Plex’s instructions by downloading the latest version of Plex and using that. Thank you. I thought I had to choose repair first, then I “fixed” my issue, but apparently it was not necessary.
VMWare - Delete inaccessible datastore
Rename the store
Use the web client to rename each store and a DEL in front of the name
Access the shell of the appliance server and then the database
VMware vCenter Server 8.0.2.00300

Type: vCenter Server with an embedded Platform Services Controller

Connected to service
* List APIs: "help api list"
* List Plugins: "help pi list"
* Launch BASH: "shell"

Command> shell
Shell access is granted to root
root@vcenter80 [ ~ ]#
shell;/opt/vmware/vpostgres/current/bin/psql -d VCDB -U postgresView the stores
This will give you the ID that is needed to clean up
SELECT * FROM vpx_entity; Delete the store
This is the delete for cleaning up the inaccessible datastore
| DELETE FROM vpx_ds_assignment WHERE ds_id=1015; DELETE FROM vpx_datastore WHERE id=1015; DELETE FROM vpx_vm_ds_space WHERE ds_id=1015; DELETE from vpx_entity where id=1015; |
Change the ID and then run the following
DELETE FROM vpx_ds_assignment WHERE ds_id=5015;DELETE FROM vpx_datastore WHERE id=5015;DELETE FROM vpx_vm_ds_space WHERE ds_id=5015;DELETE from vpx_entity where id=5015;Restart the services
quit;service-control --stop --all && service-control --start --allProper Active Directory Time Sync Methods
Network Time Protocol (NTP) is a long-standing standard for computers to synchronize time between systems. NTP can be used to ensure that all synchronized computer clocks maintain the same time within a very small margin, usually measured in milliseconds. While making sure all your devices report the correct time is convenient in and of itself, ensuring proper time settings is paramount to security in ways you might not expect. Here are a few security-related items that rely on accurate time settings to work correctly:
-
Certificate verification
-
Kerberos authentication
-
Log integrity
-
One-time password (OTP) two-factor authentication
Generally, the best practice setup involves creating a trusted time source for internal clients to use as a reference to sync against. This internal time source in turn syncs against a trusted external time source. Following the trail of time syncing, we would expect time to sync from the trusted external source to the trusted local source to all other clients as seen in Figure 1. You may consider having the Active Directory domain controller (DCs) sync to an external time source independently rather than use a single trusted internal source, but this would cause additional overhead and problems such as clock drift that you may not realize until it becomes an issue.
Figure 1 – Proper syncing from an external time source to a trusted internal source
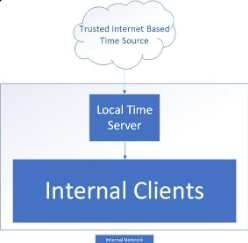
Take an example where the external time source is no longer available. Your clocks will slowly begin to drift until they eventually desynchronize, causing issues such as failed Kerberos authentication. The worst-case scenario for a single trusted time source is that the entire environment “fails together” but clients still have accurate time relative to each other, allowing your critical services to keep moving. All internal clocks would have the same time even if synchronization to the external source were to stop working.
Because time services are a necessity for any network, there are many trusted sources that offer public NTP servers for clients and other networks to sync against. While not nearly an exhaustive list, the following table lists a few example sources.
|
Provider |
URL |
|
|
|
|
CloudFlare |
|
|
Microsoft |
|
|
Apple |
|
|
NIST |
|
|
NTP Project |
Microsoft’s Recommendations
Active Directory (AD) has a built-in NTP server configured on DCs. Modern DCs leverage NTP with backward compatibility support for Simple Network Time Protocol (SNTP) used in some older Windows environments such as Windows 2000. In most situations where Active Directory Domain Services (AD DS) is already installed, a Domain Controller makes a great candidate for internal time servers that can support both NTP and SNTP. There are usually multiple DCs in any given environment, so the role of determining the base time for all other DCs and by extension all other clients is the responsibility of the DC with the Primary Domain Controller Emulator (PDCe) Flexible Single-Master Operation (FSMO) role in the forest root domain. Figure 2 shows an example configuration using DCs as time servers.
Figure 2 – Example time sync configuration for a single AD domain
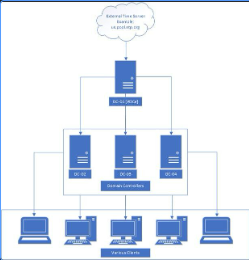
While the PDC emulator will likely be using the standard NTP protocol to sync from an external source, all other DCs, member servers, and client computers joined to the domain will typically be configured to forego use of the NTP protocol for the Microsoft-specific NT5DS time synchronization method. Typically, any client joined to the domain should be configured to use NT5DS to synchronize time through AD automatically. In most situations, no actual client configuration should be required unless an existing configuration that uses NTP needs to be removed.
Multi-Domain Forest NTP Considerations
Time synchronizations for forests that have multiple domains don’t all sync directly with the parent domain PDCe DCs. In a situation where one or more child domains exist, time synchronization can be determined using the following table.
|
Domain |
Device Type |
Syncs Time From |
|
Parent |
PDCe DC |
External time source |
|
Parent |
Non-PDCe DC |
Parent domain PDCe DC |
|
Parent |
Domain-joined client |
Parent domain DC |
|
Child |
PDCe DC |
Any parent domain DC |
|
Child |
DC |
Any child domain DC |
|
Child |
Domain-joined client |
Child domain DC |
Note: this table assumes the CrossSiteSync flag is set to the Microsoft default of 2; other configurations are possible and will be elaborated on in a future blog post
Configuring a Robust Internal Time Syncing Infrastructure
While it’s trivial to configure external NTP synchronization from the PDCe, it becomes another item to manage and configure in the event of transferring FSMO roles. A more robust solution that would allow for external NTP configurations to be transferred along with the PDC emulator role would be ideal. To this end, the following configuration items are recommended:
-
Create a Group Policy Windows Management Instrumentation (WMI) filter to target the PDCe role holder.
-
Create a Group Policy Object (GPO) to allow the PDCe to sync time from a trusted external source, apply the WMI filter you previously created, and link the GPO to the default Domain Controllers organizational unit (OU).
This means that if the PDCe role is transferred from one Windows server to another, Group Policy will enforce external time syncing on the DC with the newly acquired PDCe role. Once the policy for the PDCe is unlinked due to role change, the old PDCe returns to the normal NT5DS synchronization—allowing it to gather time from the new PDCe rather than the originally configured external time source.
Requirements for Configuration
-
The DC(s) that may be serving as PDCe are allowed to access the configured external trusted time server using the NTP protocol [UDP Port 123].
-
The DCs not serving as the PDCe are allowed to access the PDCe using the NT5DS protocol [UDP Port 123].
-
Clients can reach the DCs serving as NTP servers using both the NTP and NT5DS protocol [UDP Port 123].
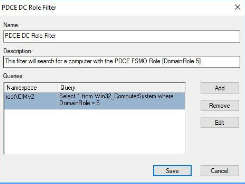
PDCe DC Role Filter Configuration
The first required step is to create the WMI filter that will be used to ensure only the PDCe is allowed to sync from an external time source. This can be configured from the Microsoft Management Console (MMC) Active Directory Group Policy Management snap-in, as Figure 3 shows.
-
Right-click the WMI Filters folder and right-click New
-
Give the new filter a meaningful name, for example PDCe DC Role Filter
-
Give the new filter a meaningful description such as “This filter will search for a computer with the PDCe FSMO Role [DomainRole 5]”
-
Create a new query by clicking Add
-
Leave the Namespace field at the default value of root\CIMv2
-
Enter the following text for the Query value: Select * from Win32_ComputerSystem where DomainRole = 5
Figure 3 – Example role filter to target only the PDCeNote: this query will specifically look for the DomainRole value of 5 which is only used by the DC with the PDCe FSMO role
PDCe NTP Configuration GPO Creation
The next step is to create a GPO that will configure the PDCe to sync time from an external source. This can be configured from the MMC Active Directory Group Policy Management snap-in.
-
Right-click the Group Policy Objects folder and click New
-
Give the new GPO a meaningful name such as Configure PDCe Time Server
-
Select Configure PDCE Time Server GPO and set the WMI Filtering filter to PDCE DC Role Filter
-
Edit the Configure PDCE Time Server GPO and navigate to: Computer Configuration > Policies > Administrative Templates > System > Windows Time Service > Time Providers
-
Edit the Configure Windows NTP Client setting and set the following values:
|
Status |
Enabled |
|
NtpServer |
http://us.pool.ntp.org ,0x9 http://1.us.pool.ntp.org ,0x9 |
|
Type |
NTP |
|
CrossSiteSyncFlags |
2 |
|
ResolvePeerBackoffMinutes |
15 |
|
ResolvePeerBackoffMaxTimes |
7 |
|
SpecialPollInterval |
3600 |
|
EventLogFlags |
3 |
Note: You may choose different external time servers based on your location and needs; these values are only given as an example but will work.
-
Edit the Enable Windows NTP Client setting and set the following value:
Status: Enabled
-
Edit the Enable Windows NTP Server setting and set the following value:
Status: Enabled
-
Exit the Configure PDCE Time Server Group Policy window
-
Right-click the Domain Controllers OU and select Link an Existing GPO
-
Select Configure PDCE Time Server and click OK
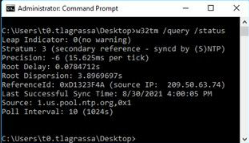
Testing NTP Configuration on the PDCe
-
Log on to the PDCe DC and open an administrative CMD prompt
-
Perform a Group Policy update by entering the following command: gpupdate /force
-
Confirm that Group Policy has been updated successfully
-
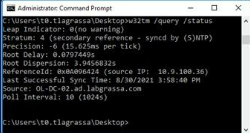
Check the NTP client configuration by entering the following command: w32tm /query /status
The output should confirm that the source is one of the external time servers configured in the GPO, as seen in Figure 4.
Figure 4 – The PDCe is correctly syncing from an external source
Testing NTP Configuration on a Non-PDCe DC or Client
-
Log on to a non-PDCe DC and open an administrative CMD prompt
-
Perform a Group Policy update by entering the following command: gpupdate /force
-
Confirm that Group Policy has been updated successfully
-
Check the NTP client configuration by entering the following command: w32tm /query /status
The output should confirm that the source is the PDCe or DC, as seen in Figure 5.
Figure 5 – The DC is correctly syncing time from the PDCe
Final Considerations
Time synchronization is an important yet sometimes overlooked part of security. Luckily, the tools offered through AD allow for a relatively simple time synchronization configuration that proves to be robust and survivable even through FSMO role changes. It may also be worth investigating other NTP configurations, such as configuring DHCP Option #42 to automatically configure NTP sources on your network for non-domain-joined devices.
Synology - Backup from Linux
Introduction
This is to setup a hourly MySQL backups and also a full system backup once a week.
Synology Configuration
NFS Configuration
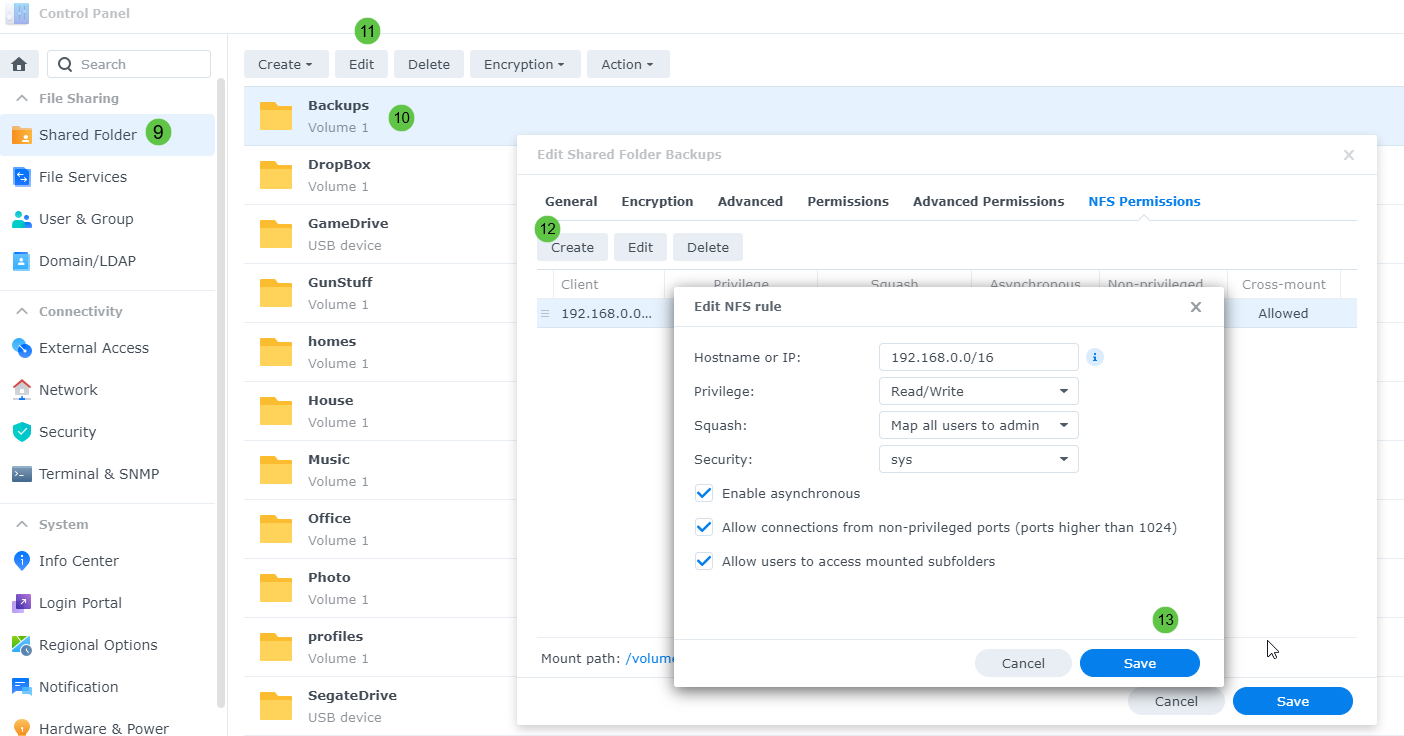
You will need to go to the Control Panel → File Services under the NFS section and turn it on
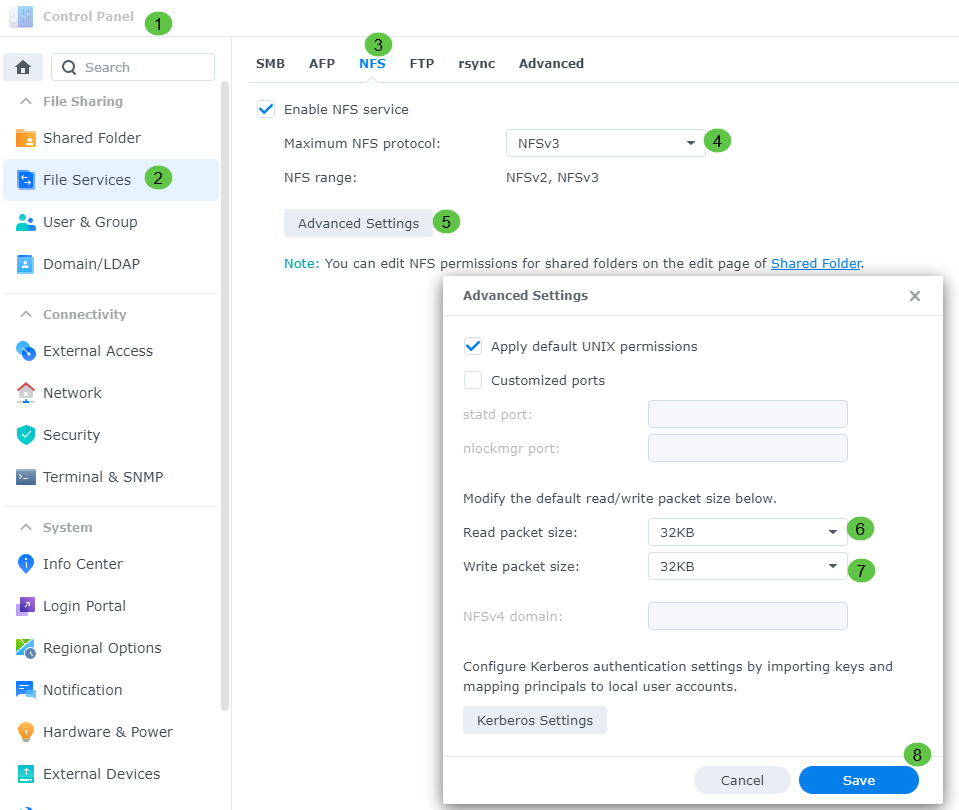
Then hit APPY
Linux Configuration
Now login to the Linux server to setup FSTAB to allow the NFS link to work
Edit the “/etc/fstab“
#Custom
bigberta.onling.com:/volume1/Backups /mnt/backups nfs auto,defaults 0 0
Create the directory for the mount
mkdir -p /mnt/backupsAfter the mount the new NFS drive
mount -a -v
systemctl daemon-reload
To force kill the new mount
umount -l /mnt/backups
Raspberry Pi - Kiosk
Configure kiosk mode
clear chrome cache
rm -rf ~/.cache/chromium ~/.config/chromiumNew one https://reelyactive.github.io/diy/pi-kiosk/
https://github.com/debloper/piosk
Change hostname if not already done
sudo hostnamectl set-hostname ???
sudo reboot
Install the following
sudo apt install xdotool unclutterCreate a kiosk file
sudo nano /home/pi/kiosk.shPaste the following in
#!/bin/bash

xset s noblank
xset s off
xset -dpms

unclutter -idle 0.5 -root &

sed -i 's/"exited_cleanly":false/"exited_cleanly":true/' /home/pi/.config/chromium/Default/Preferences
sed -i 's/"exit_type":"Crashed"/"exit_type":"Normal"/' /home/pi/.config/chromium/Default/Preferences

#/usr/bin/chromium-browser --noerrdialogs --disable-infobars --kiosk https://www.raspberrypi.com/ https://time.is/London &
#/usr/bin/chromium-browser --no-sandbox --window-size=1024,768 --kiosk --window-position=0,0 https://hdrcameras.onling.com:5001/webman/3rdparty/SurveillanceStation/?launchApp=SYNO.SS.App.VideoViewerVue.Instance&SynoToken=W9ZwQIG7NiF1Q &
#/usr/bin/chromium-browser --window-size=1080,720 --kiosk --window-position=0,0 https://www.hammerdownrange.com/lobby/index.php &
/usr/bin/chromium-browser --window-size=1080,720 --kiosk --window-position=0,0 https://www.hammerdownrange.com/lineup/lineup.php &

while true; do
   xdotool keydown ctrl+Tab; xdotool keyup ctrl+Tab;
   sleep 10
done
Make it executable
sudo chmod 777 kiosk.sh Make a service file to auto startup
sudo nano /lib/systemd/system/kiosk.servicePaste the following in
[Unit]
Description=Chromium Kiosk
Wants=graphical.target
After=graphical.target

[Service]
Environment=DISPLAY=:0.0
Environment=XAUTHORITY=/home/pi/.Xauthority
Type=simple
ExecStart=/bin/bash /home/pi/kiosk.sh
Restart=on-abort
User=pi
Group=pi

[Install]
WantedBy=graphical.target
Make it so it auto starts and start it
sudo systemctl enable kiosk.service
sudo systemctl start kiosk.service
Linux - FTP Using Bash
Example of simple bash script ftp client
This script first defines variables such as hostname of the ftp server, username and password and then it creates an ftp session and uploads the specified file into your selected directory:
#!/bin/bash

ftp_site=127.0.0.1
username=ftpuser
passwd=pass

PS3='Select a destination directory: '

# bash select
select path in "." "/test" "public_html/myblog/" "backup/images/"
do
ftp -n $ftp_site<<EOF
quote USER $username
quote PASS $passwd
binary
cd $path
put $1
quit
EOF
break
done
Be sure to edit the ftp_site, username, and passwd variables above. You should also change the paths to whichever directories you most commonly upload your files to.
Executing the script:
$ chmod +x ftp_bash_script.sh
$ ./ftp_bash_script.sh file1
Example script output:
$ ./ftp_bash_script.sh somerandomfile
1) .
2) /test
3) public_html/myblog/
4) backup/images/
Select a destination directory: 2
Connected to 127.0.0.1.
220 (vsFTPd 3.0.5)
331 Please specify the password.
230 Login successful.
200 Switching to Binary mode.
250 Directory successfully changed.
local: somerandomfile remote: somerandomfile
229 Entering Extended Passive Mode (|||10078|)
150 Ok to send data.
     0        0.00 KiB/s
226 Transfer complete.
221 Goodbye.
XWiki - Install
This is to create a installation of XWiki on a installation of Rocky Linux already installed
Configuration
Linux configuration
Disable selinux
Run the following or you can modify the file here, “/etc/sysconfig/selinux”. If you modify the file make sure you still run the “setenforce 0” or just simply reboot after modification.
setenforce 0
sed -i 's/^SELINUX=.*/SELINUX=disabled/g' /etc/selinux/config
Disable firewall
systemctl disable firewalld.serviceEpel Release
dnf install epel-release -yAfter Epel install
dnf upgrade -yServer Software Configuration
Install MySQL on the server
Install Java
dnf install java-11-openjdk -y
dnf install java-11-openjdk-devel -y
Verify the Viserion after install
java -versionResults
openjdk version "11.0.24" 2024-07-16 LTS
OpenJDK Runtime Environment (Red_Hat-11.0.24.0.8-2) (build 11.0.24+8-LTS)
OpenJDK 64-Bit Server VM (Red_Hat-11.0.24.0.8-2) (build 11.0.24+8-LTS, mixed mode, sharing)
Install MariaDB
Install the server
sudo dnf install mariadb-server -yModify the my.cnf server file
sudo vi /etc/my.cnf.d/mariadb-server.cnfMake modifications the file and append under the current settings in the [mysql] section
#Custom Entries
performance_schema = ON
tmpdir = /run/mariadb
thread_cache_size = 4
table_open_cache = 16384
table_definition_cache = 8384
sql_mode = ERROR_FOR_DIVISION_BY_ZERO,NO_AUTO_CREATE_USER,NO_ENGINE_SUBSTITUTION

query_cache_type = 0
query_cache_size = 0
query_cache_limit = 128M
query_cache_strip_comments = 1

tmp_table_size = 512M
max_heap_table_size = 512M

max_connections = 512
max_allowed_packet = 24M
sort_buffer_size = 24M
join_buffer_size = 48M

innodb_buffer_pool_size = 4G
innodb_buffer_pool_instances = 4
innodb_use_native_aio = 1
innodb_flush_log_at_trx_commit = 0
innodb_file_per_table
innodb_log_file_size = 512M

#Optional config if using transaction log.
log_bin = /var/log/mariadb/mariadb.log
expire_logs_days = 2
Reload for changes
sudo systemctl daemon-reloadStart and enable on boot
systemctl enable --now mariadb.serviceAdd the XWiki user to access the database
mysql
create database xwiki default character set utf8mb4 collate utf8mb4_bin;
grant all privileges on xwiki.* to 'xwiki'@'localhost' identified by 'xwiki_password';
grant all privileges on xwiki.* to 'xwiki'@'%' identified by 'xwiki_password';
FLUSH PRIVILEGES;
exit;
Tomcat Configuration
Verify which version you want to install, we will be using “v9.0.63”
http://dlcdn.apache.org/tomcat/tomcat-9Create folder for Tomcat
sudo mkdir /opt/tomcat
sudo cd /opt/tomcat
Replace the version within the following link
wget https://dlcdn.apache.org/tomcat/tomcat-9/v9.0.93/bin/apache-tomcat-9.0.93.tar.gzExtract the file you downloaded in you current folder
sudo tar xvf apache-tomcat-*.tar.gz -C /opt/tomcat --strip-components=1Create the tomcat user
sudo groupadd tomcat
sudo useradd -s /bin/false -g tomcat -d /opt/tomcat tomcat
Change the permissions on the tomcat folder
sudo chown -R tomcat: /opt/tomcatConfiguring Systemd Service
sudo vi /etc/systemd/system/tomcat.serviceAdd the following content to the file
[Unit]
Description=Tomcat 9 servlet container
After=network.target

[Service]
Type=forking

User=tomcat
Group=tomcat

Environment="JAVA_HOME=/usr/lib/jvm/jre"
Environment="CATALINA_PID=/opt/tomcat/temp/tomcat.pid"
Environment="CATALINA_HOME=/opt/tomcat"
Environment="CATALINA_BASE=/opt/tomcat"
Environment="CATALINA_OPTS=-Xms512M -Xmx1024M -server -XX:+UseParallelGC"
Environment="JAVA_OPTS=-Djava.awt.headless=true -Djava.security.egd=file:/dev/./urandom"

ExecStart=/opt/tomcat/bin/startup.sh
ExecStop=/opt/tomcat/bin/shutdown.sh

[Install]
WantedBy=multi-user.target
Enable and start the Tomcat service:
sudo systemctl daemon-reload
sudo systemctl enable tomcat
sudo systemctl start tomcat
Adjusting the Firewall and you did not run the firewall disabling command above, allow traffic to Tomcat's default port 8080
sudo firewall-cmd --permanent --zone=public --add-port=8080/tcp
sudo firewall-cmd --reload
Securing Tomcat
Edit the web.xml file to disable directory listing and add security constraints to the manager and host-manager applications. It's also advisable to change the default shutdown port and command in server.xml.
Add access from another host if needed
vi /opt/tomcat/webapps/manager/META-INF/context.xml Add the IP or IPs you are accessing from to allow access to the main tomcat page. you will need to change this entry from this “allow="127\.\d+\.\d+\.\d+|::1|0:0:0:0:0:0:0:1” />" to something like this
allow="127\.\d+\.\d+\.\d+|::1|0:0:0:0:0:0:0:1|192.168.253.100|192.168.252.2" />Configure XWiki
Download the war file
cd /opt/tomcat/webapps
wget -O wiki.war https://nexus.xwiki.org/nexus/content/groups/public/org/xwiki/platform/xwiki-platform-distribution-war/15.10.11/xwiki-platform-distribution-war-15.10.11.war
systemctl restart tomcat
Reverse Proxy
Change for reverse proxy settings
sudo vi /opt/tomcat/webapps/wiki/WEB-INF/xwiki.cfgChange the following in the file
To point to a specific domain
xwiki.home=http://wiki.sflservicesllc.comChange to use https
xwiki.url.protocol=httpsMySQL Setup
After the Tomcat service is restarted move to the XWiki’s WEB-INF/lib directory and download the MySQL JDBC Driver JAR:
su - tomcat
cd /opt/tomcat/webapps/wiki/WEB-INF/lib/
wget https://repo1.maven.org/maven2/mysql/mysql-connector-java/5.1.49/mysql-connector-java-5.1.49.jar
chown tomcat:tomcat mysql-connector-java-5.1.49.jar
MariaDB Setup
After the Tomcat service is restarted move to the XWiki’s WEB-INF/lib directory and download the MariaDB JDBC Driver JAR:
su - tomcat
cd /opt/tomcat/webapps/wiki/WEB-INF/lib/
wget https://dlm.mariadb.com/3852266/Connectors/java/connector-java-3.4.1/mariadb-java-client-3.4.1.jar
chown tomcat:tomcat mariadb-java-client-3.4.1.jar
Open the WEB-INF/hibernate.cfg.xml file and configure XWiki to use MySQL:
vi /opt/tomcat/webapps/wiki/WEB-INF/hibernate.cfg.xmlComment out the default hsqldb database section and uncomment and edit the MySQL database section as shown below:
<!-- Configuration for the default database.
Comment out this section and uncomment other sections below if you want to use another database.
Note that the database tables will be created automatically if they don't already exist.

If you want the main wiki database to be different than "xwiki" (or the default schema for schema based engines)
you will also have to set the property xwiki.db in xwiki.cfg file
-->
<!--
<property name="connection.url">jdbc:hsqldb:file:${environment.permanentDirectory}/database/xwiki_db;shutdown=true</property>
<property name="connection.username">sa</property>
<property name="connection.password"></property>
<property name="connection.driver_class">org.hsqldb.jdbcDriver</property>
<property name="dialect">org.hibernate.dialect.HSQLDialect</property>

<property name="hibernate.connection.charSet">UTF-8</property>
<property name="hibernate.connection.useUnicode">true</property>
<property name="hibernate.connection.characterEncoding">utf8</property>

<mapping resource="xwiki.hbm.xml"/>
<mapping resource="feeds.hbm.xml"/>
<mapping resource="activitystream.hbm.xml"/>
<mapping resource="instance.hbm.xml"/>
<mapping resource="notification-filter-preferences.hbm.xml"/>
<mapping resource="mailsender.hbm.xml"/>
-->
Uncomment wither the MySQL Section or the MariaDB section and change the password
    <property name="hibernate.connection.username">xwiki</property>
    <property name="hibernate.connection.password">xwiki_password</property>
Restart the Tomcat service
sudo systemctl restart tomcatAccessing Tomcat
Open your web browser and navigate to the following below. You should see the default Tomcat landing page.
http://[your_server_ip]:8080/wikihttps://linuxhostsupport.com/blog/how-to-install-xwiki-on-centos-7/
https://reintech.io/blog/installing-configuring-tomcat-rocky-linux-9
Synology - Moving Packages Between Volumes DSM 7.0
-
Stop the application(s) via the Synology package center.
-
Make sure that Telnet/SSH is enabled
-
Login to Synology using SSH and elevate to root.
-
Make sure that the volume you are moving the application(s) to have the following folders:
-
@appstore
-
@apphome
-
@appconf
-
@apptemp
-
If they do not you will have to create them in super user mode “sudo -i” for all of the following commands
-
sudo -i
cd /volume2
mkdir /volume2/@appstore
mkdir /volume2/@apphome
mkdir /volume2/@appconf
mkdir /volume2/@apptemp
-
-
-
Find the application that you need to move on the correct value
-
Use “ls” against /VolumeX/@appstore to find your package folder name
-
cd /volume1/@appstore ls -lart drwxr-xr-x 15 AudioStation AudioStation 4096 Oct 6 22:37 AudioStation drwxr-xr-x 16 MediaServer MediaServer 4096 Oct 6 22:40 MediaServer drwxr-xr-x 9 iTunesServer iTunesServer 4096 Oct 6 22:41 iTunesServer drwxr-xr-x 23 SurveillanceStation SurveillanceStation 4096 Jan 24 17:13 SurveillanceStation -
Use “mv” to move the data between the old and new volume, you may need to create the @appstore folder first.
-
mv SurveillanceStation /volume2/@appstore/
-
-
Now you will need to adjust Synology and relocate the parameters for the application(s) and where it is now moved to. this is done where the packages configurations live in “/var/packages”.
-
cd /var/packages/SurveillanceStation ls -lrt lrwxrwxrwx 1 root root 33 Oct 6 22:33 var -> /volume1/@appdata/UniversalViewer lrwxrwxrwx 1 root root 33 Oct 6 22:33 tmp -> /volume1/@apptemp/UniversalViewer lrwxrwxrwx 1 root root 34 Oct 6 22:33 target -> /volume1/@appstore/UniversalViewer lrwxrwxrwx 1 root root 33 Oct 6 22:33 home -> /volume1/@apphome/UniversalViewer lrwxrwxrwx 1 root root 33 Oct 6 22:33 etc -> /volume1/@appconf/UniversalViewer -
Now we have to remove the symbolic links and recreate them to point to volume2 using the “rm” to remove and the “ln -s” to recreate them.
-
rm var tmp target home etc ln -s /volume2/@appdata/UniversalViewer var ln -s /volume2/@apptemp/UniversalViewer tmp ln -s /volume2/@appstore/UniversalViewer target ln -s /volume2/@apphome/UniversalViewer home ln -s /volume2/@appconf/UniversalViewer etc -
-
-
Repair your application(s) package in the Synology Package Centre.
-
It will automatically re-download and restart
-
Veeam Upgrade
https://www.reddit.com/r/Veeam/comments/1b84qg4/migrate_11_to_12_on_new_hardware/
-
Disable all jobs, perform necessary backups and snapshots of existing v11 server
-
Perform upgrade to v12
-
Post upgrade, take configuration backup
-
On new v12 server, perform configuration restore
-
Enable jobs
-
Decom old VBR server/DB.
Or you can install the same v11 version on the new server, perform the config backup and restore first, then do an in place upgrade of the new server to v12.
Make sure you upgrade any VeeamONE and Enterprise Manager first.
Licensing, you can use the same license on both servers as long as its part of the migration process...only running the same license on two different VBR server in production at the same time is an issue.
WordPress - Setup WordPress
Connecting to Your Server
Using PuTTY
Open PuTTY and enter your domain name in the box named Host name (or IP address) and enter the port number used to connect to SSH under Port, and then click Open. You can even save your site settings by entering a name in the Saved Sessions box and by pressing Save. Next time, you can always load the session by selecting your site and clicking Load.
PuTTY will now ask for your username. Enter your username and press Enter. Now you will be asked for your password. Note here that while you are typing your password, you won't see it being typed on the screen. It's hidden for security reasons. Press Enter after you've typed your password, and you will be logged on.
Using Any Other SSH Client or Mac Terminal
Enter the following command in your Terminal client to connect to your site's command-line over SSH:
ssh username@domain.com -p 22
The -p switch tells it to use port number 22. If your host allows SSH over default port 22, you can omit -p and 22 in the above command; otherwise, substitute 22 for your host's SSH port number. After logging in, you will see something like this:
domain.com@username:-$
That's the shell command prompt where you will be typing all your commands from now on.
2. Downloading WordPress
Now that we have logged in to our SSH server, we need to go to the correct directory where we want to set up our blog. Then we download the files and extract them there. Let's say the directory you want your blog to be installed under is blogdemo residing under the public_html directory. In that case, you will use the following command:
cd public_html/blogdemo/
Now that we have reached the correct directory, we will download WordPress using the wget command.
wget http://wordpress.org/latest.tar.gz
$tar xfz latest.tar.gz
The above command downloads the latest WordPress install from their server and extracts the file from it into the blogdemo directory. x, f, and z are parameters which tell the tar command to extract the contents from the specified file using gzip.
Now, after extraction, you will find a wordpress directory under the blogdemo directory containing your install. So to shift the files back to where they should be, use the following commands:
mv wordpress/* ./
This command moves the contents of the wordpress directory into the current directory. Anytime you want to check what's in the current directory, type ls.
If you want, you can use the following commands to delete both the wordpress directory and the archive file you downloaded:
rmdir ./wordpress/
rm -f latest.tar.gz
3. Installing WordPress
In this step, we will create the database and corresponding user and associate them together. Then we will use the famous five-minute install of WordPress to finish it off.
Note: Before moving ahead, you will need to check whether you have got the privileges to create a database or not. An easy way to check is to go to your phpMyAdmin and check whether you can create a database from there or not. If you can't, that means you won't be able to follow this step. You should check with your web host if they allow you to do so or not. Most shared web hosts will let you create a database.
First, you need to log in to the MySQL command-line using the following command:
mysql -u username -p
After entering this, you will be asked for your MySQL password. Type your password and you will be shown a screen like this:

Now that we have logged in to the MySQL Server, we will first create a database and will grant the user access to that database. Use the following commands now:
create database dbname;
grant usage on *.* to username@localhost identified by 'password';
grant all privileges on dbname.* to username@localhost;
Don't forget the semi-colon at the end of each MySQL command. The first command creates the database. The second command allows the user to connect to the database. The final command grants all privileges to the user for that database. You can test whether your database creation was successful by running this command:
use dbname;
It should say "database changed". Now you can exit the MySQL command-line by typing exit.
Now fire up the blog in your browser and run the usual WordPress install, and use the database information we used in the third step to set up your wp-config.php and then set up your blog.
Note: New Database User
In our tutorial, we are using an existing database user to connect to the new database. But if you want a separate user for each database, you need to create a new user to access that database. Here's how you should do it.
Once you are inside the MySQL shell, use the following commands to create a new user and set its password.
create user 'dbusername'@'localhost' identified by 'password';
Now go back to Step 3 and run all other commands with this username.
Editing wp-config.php
In our tutorial, I have told you that after doing everything on the shell, you can directly proceed to the install. But some of you might want to edit wp-config.php to add special settings and code. You can only do that via the shell. While you are in your blog directory at the shell, use the following command to fire up the Vim Editor (a command-line shell file editor)
vi ./wp-config.php
Now you will see something like what's shown below:

Press the i key to enter insert mode, and use the arrow keys to move around the file. Once you have made your edits, press the Esc key to exit insert mode. To exit Vim, type : and then type wq and press Enter. This will save your changes and quit Vim.
Download and Install WordPress With the WP-CLI Tool
In this section, I'll show you an even better way to download and install WordPress: with the WP-CLI tool. First, we have to install the WP-CLI tool on the server.
How to Install the WP-CLI Tool
Run the following commands on your server to download, install, and configure the WP-CLI tool.
curl -O https://raw.githubusercontent.com/wp-cli/builds/gh-pages/phar/wp-cli.phar
chmod +x wp-cli.phar
sudo mv wp-cli.phar /usr/local/bin/wp-cli
Let's check if the WP-CLI tool is installed successfully by using the following command.
wp-cli --info
You should see something like this:
OS: Linux 4.15.0-91-generic #92-Ubuntu SMP Fri Feb 28 11:09:48 UTC 2020 x86_64
Shell: /bin/bash
PHP binary: /usr/bin/php7.2
PHP version: 7.2.24-0ubuntu0.18.04.3
php.ini used: /etc/php/7.2/cli/php.ini
WP-CLI root dir: phar://wp-cli.phar/vendor/wp-cli/wp-cli
WP-CLI vendor dir: phar://wp-cli.phar/vendor
WP_CLI phar path: /etc/init.d
WP-CLI packages dir:
WP-CLI global config:
WP-CLI project config:
WP-CLI version: 2.4.0
Download and Install WordPress
Let's download the latest version of WordPress first.
wp-cli core download
If the download is successful, you'll see something like the following:
Downloading WordPress 5.5.1 (en_US)...
md5 hash verified: 72c6f56b4818ffd0e6e6a4ed8f3e8d4e
Success: WordPress downloaded.
So we've downloaded the WordPress codebase now.
Next, it's time to create the wp-config.php file. We can do it with the help of the following command. Replace the placeholders with the actual values. I assume that you've already created the database which you would like to use with WordPress.
$wp-cli config create --dbname=YOUR_DB_NAME --dbuser=YOUR_DB_USERNAME --dbpass=YOUR_DB_PASSWORD --locale=en_DB
Success: Generated 'wp-config.php' file.
Finally, let's run the following command, which installs WordPress.
$wp-cli core install --url=YOUR_DOMAIN_NAME --title=YOUR_BLOG_TITLE --admin_user=ADMIN_USERNAME --admin_password=ADMIN_PASSWORD --admin_email=ADMIN_EMAIL
Success: WordPress installed successfully.
And with that, WordPress is installed successfully on your server!
In fact, the WP-CLI tool is capable of doing a lot more than just installation. It allows you to manage plugins and themes and do any necessary version updates as well.
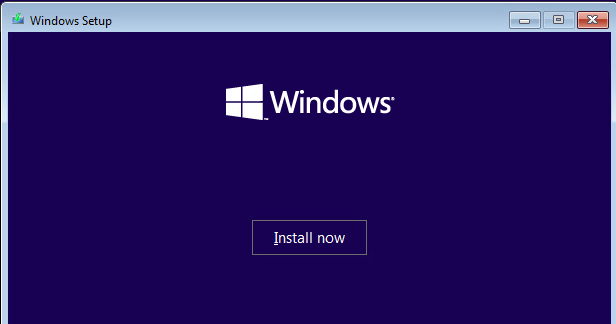
VMWare - Install Windows 11 on vCenter 8 without TMP 2.0
Create a VMWare to host Windows 11 without having a virtual TMP or device installed.
Once you are at this step you have to hit "Shift-F10" to open up the command prompt

Once the command prompt window is opened type "regedit"
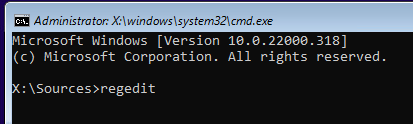
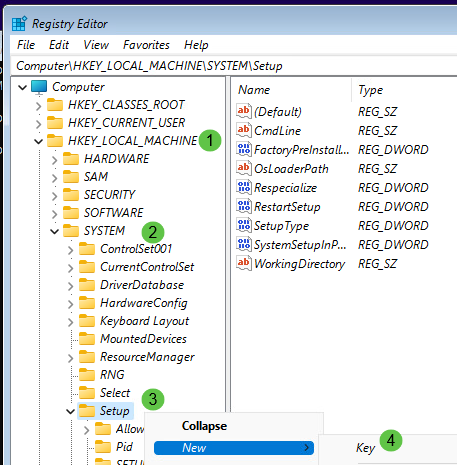
Add the key called "LabConfig" then right-click on the "LabConfig" and add a new "DWORD Value"

Add the new value called "ByPassTPMCheck" with a hexdecimal of "1"
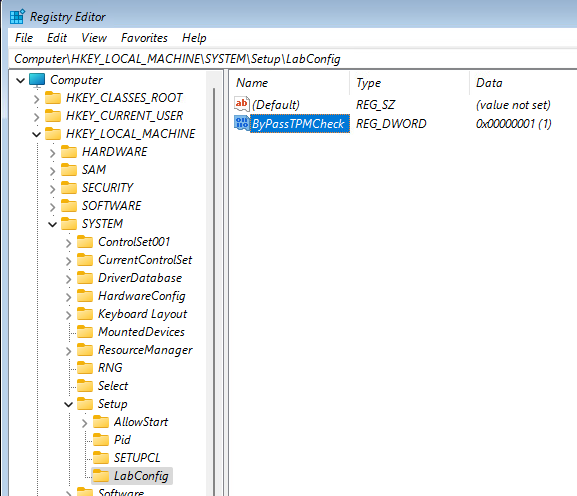
Close every window then click on "Install Now" but do not reboot or the new added key will be lost.
File Transfer - Using FTP LFTP commands
FTP
Commands
to resume a single file upload using the built-in ftp command you will need to know how many bytes of the file you have already sent. This should be accessible by using ls. Then you use the following sequence to restart your upload replacing <#> with the number of bytes already sent and <filename> with the filename you are uploading.
restart <#>
put <filename>
If the server allows it you should receive a message such as the following...
350 Restart position accepted (<#>).
150 Ok to send data.
This will resume your upload.
LFTP
Using the LFTP command this allows you to restart a died ftp session
Commands
The following command is the login to the server and go to the folder you are placing the file in
lftp user:pass@host/path/to/folder| lftp user:pass@host/path/to/folder cd ok, cwd=/path/to/folder lftp user@host:/path/to/folder> reput file.ext ---> TYPE I <--- 200 Type set to I ---> SIZE file.ext <--- 213 11842837120 ---> PASV <--- 227 Entering Passive Mode (10,211,14,15,220,70). ---- Connecting data socket to (10.211.14.15) port 56390 ---- Data connection established ---> ALLO 20769244058 <--- 202 No storage allocation necessary ---> REST 11842837120 <--- 350 Restarting at 11842837120. Send STORE or RETRIEVE to initiate transfer ---> STOR file.ext <--- 150 Opening BINARY mode data connection for file.ext `file.ext' at 6756302848 (32%) 31.50M/s eta:7m [Sending data] |
This command is to restart the failed FTP replace the "file.txt" with your file
reput file.txtAfter a quick search, there's a command line program called lfvi sftp that provides ftp mirroring functionality.
Adapted from a guide here, something like this should do the trick:
#!/bin/bash
HOST='address.co.uk'
USER='myuser'
PASS='mypass'
TARGETFOLDER='/public_html/java/desktop/'
SOURCEFOLDER='deploy/'

lftp -f "
open $HOST
user $USER $PASS
lcd $SOURCEFOLDER
mirror --reverse --delete --verbose $SOURCEFOLDER $TARGETFOLDER
bye
"
I'd suggest you'd do it without the --delete until you're sure you've got the arguments right!
File Transfer - WPUT
WPUT
This is to resume a files transfer using wput instead ftp or lftp commands and can be used in Windows or Linux
WPUT Commands
Here is an example how wput continues upload after connection problems:
wput -v -u -B upload.zip ftp://login:pass@server.com/dir/upload.zip
--20:14:23-- `upload.zip'
    => ftp://login:xxxxx@111.111.111.111:21/dir/upload.zip
Connecting to 111.111.111.111:21... connected!
Logging in as login ... Logged in!
==> CWD dir
==> TYPE I ... done.
==> SIZE upload.zip ... done (4313 bytes)
==> PASV ... done.
==> REST 3584 ... done.
==> STOR upload.zip ... done.
Length: 902,153,406 [902,149,822 to go]
 7% [======>                                                                                         ] 65,658,368       194.0K/s ETA  1:10hError: Error encountered during uploading data (Operation now in progress)
==> ABOR ... Error: recv() timed out. No data received
Receive-Warning: read() timed out. Read '' so far.
failed.
Waiting 10 seconds... Error: recv() timed out. No data received
Receive-Warning: read() timed out. Read '' so far.
Connecting to 111.111.111.111:21... connected!
Logging in as login ... Logged in!
==> CWD dir
==> TYPE I ... done.
==> SIZE upload.zip ... done (65247144 bytes)
==> PASV ... done.
==> REST 65246208 ... done.
==> STOR upload.zip ... done.
Length: 902,153,406 [836,907,198 to go]
 9% [++++++==>
File Transfer - CURL
CURL
This is the resume a file transfer using curl instead ftp or lftp commands and can be used in Windows or Linux
CURL Commands
curl -C - --upload-file source_file ftp://destination.server.com/Asus - OpenVPN Site to Site or Point to Point
ASUS Asuswrt Merlin
Most of the documents online are missing steps or the folks writing the document are assuming that the folks setting this up are network traffic wizards.
GOAL:
With one of the Asus routers being the server and the other being a client, we want to be able from either side hit IPs or hostnames of any of any device.
Both Routers:
VPN Type: TUN as TAP maybe overkill for this case
Protocol: UDP
Static Routes: Both servers
When you export the OpenVPN certificates from the router (as opposed to supplying your own), they have the CN set as ‘client’. This is relevant/confusing for the server config, as our other router is a client named client.
Server:
ASUS RT-AC5300 with 192.168.53.1/24
| Interface Type | TUN TAP |
|---|---|
| Protocol | TCP UDP |
| Server Port | (Default : 1194) |
| Authentication Mode | TLS Static Key |
| Keys and Certificates | |
| Username/Password Authentication | Yes No |
| TLS control channel security (tls-auth / tls-crypt) |
|
| HMAC Authentication | |
| VPN Subnet / Netmask | |
| Advertise DNS to clients | Yes No |
| Data ciphers | |
| Compression | |
| Log verbosity | (Between 0 and 6. Default: 3) |
| Manage Client-Specific Options | Yes No |
| Allow Client <-> Client | Yes No |
| Allow only specified clients | Yes No |
| Allowed Clients | ||||
| Common Name(CN) | Subnet | Mask | Push | Add / Delete |
|---|---|---|---|---|
| client | 192.168.51.0 | 255.255.255.0 | Yes |
| Custom Configuration |
| reneg-sec 432000 push "route 192.168.53.0 255.255.255.0" route 192.168.51.0 255.255.255.0 |
Custom Explained:
reneg-sec 432000 #optional
push "route 192.168.53.0 255.255.255.0" #server LAN IP
route 192.168.51.0 255.255.255.0 #client LAN IP
Export the .ovpn files from the new server config
Client:
ASUS RT-AC5300 with 192.168.51.1/24
Import .ovpn config file exported from server, to set the certificates and some of the basic settings.
| Select client instance | |
|---|---|
| Service state |
 |
| Automatic start at boot time | Yes No |
| Description | |
| Import .ovpn file |
| Network Settings | ||
| Interface Type | TUN TAP | |
|---|---|---|
| Protocol | TCP UDP | |
| Server Address and Port | XXXXXXX.asuscomm.com |
|
| Create NAT on tunnel | Yes No Routes must be configured manually. | |
| Inbound Firewall | Block Allow | |
| Accept DNS Configuration | ||
| Redirect Internet traffic through tunnel | ||
| Authentication Settings | |
| Authentication Mode | TLS Static Key |
|---|---|
| Username/Password Authentication | Yes No |
| Crypto Settings | |
| Keys and Certificates | |
|---|---|
| Data ciphers | |
| TLS control channel security (tls-auth / tls-crypt) |
|
| Auth digest | |
| Advanced Settings | |
| Log verbosity | (Between 0 and 6. Default: 3) |
|---|---|
| Compression | |
| TLS Renegotiation Time | (in seconds, -1 for default) |
| Connection Retry attempts | (0 for infinite) |
| Verify Server Certificate Name | |
| Custom Configuration |
| resolv-retry infinite float keepalive 15 60 remote-cert-tls server |
Applied the "automatic start at boot time"
Turn on the client VPN
Server Connection:
| OpenVPN Server 2 - Running | ||||||||||||||||||||||||||||||||||||||||||||||||||||||||||||||||||||||||||||||||||||||||||
|
||||||||||||||||||||||||||||||||||||||||||||||||||||||||||||||||||||||||||||||||||||||||||
Confusion:
The problem is that from the server I cannot access the the LAN on the client side without adding a route vis the JFFS scripts folder using the "nat-start" script.
#!/bin/sh
#https://github.com/RMerl/asuswrt-merlin.ng/wiki/User-scripts
#
DATE=$(date +"%Y-%m-%d-%H%M%S")
echo "deleting the route to router if it exists" $DATE >> /tmp/nat-start.log
route delete -net 192.168.51.0 netmask 255.255.255.0 gw 10.100.100.2
echo "done deleting the route" $DATE >> /tmp/nat-start.log
echo "adding route to router" $DATE >> /tmp/nat-start.log
route add -net 192.168.51.0 netmask 255.255.255.0 gw 10.100.100.2
echo "done adding route to router" $DATE >> /tmp/nat-start.log
References:
https://medium.com/@kylemattimore/asuswrt-merlin-openvpn-tunnel-site-to-site-69b9011b079a
https://www.senia.org/2018/03/12/router-to-router-vpn-tunnel-using-asus-routers/
https://www.asus.com/us/support/faq/1011706/